about shop patterns projects printables extras sponsorship wild olive twitter flickr pinterest subscribe
Showing posts with label KawaiiCrossingResidents. Show all posts

pattern // mel the mouse embroidery

Mel The Mouse Embroidery Pattern Not a creature was stirring. Not even a mouse. Well, that's not quite true because today's embroidery pattern has Mel the Mouse stirring up a batch of Christmas cookies!

This is the last of the patterns that fit in a border pattern that holds all of the Kawaii crossing residents from this year. All 12 of the designs have an animal friend, plus two mini designs showing their favorite activity. They're designed to use together, but they also work separately, and they'd also look super cute as little ornaments, or stitched onto some English paper piecing.


Now it's time for a confession. I have LOVED making these Kawaii Crossing designs each month. Creating little characters with backstories is pretty much amazing. AND? I'm kinda glad to be wrapping this up. I may revisit Kawaii Crossing again in the future, but seeing 2023 just around the bend and knowing that it can be filled with whatever I want is exciting. Anything can happen and I'm ready to throw in some types projects that I haven't done here on the blog for awhile.

Lots of good things to come, including some fresh-baked cookies from Mel the Mouse!

pattern // mel the mouse cross stitch

Mel the Mouse Cross Stitch Pattern

This December is a perfect time to stitch a mouse who loves to bake cookies, so I happily present this new free cross stitch pattern! Curl up by the fireplace with a freshly-baked cookie and start stitching. (Just be sure to keep those hands clean when touching your cross stitch project!)

Speaking of clean, I know that the idea of a mouse in the kitchen, making food of any kind isn't always appealing. But Mel keeps her kitchen squeaky clean. Probably more than I do. I try to tidy up after myself, but there are always lots of bowls and oh so many spatulas around! At least Mel has me thinking about baking some Christmas cookies instead of just watching holiday baking shows where other people (or mice!) do the baking.

But now let's talk about this cross stitch pattern. When I started this series of patterns at the beginning of the year, I wanted to list the complete set of colors so you could know what was expected. And then Mel came along. I liked the idea of making her more indigo-ish, but I also wanted her to be a light tint of that. So I added an extra color for this that hasn't been used any other time in the patterns.

It's pretty light, so you may just want to use the darker DMC 156. But I do love the 3747 that I suggested here. As with all of my patterns, you can ALWAYS choose to swap in what you like!


And as I mentioned, this is part of a series of patterns that I've released through 2022. There are both embroidery and cross stitch versions of 12 animal friends, all residents of Kawaii Crossing. You can stitch them up in one large piece that fits in a ribbon border, available when you support me on Ko-Fi.


If you're not looking to make a large project, you can stitch the residents on their own and it's sill super cute! Put them in a small hoop or use my super easy cross stitch ornament tutorial to add them to your tree.

Happy stitching!

pattern // bea the badger embroidery

Bea The Badger Embroidery Pattern Who's ready to stitch Bea the Badger? Or maybe you just want to stitch a little book or a tiny cup of coffee? However you want to use this new free design is just fine. As long as you're cozy and comfortable while you get the stitching underway.

That's Bea's way of doing things, so it's only right that you follow suit. In fact, Bea likes it when she can just read and be be herself. She tried joining the Kawaii Crossing book club, but everyone there was talking and she got a little overwhelmed. Plus, by the time the group of friend met up, Bea had already ready 19 other books and it got confusing.

I get it. Sometimes quiet with a book and some good coffee is the best kind of social gathering!


True story: Bea was originally going to be a bear and she was going to be more about coffee than books. The change happened because I already featured a Panda and even though they aren't the same, they have the same shape. I also have some big coffee plans for next year and that's all I'll say. Except that it also relates to this:

Have you found my bonus patterns and other fun stuff on Ko-Fi? Each month this year there's been a mini plush pattern, plus a few other things from time to time, along with a border pattern that holds all of the Kawaii crossing residents from this year. All of those things unlock when you send me a Ko-Fi donation, and more good things are coming to those who subscribe!

pattern // bea the badger cross stitch

Bea the Badger Cross Stitch

If you have ever wanted to cross stitch a badger who loved to read books and drink coffee, I have the perfect free pattern for you! Bea the Badger is a bit of a book worm (which is awkward because badgers also like to eat worms) and that means she always has that snout of hers burried between the pages of a new story.

I'm not sure if she's ever tried cross stitch, but I'd like to think that if we were ever to pull her away from her reading, she would be excited to stitch a mini book design. Right? That's also your hint that you could very easily stitch only the book or the cup of coffee if you prefer. These are grouped charts, but they're also a collection of mini patterns.

Okay, time for a pattern!

DOWNLOAD THE BEA THE BADGER CROSS STITCH PDF

There's also a ribbon border chart that's designed to hold all 12 of the Kawaii Crossing residents I'm sharing this year. You can find it on Ko-Fi!


If you like embroidery instead of cross stitch (I do both!), the embroidery version will be coming soon!

pattern // pia the pig embroidery

Pia The Pig Embroidery Pattern

Make it work! That's Pia the pig's favorite phrase when it comes to making a new design. And you can make it work with this new Kawaii Crossing embroidery pattern!

If you've ever watched any Project Runway, you know that the designers usually have about 30 minutes to sketch and then they get a short shopping trip to Mood, followed by about a day to make an outfit. The fun thing about this pattern is that you can take less than 30 minutes to gather your supplies and then you'll be able to embroider the whole design is less than a day!

But I'd also like to point something out about this and all the patterns in this series. Yes, they are a little grouping of an animal friend with some favorite items. But you don't have to stitch them this way. If you only want to stitch a sweet piggy face, you can just use that part. If you want to make a dress form for someone, you can embroider only that part. These are patterns with flexibility!

Whether you want to stitch the whole thing or just one part, enjoy stitching Pia the fashion designer pig!


Did you know that all of my Kawaii Crossing residents are designed to work together? Not only are they all about the same size, but they also all fit into a special frame. That ribbon and sparkle border is available when you send me a Ko-Fi donation. (That also unlocks a bunch of bonus content for 30 days, or you can sign up for a monthly donation so you don't miss a thing!)

Speaking of that large border, I STILL haven't made progress on mine. Wouldn't it be amazing if I caught up by the end of the year? Think Pia will help me? She's gotta have some embroidery skills as a fashion designer, right?

pattern // sam the sloth embroidery

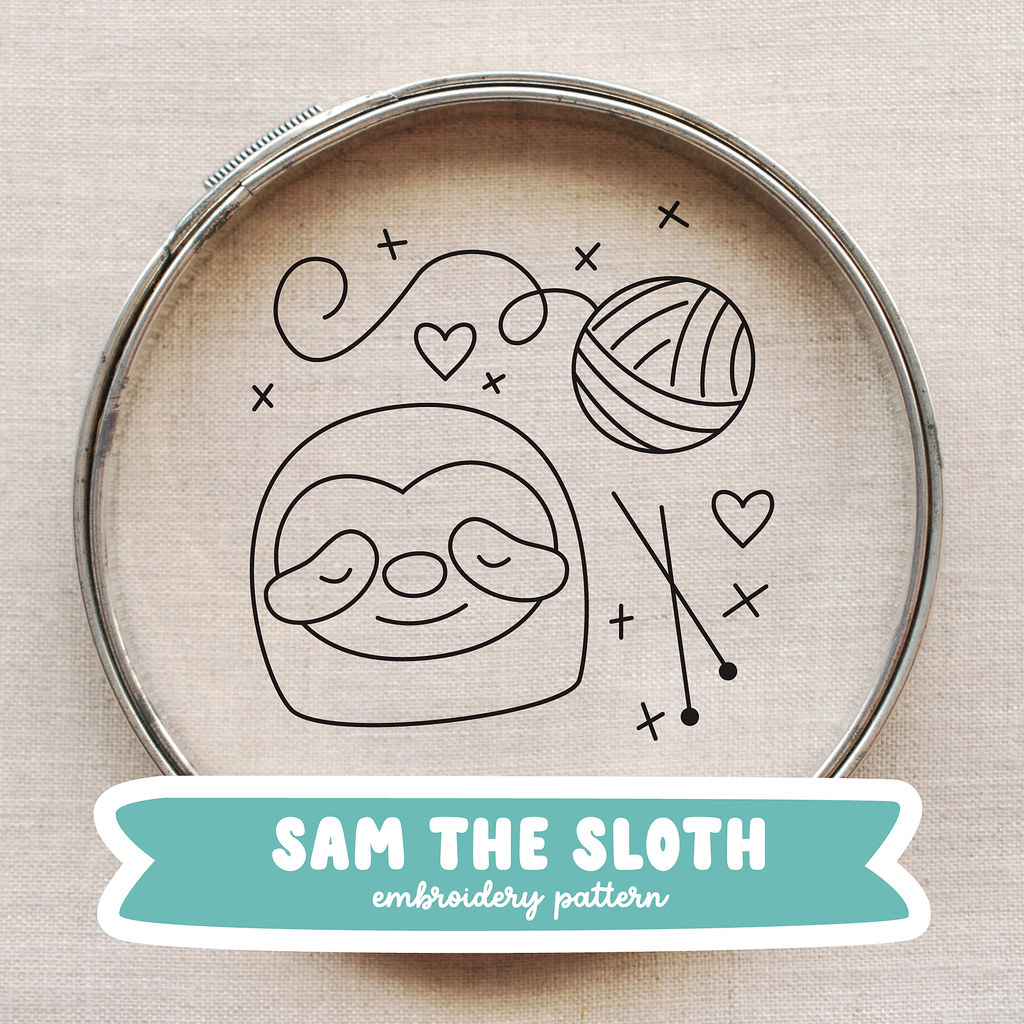
Sam the Sloth Embroidery Pattern

I always love when crafts cross, so this embroidery pattern that features knitting is definitely my style! It also helps that there's a sloth and I am delighted by sloths.

For this month's free pattern, it has Sam the sloth, a ball of yarn, and some knitting needles. Now, If you'd prefer to make Sam a crocheter, you could probably figure out how to swap out those needles for a simple crochet hook. Right? Right.

Sam the sloth is one of Kawaii Crossing's most recognized knitters, but I'm noticing something. Since the beginning of September, every time I see Sam there is just a ball of yarn nearby. Nothing on the needles yet! I'm starting to wonder if that's really how sloth Sam is at getting project going, or if part of the fun is just buying the yarn and making it into a pretty, hand-wound ball that's ready for knitting (or crochet!).

No matter. As they say, buying supplies and using them are two separate hobbies.

If you have bought some embroidery supplies AND want to use them, how about stitching Sam?


Have you stitched any or all of the Kawaii Crossing residents? Tag me (@molliejohanson) or add the #KawaiiCrossing hashtag if you share photos on Instagram!

pattern // sam the sloth cross stitch

Sam The Sloth Cross Stitch Chart

Do you feel up for some slow stitching? But maybe a project that won't take a super long time? May I suggest cross stitching Sam the Sloth? Sam loves knitting, which means you also get to stitch a happy ball of yarn!

Once again, I am behind on my Kawaii Crossing residents stitching, because, well, I'm stitching slower than Sam knits right now. But I'm really looking forward to working on this one...especially that yarn ball! Maybe I'll work on Sam and some real knitting when I squeeze in a little weekend trip soon. Somehow I rarely slow down long enough for personal projects unless I get VERY intentional about it.

But back to this cross stitch pattern!

This is the 9th pattern in my Kawaii Crossing residents series, and if you haven't grabbed the rest just yet, you can find them by clicking this link. There are also embroidery pattern versions for each one. AND, AND, AND...while they are each designed so you can stitch them on their own, if you want to make them into a sampler of sorts, you can get a border that they fit into by supporting me on Ko-Fi.


pattern // meg the monkey embroidery

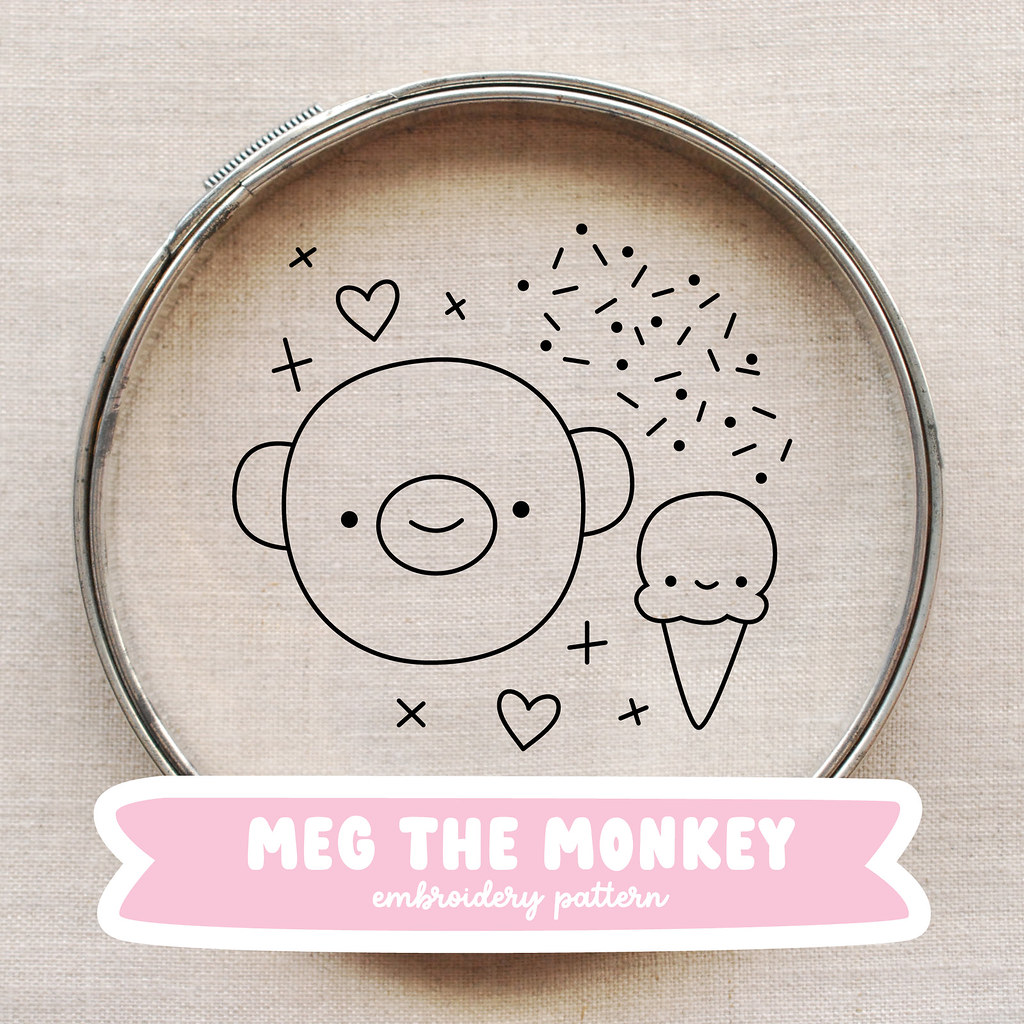
Meg the Monkey Embroidery Pattern

It's time for another free embroidery pattern from Kawaii Crossing!

The embroidered Kawaii Crossing residents are very excited to welcome Meg the Monkey! And it's not just because of the ice cream and sprinkles! Meg is just really popular, even if she's a little shy. While others gather around her gourmet iced cream cart to chat and get the latest "scoop" from each other, Meg likes quietly scooping tasty treats for her friends.

Whether you like getting in the middle of the conversation or working in the shadows, you can do either as you stitch this pattern!

Meg is one of the simplest of the animals so far, so you can stitch her quickly, saving you time for all the French knot and straight stitch sprinkles. I might also also point out that you could definitely add seed beads in place of the French knots. I say that because I envisioned these as the fancy sprinkles with the different shapes in them. They're so magical!

Now, how about that pattern?


Meg is perfectly fine stitched on her own, but she's even better when she's with her friends. And they're all a whole lot better when stitched in their coordinating frame as a giant piece of embroidery! You can get the border pattern with a Ko-Fi donation. If you're looking for all the rest of the Kawaii Crossing resident patterns (both embroidery and cross stitch), you can find them here.

pattern // meg the monkey cross stitch

Meg The Monkey Cross Stitch Chart

It's time to cross stitch Meg the Monkey! Except, I'm really the most excited about stitching the sprinkles in this pattern. Maybe the ice cream too, but mostly sprinkles.

This is almost funny, because I love the idea of sprinkles more than actually eating them. And I also know that the sprinkle part of the pattern will not result in the neat and tidy back that I usually prefer. Stitching all over the place like this is a little harder than just stitching a block of stitches. But it's so cute that I think it's worth it!

Yesterday I pulled out my actual Kawaii Crossing residents project to see where I last left off. And it was back in April! But with some details left off from the previous months and some of the sparkle borders dividing the sections too. Even though I have a bunch to stitch and catch up, I'm going to start on those sprinkles today.

If you haven't seen or downloaded all of these patterns, there is one for each month in 2022 and you can find them by clicking this link. The border I mentioned is also available to those who support me on Ko-Fi.


Now I'm gonna go plan my next batch of homemade ice cream and stitch some sprinkles!

pattern // pam the panda embroidery

Pam the Panda Embroidery Pattern

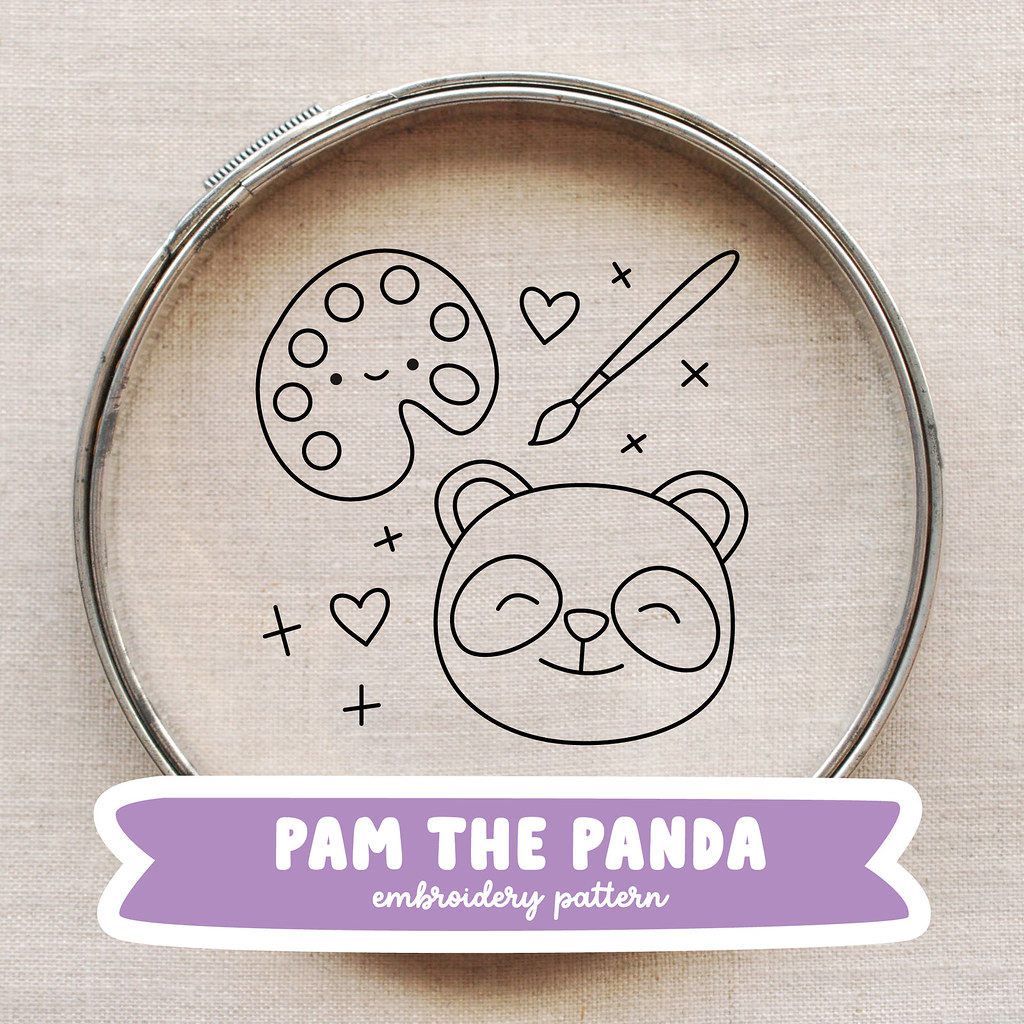
If you've ever wanted to embroider a panda that is also an artist, your time has come. Because that's exactly what this month's free embroidery pattern is all about!

Pam the Panda is Kawaii Crossing's resident artist and that means she uses all the colors. And I'm going to warn you, since she uses all the colors, this pattern uses a lot more colors than these little designs typically do. It's just small amounts, so you could swap in something else if it would simplify things, but you GOTTA have that rainbow of paint blobs!

Speaking of paint blobs, they are shown on the pattern as an outline, but for real impact here, I'd recommend stitching them with satin stitch. Maybe even do the same for Pam's nose.


As I sit here typing this, realizing that it's now the seventh pattern of the year, I'm thinking about how few of these I've stitched. But I'm not going to go dig out my hoop and check. Instead I'm going to dream of embroidering these little friends starting next month. Or in September. Maybe by the end of the year?

I'm half serious and half joking, and it's really all to say that it's okay to have these sorts of projects that you let sit for awhile. It's okay to aspirationally craft from time to time. Craft in a way that gives you joy!

pattern // pam the panda + cam the corgi cross stitch

PamThePandaCrossStitch

Pam the Panda, Kawaii Crossing's resident artist, is ready for you to cross stitch! And I know that folks were looking for Cam the Corgi last month, but I fell behind. So Cam is here too!

I've had a whirlwind of action behind the scenes over here. In fact, my sister and I have both been busy stitching secret things and that's relevant because Pam the Panda is inspired by my sister! She is an artist (I refer to her room as a gallery) and she also LOVES pandas. I couldn't help but make a Kawaii Crossing friend for her!

CamTheCorgiCrossStitch

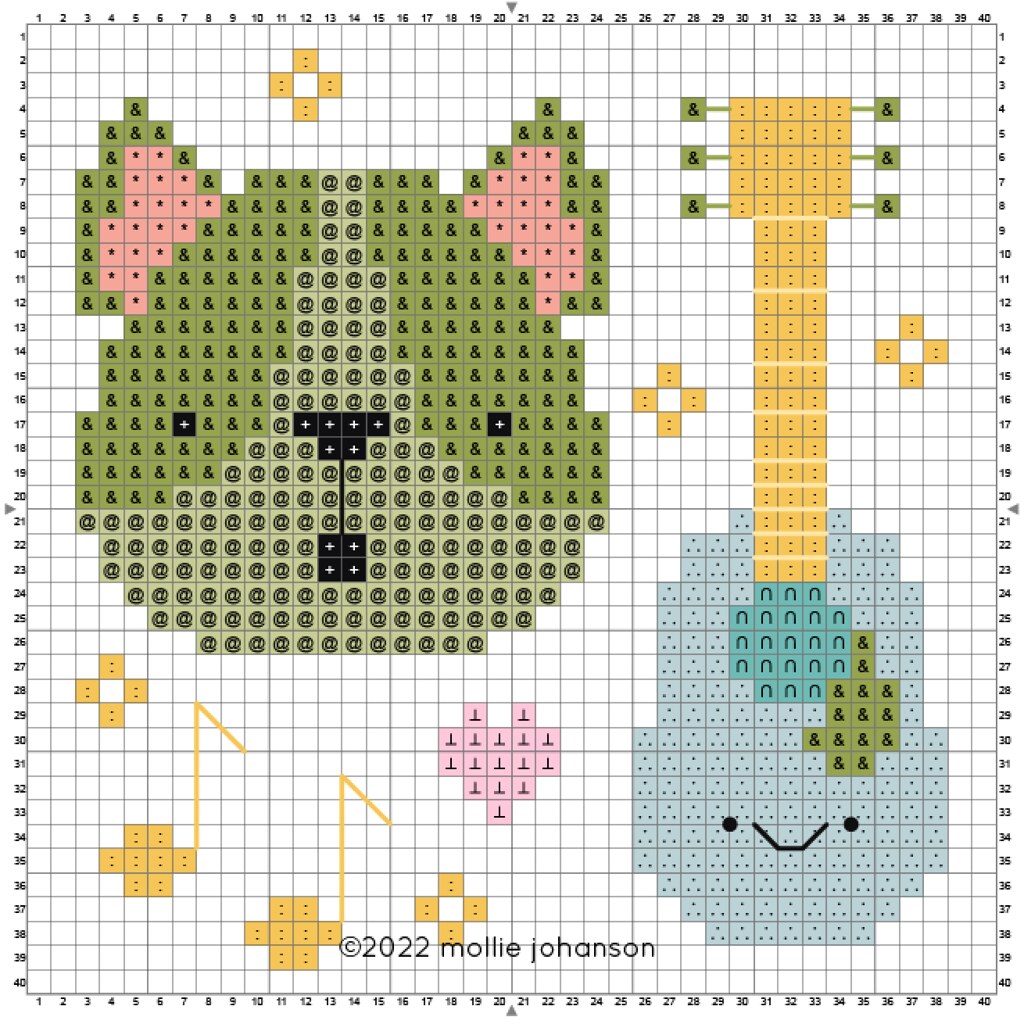
And here's Cam! We're going to pretend that he was rehearsing his awoooo's for you, instead of this lateness being about me not making the pattern sooner. If you're new to the Kawaii Crossing residents series, these are the 6th and 7th patterns. You can find them all (as well as the embroidery versions) by clicking this link. There's also a border you can stitch make it a large sampler, and it's yours with a one-time or ongoing donation to my Ko-Fi fund.


pattern // cam the corgi embroidery

Cam The Corgi Embroidery Pattern

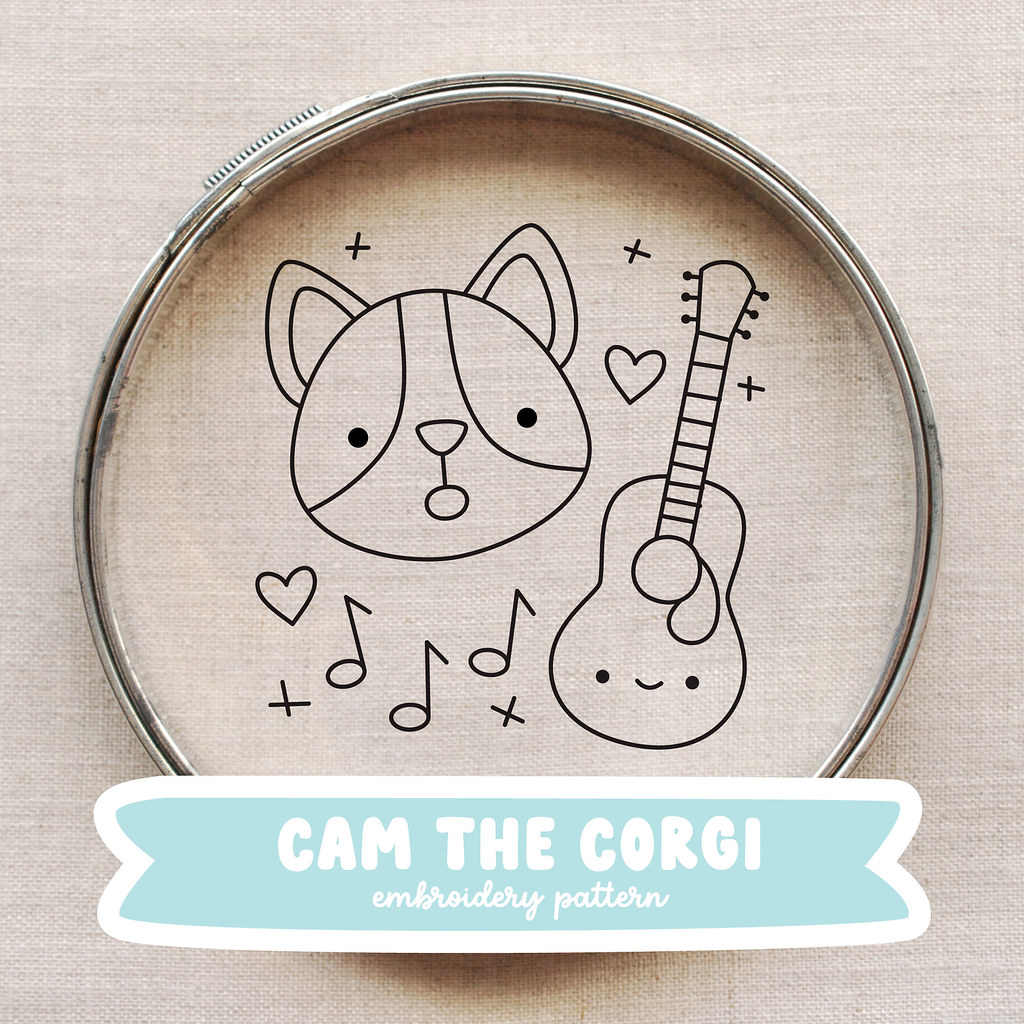
It seems that corgis are everywhere, and now Cam the Corgi can be in your embroidery hoop!

Since my brother got a corgi, they pop up in my Instagram feed, walk by my house, show up on socks at Target, and I don't know what else. Certainly they were present at the Queen's Jubilee earlier this month. I'm not sure if I'm seeing them more because I'm more aware of them (like when you get a new car and then you see the same kind of car everywhere you go) or if they're just really popular. At any rate, I'm adding to that with this month's embroidery pattern.

Cam the corgi plays the guitar (he doesn't need a pick because his clickety clack nails are good at pickety picking the strings). He also awooooooos, which is why his mouth is open! On this pattern, I made the nose and mouth as outlines, but I'd recommend stitching those two elements with satin stitch so they are all filled in. The notes would also look great filled with satin stitch.


As I was planning out the months for my Kawaii Crossing residents, there's one thing that I definitely didn't think about. In May, we were introduced to Kay the Kitty. Now in June, it's Cam the Corgi. A cat, followed by a dog means they are next to each other in the sampler frame that I made. Is that a problem? My cat and my brother's dog don't get along, but I'd like to think that Kay and Cam are friends. After all, they live in Kawaii Crossing so it's all just cute!

pattern // kay the kitty embroidery

Kay The Kitty Embroidery Pattern

For fans of kitties, sushi, cute things, or all three, today I bring you the Kay the Kitty embroidery pattern! This is the fifth (how can that be?!?) pattern in this year's series of Kawaii Crossing Residents. And I'm just as smitten by this kitten as I have been with every other character as they appear from my pencil, drawing cursor, and eventually needle. I hope you like them as much as I do!

One of the reasons I decided to make the residents of my Kawaii Crossing town as little faces with their favorite things is that I liked the flexibility of it. A few years ago I did a stitching club that was similar in that each official pattern was actually three tiny patterns. That means you can use them together or separate them out and that's exactly what you can do with these!

You could very easily only stitch the faces, which I think would be so cute as little pins or ornaments. But you can also stitch their favorite things on projects, including making them larger as needed. Or, stitch ALL twelve in a big hoop (or in the frame I designed for them!). So many options!


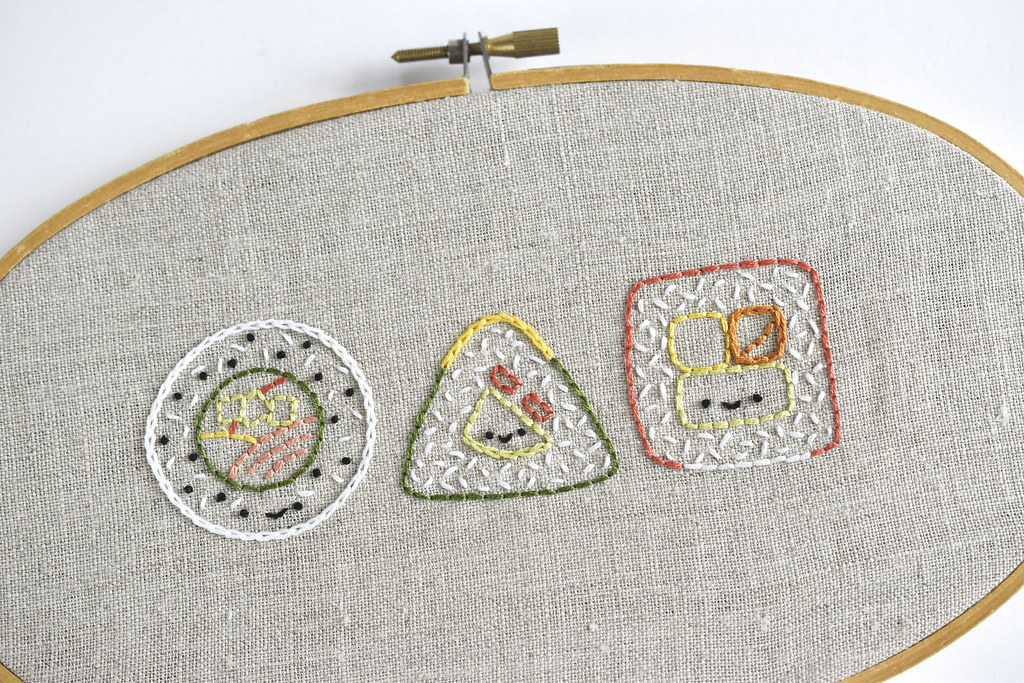
Silly Sushi Hand Embroidery Pattern

If you fall into the category of loving sushi, I do also want to point out that I have a whole set of sushi embroidery patterns in my Etsy shop. You can find that right here!

I've been thinking that it would be fun to make another sushi-themed project this month, but it may be that my patterns above need to suffice. We'll see. In the meantime I'm already picturing next month's resident...any guesses what this animal friend may be?

pattern // kay the kitty cross stitch

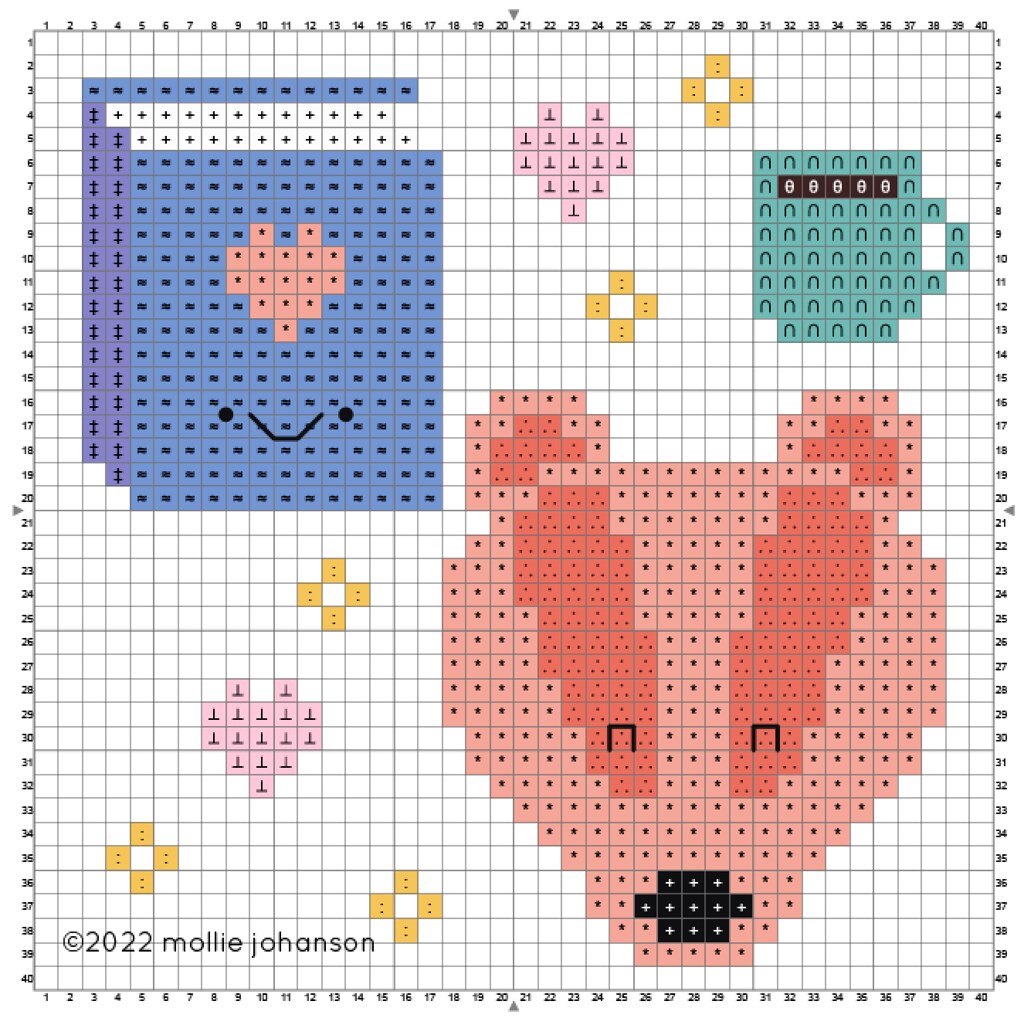
Kay the Kitty Cross Stitch Chart

Get ready to stitch up some sushi with Kay the Kitty! This month's Kawaii Crossing resident is officially now a cross stitch pattern, and she's just itching to eat up her latest catch.

True to form, I haven't even started stitching my own Kay, with her chopsticks, sushi, and dumpling. But I didn't want to wait to share this one. So I'm keeping this post short and sweet. Consider this your weekend project! Maybe it's even something to work on over some grocery store sushi...

As always, you can stitch this design on its own or add it to the growing sampler border with all the other Kawaii Crossing residents.


pattern // bob the bunny cross stitch

Bob the Bunny Cross Stitch Chart

Get yourself ready to cross stitch Bob the Bunny! This sweet little (free!) chart is quick to stitch and perfect for anyone who loves some spring gardening.

As I'm writing this, it's a few days after Easter, so there's part of me that worries that folks will just pass by a bunny cross stitch pattern. But hear me out. First, bunnies are a delight no matter what holiday or time of year it might be. Second, Bob loves gardening, and that's a hobby that happens for several seasons. Third, I'm still stitching my own sample, so there's no way this chart was coming any earlier.

Bob the Bunny Cross Stitch Progress

This is where my Bob the Bunny stitching currently stands. I'm not a super fast stitcher, so this was my progress while stitching/watching some television last night. I'm already pleased with how it's looking, even if I did stitch a carrot in the wrong place. And I 100% left it in the wrong place because it didn't mess anything else up.

That's one of my cross stitch secrets. If a mistake won't cause major headaches, I just don't sweat it. (An exception to this was on the samples for paid patterns or my book Cross Stitch Celebrations: Bundle of Joy! Those stitches are always double checked to be sure that what you see is what you should stitch!) I say this because perfection isn't necessary as long as you can make it work.

Now, are you ready for some stitching? Grab the free Bob the Bunny mini chart below. Or, if you'd like to make a sampler with all of the Kawaii Crossing Residents this year (scroll through to find the cross stitch patterns), hop over to my Ko-Fi page to get the ribbon border!


project and pattern // bob the bunny felt brooch (plus embroidery design!)

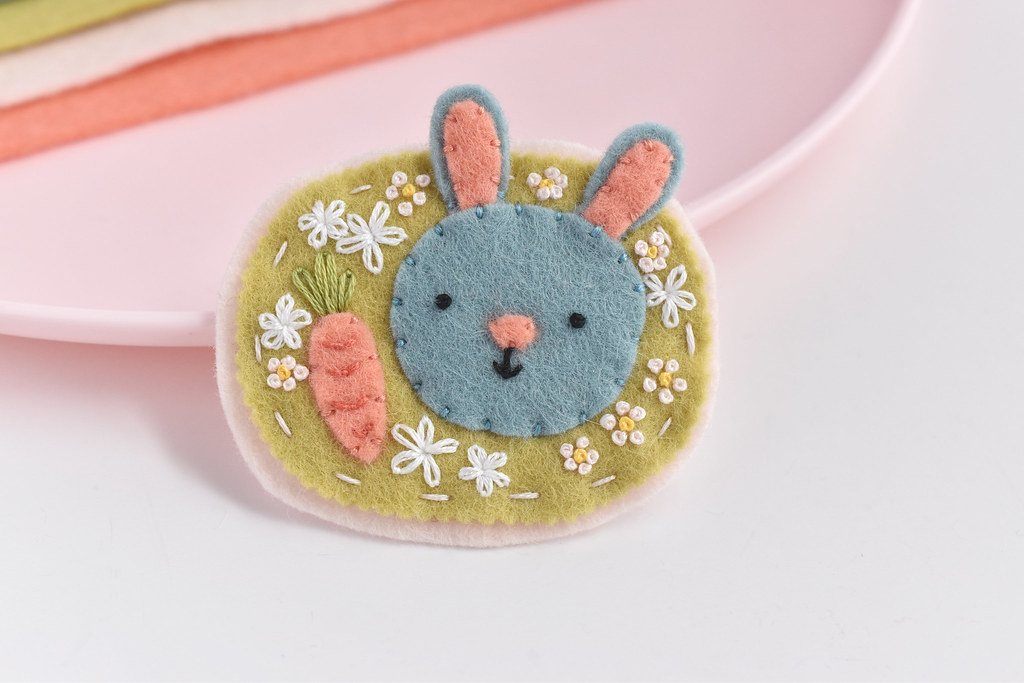
Bob the Bunny Felt Brooch

I don't want to alarm you, but you're about to make the cutest felt bunny rabbit pin you've ever seen. Yes, that might feel like a strong statement, but I literally "awwwwwwwed" outloud as the pattern was coming together and when I showed the finshed project to my mom she gasped and covered her face. I'm just sayin'.

So now that you're prepared, allow me to introduce the Bob the Bunny Brooch.

Bob is one of the residents of the Kawaii Crossing town I've been adding to, and it just felt right that he should come to life in felt in this way.
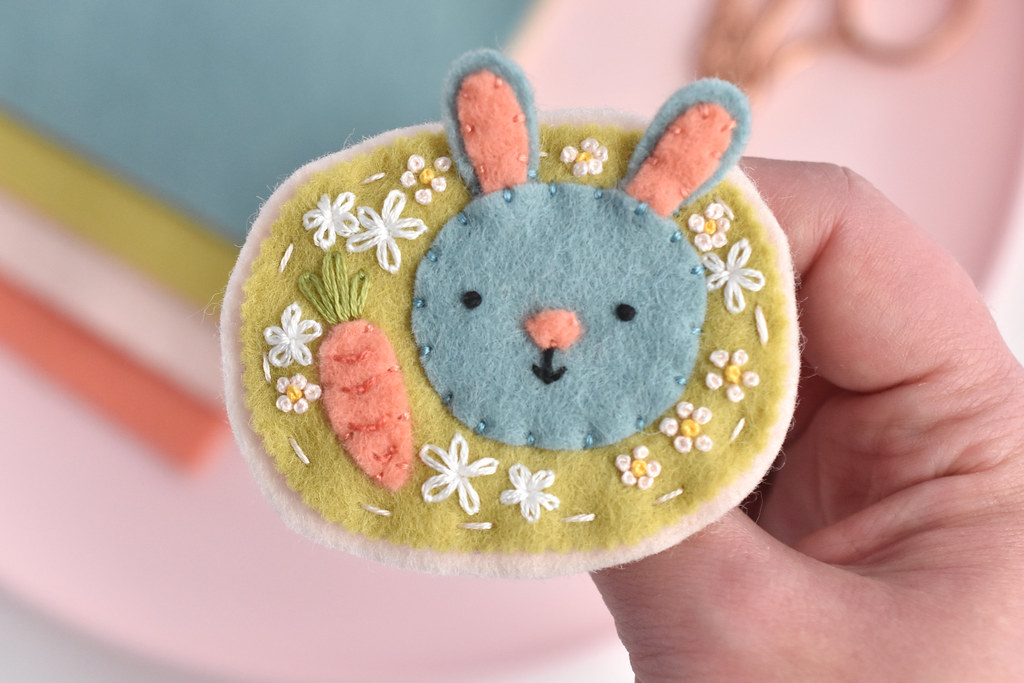
Bob the Bunny Felt Brooch

I knew that this would become a reality as I was working on some little felt eggs that I designed for Cloud Craft. The colors were perfect for Bob and honestly this pin is kind of like a companion craft to the floral eggs. One could even combine these two projects into one!

Bob the Bunny Felt Brooch

Stitching small felt projects is always very relaxing and satisfying, so I couldn't wait to make my new brooch. And I'm already looking forward to making more that are similar.

Also, before I get too far into this, I also have the Bob the Bunny embroidery pattern ready and available at the end of this post. If you're stitching along with all the Kawaii Crossing residents, you'll need that! But it's also great if you like Bob, but aren't quite up for wearing him on your jacket or bag.

Okay, now let's make this little felt pin!

Bob the Bunny Felt Brooch

You will need:

Felt (I used 100% wool provided by Cloud Craft)
Embroidery Floss
Pin Back
Freezer Paper and Pencil (optional)
Scissors (I used Benzie design scallop shears and standard scissors)
Iron (optional)
Needle

Bob the Bunny Brooch Pattern PDF

Bob the Bunny Felt Brooch

When cutting out small felt pieces, I like to use freezer paper to get the most accurate pieces as possible. You can see the whole process in video here.

Trace the pattern pieces onto the non-shiny side of the freezer paper. I usually group the pieces by felt color. You can also trace some of the little details on the pieces, but you don't have to.
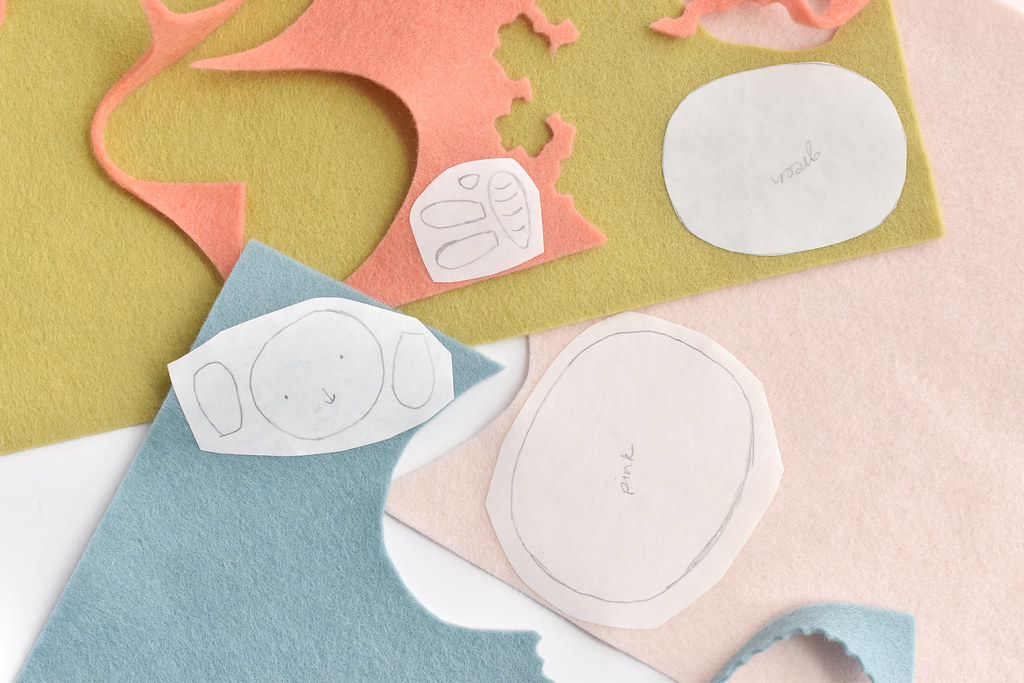
Bob the Bunny Felt Brooch

Iron the freezer paper onto the felt. It only takes a few seconds for it to adhere.

For the smaller oval shape, I cut right on the line before ironing it to the felt and I made sure to leave a bit of room around the edge. You'll see why in the next step.

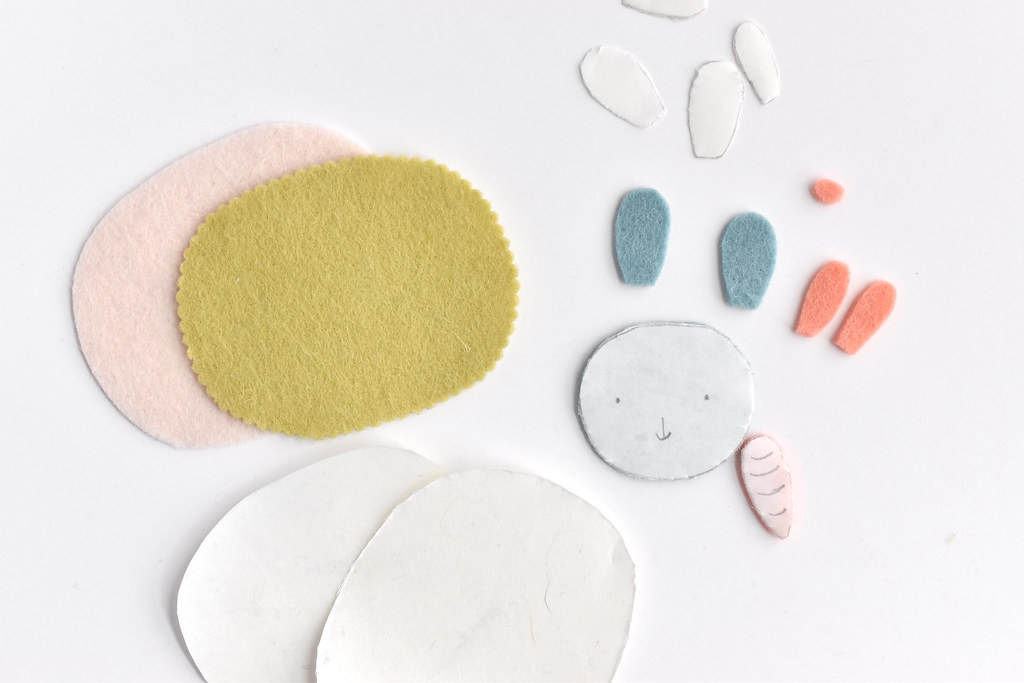
Bob the Bunny Felt Brooch

Use a scallop shears to cut out the smaller oval. Cut around the pattern template so the scissors aren't cutting the paper. Using these scissors is optional, but the decorative edge makes it super cute.

For the rest of the pieces, cut them out with regular scissors and then peel off the freezer paper.
Bob the Bunny Felt Brooch

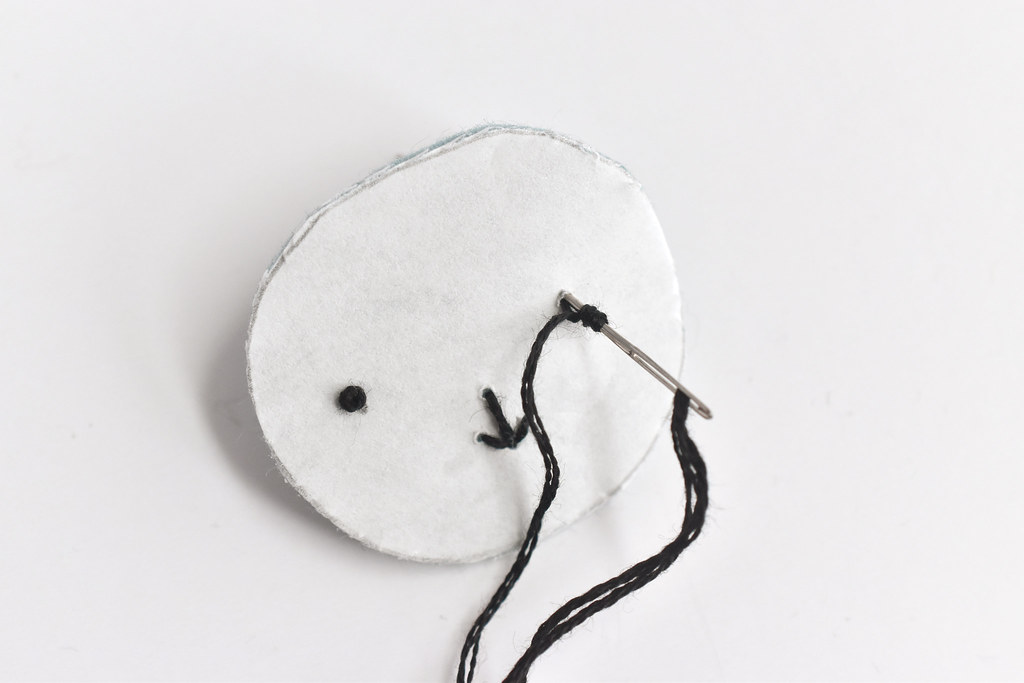
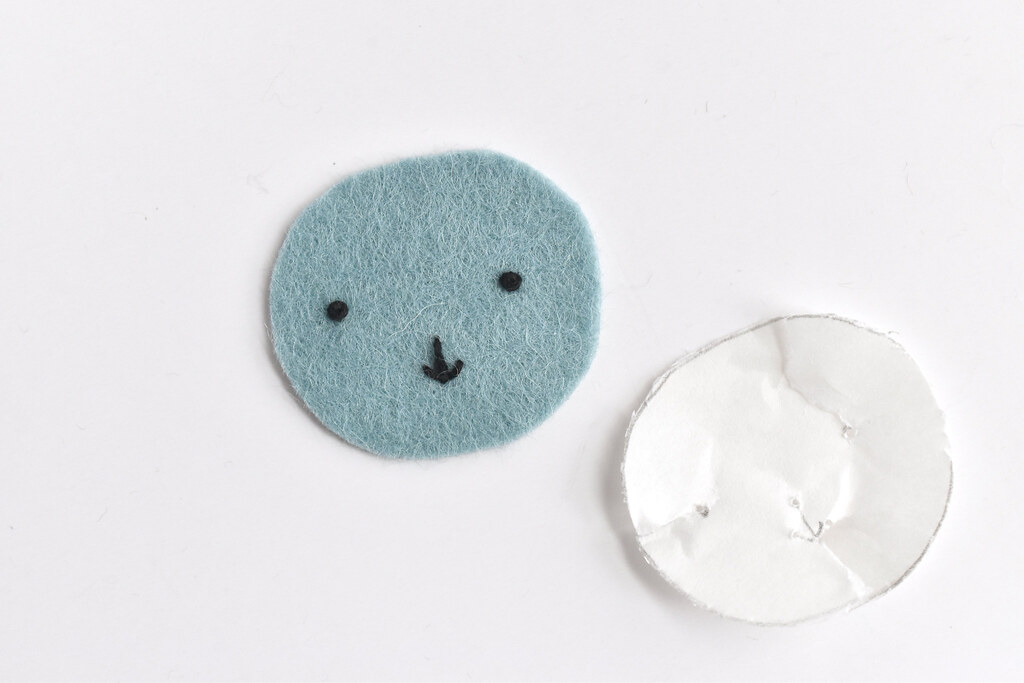
Embroider the face on Bob the Bunny and the lines on the carrot. Use three strands of embroidery floss.

You can often stitch right through the freezer paper and then carefully tear it away. But you don't have to do it this way. Use your favorite pattern marking technique or just stitch freehand!

Bob the Bunny Felt Brooch

Stitch the inside of the ears to the outside of the ears with applique stitch and thread that matches the inside of the ear.
Bob the Bunny Felt Brooch

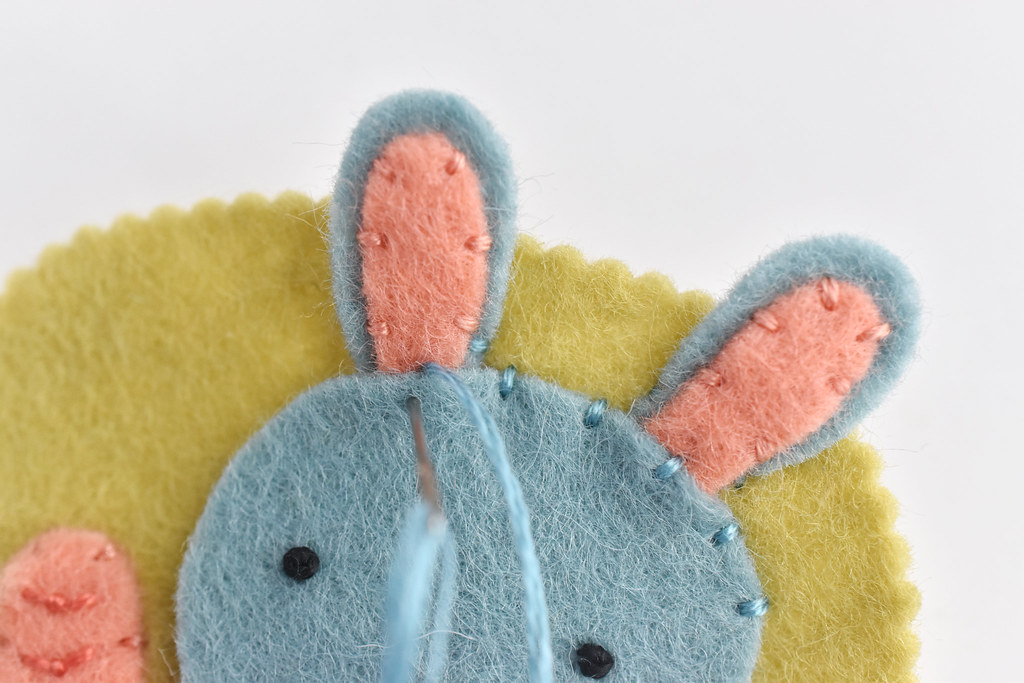
Arrange Bob the Bunny and the carrot on the smaller oval piece. Layer Bob's ears behind the head and so they overlap the edge of the background a bit. Stitch around the pieces with applique stitch. Don't forget to attach the nose!

For the top of the head and the ears, make one small stitch on each side of the ears, but keep the rest loose so the ears can wiggle. Stitch through the head and the ear as shown so that the layers are secure.

Bob the Bunny Felt Brooch

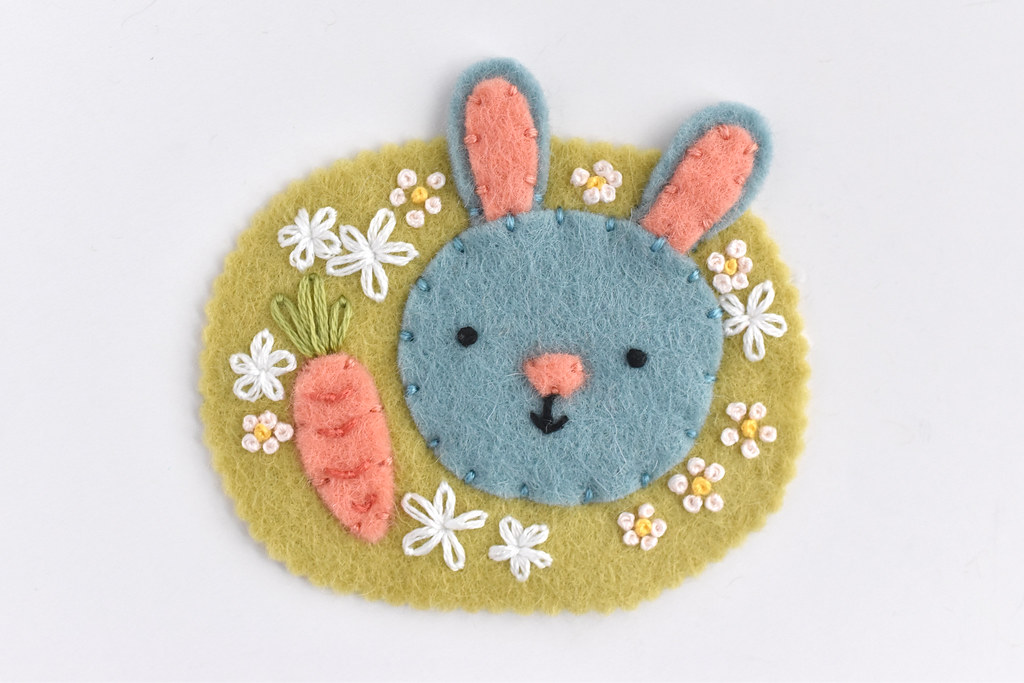
Now it's time to embroider the background flowers. Once again, use three strands of embroidery floss. You can mark the pattern in some way, or you can just use the pattern as a guide and freehand stitch the flowers as I did.

The larger flowers are lazy daisies.

Bob the Bunny Felt Brooch

The tiny flowers are groupings of french knots.
Bob the Bunny Felt Brooch

It's almost finished!

Bob the Bunny Felt Brooch

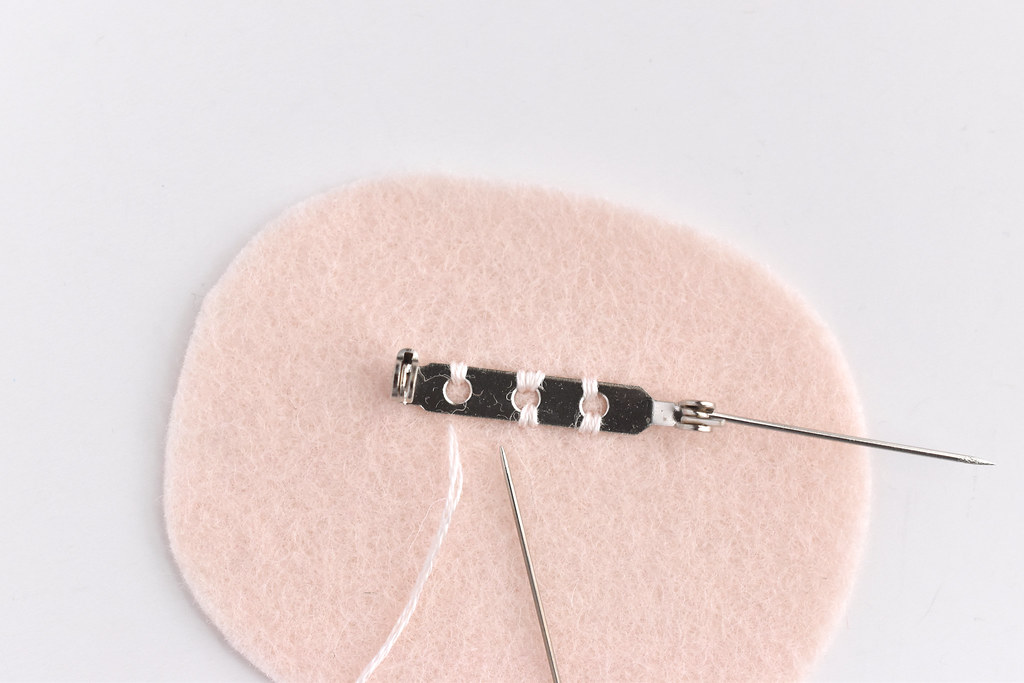
Hand sew the pin back onto the back of the larger oval shape.
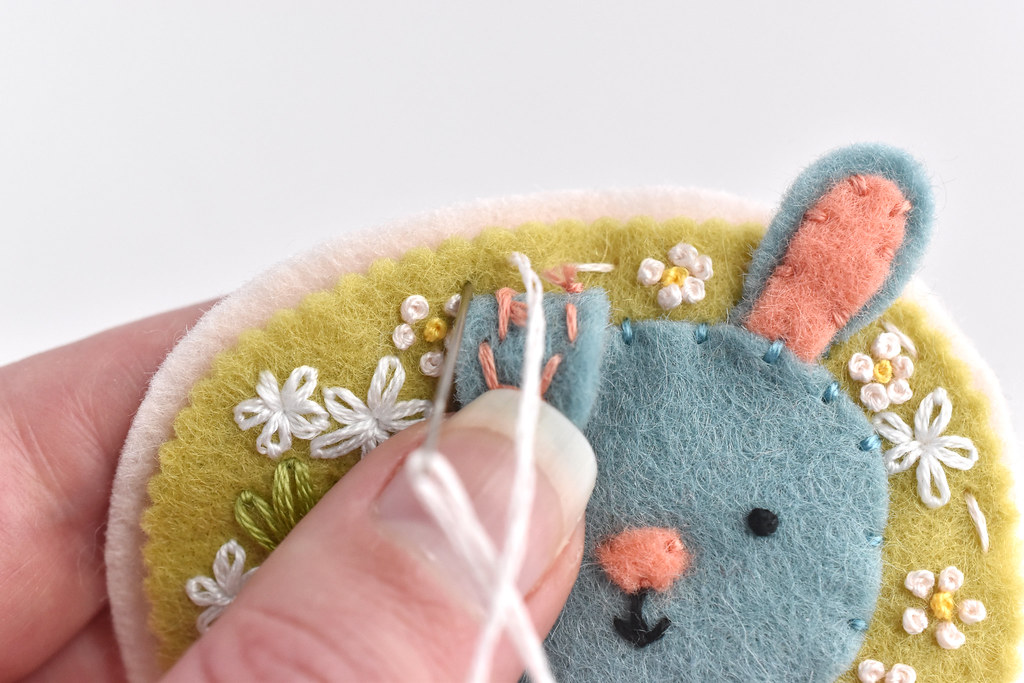
Bob the Bunny Felt Brooch

Stitch the front oval to the back oval with running stitch. Be sure to hold the ears out of the way as you stitch the layers behind them!

Bob the Bunny Felt Brooch

Your Bob the Bunny Brooch is all ready for you to wear!
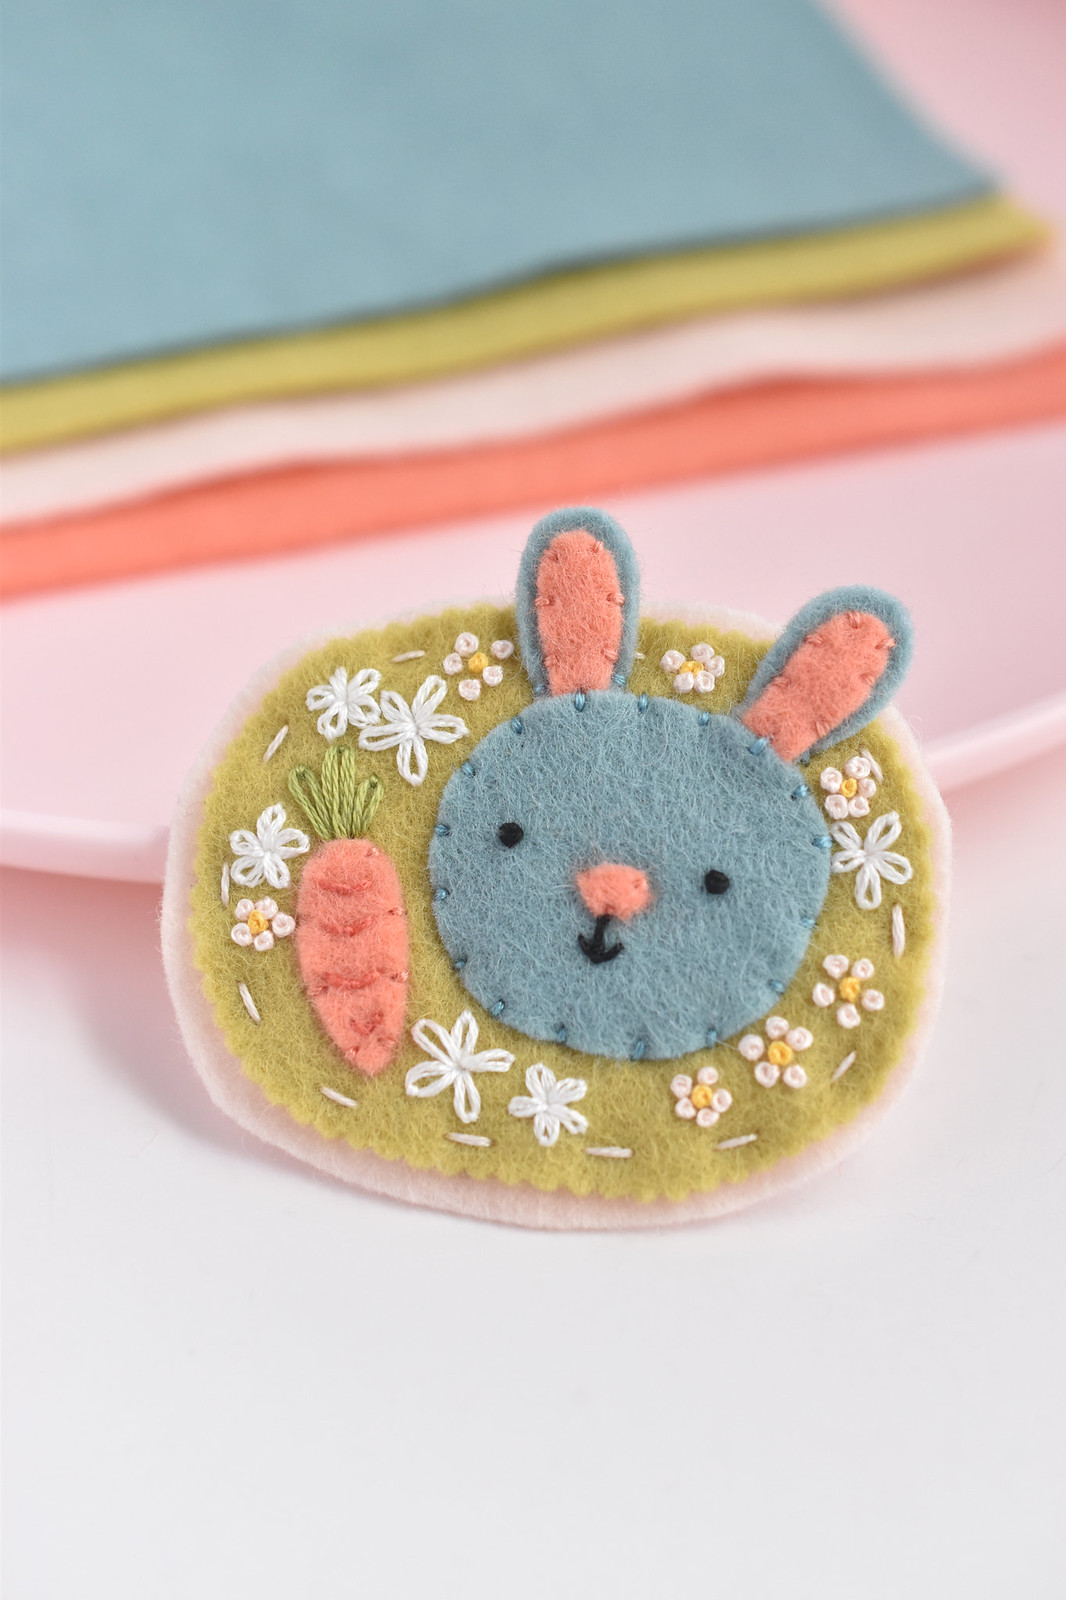
Bob the Bunny Felt Brooch

Does this brooch work well for Easter time? Yes. Is it also good for spring in general? Also yes. And could you wear this simply because you think bunnies are a delight? STILL YES.

I need more things like this in my life. Always.
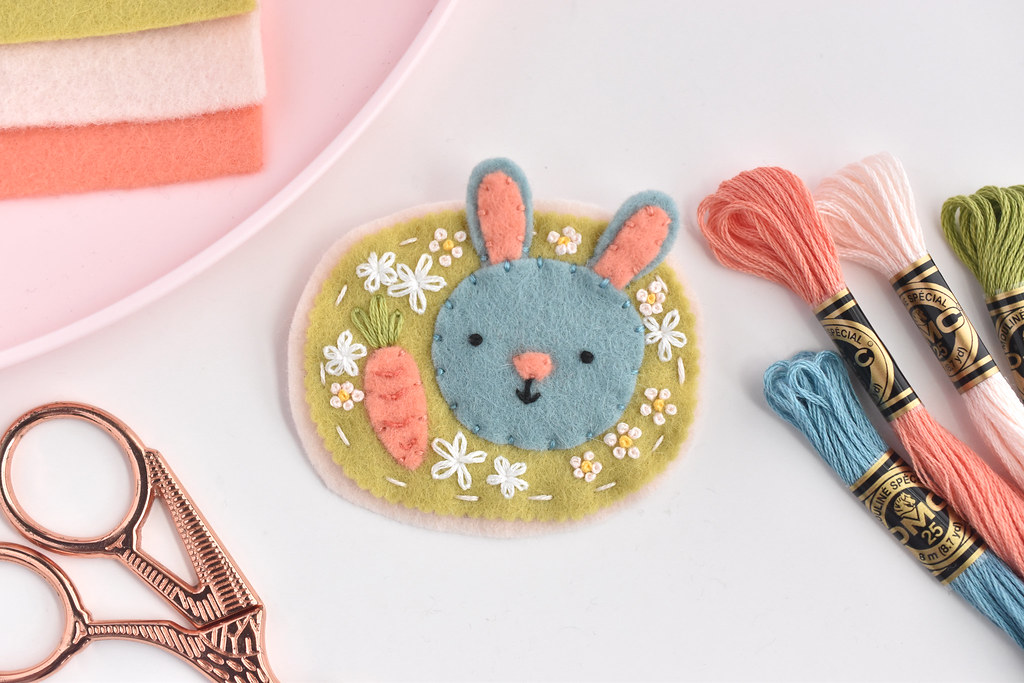
Bob the Bunny Felt Brooch

One of the things that I love about little projects like this is that you can make them in a few hours. They're great for crafternoons with friends or to stitch up in an evening while you watch a movie.

If you like Bob, but don't want to make a brooch, maybe you'd like to embroider him?

Bob the Bunny Embroidery Pattern The Bob the Bunny embroidery pattern is part of my Kawaii Crossing resident stitching project, and he's the fourth friend to show up. All of the residents fit into a ribbon border which you can get through my Ko-Fi page, but you can also just stitch the patterns on their own. Find them all here.

But don't forget to get the Bob the Bunny pattern first:


Happy, or should I say...hoppy stitching friends!

pattern // cal the chicken embroidery

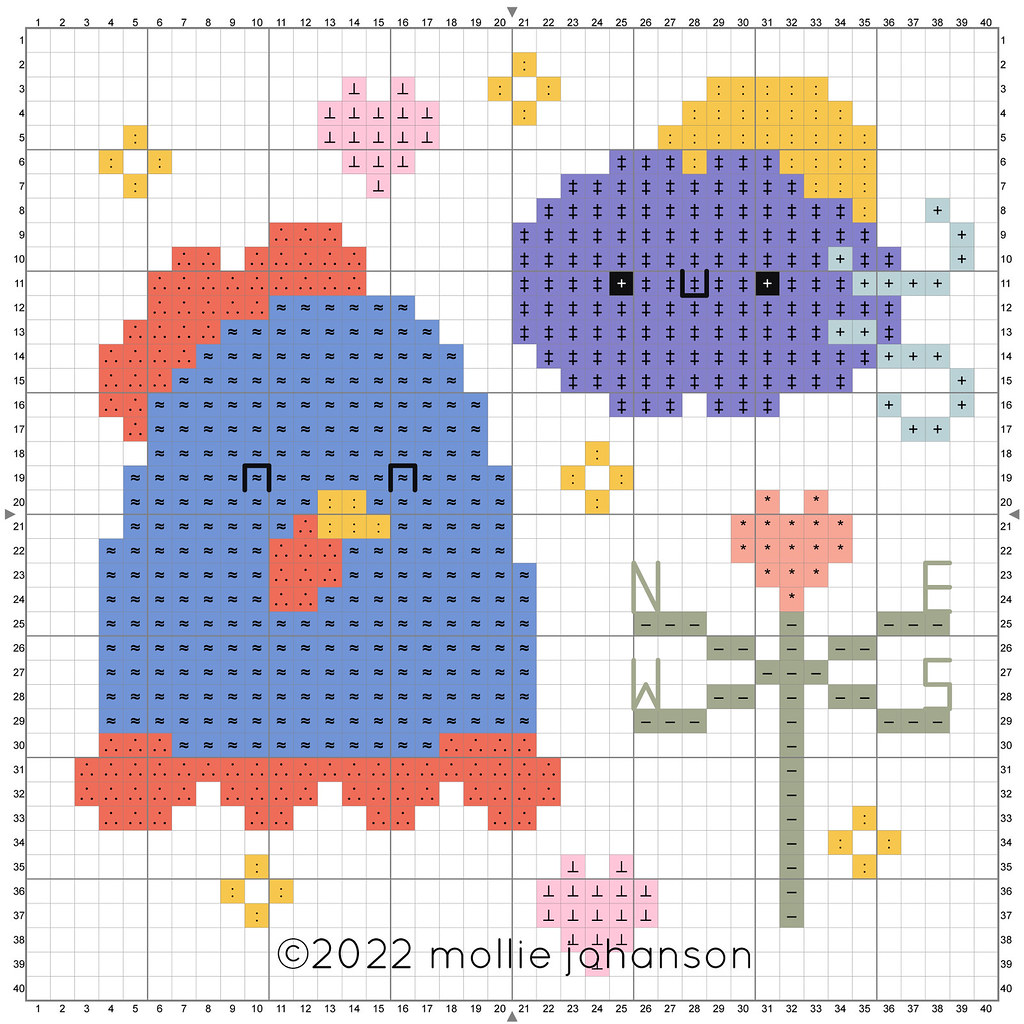
Cal The Chicken Embroidery Pattern

Just popping in with a quick post and this month's free embroidery pattern! Cal the Chicken is here and you can start your stitching of this plucky, clucky weather watcher.

The Kawaii Crossing patterns are increasing and Cal is happy to be part of the crew. Remember, if you're stitching any of these, I'd love to see! Be sure to tag me on social media (I'm @molliejohanson) or use the hashtag #kawaiicrossing.


The letters on the weather vane are admittedly tiny, but they are 100% stitchable. The S will be the trickest because of the curves, but guess what! You can use two scallop stitches to make them. Easy peasy!

The rest of the stitching can pretty much be backstitch. I'm gonna guess that most people finding this pattern will already know how to do back stitch, but just in case, you might want to check out my latest YouTube video:


The video also shows wrapped and woven backstitch, which would be a fun way to add some extra detail to any of these Kawaii Crossing designs.

pattern // cal the chicken cross stitch

Cal the Chicken Cross Stitch Chart Cal the Chicken is ready for you to cross stitch him! This latest free pattern in my Kawaii Crossing Residents Sampler features Cal, a cloud, and a weathervane. That's because Cal is a weather watcher, much like my grandpa (who also loved chickens). Gosh, I love creating these critters!

My own stitching on this project is slow to say the least, but I'm enjoying every bit of it. Let's take a look!

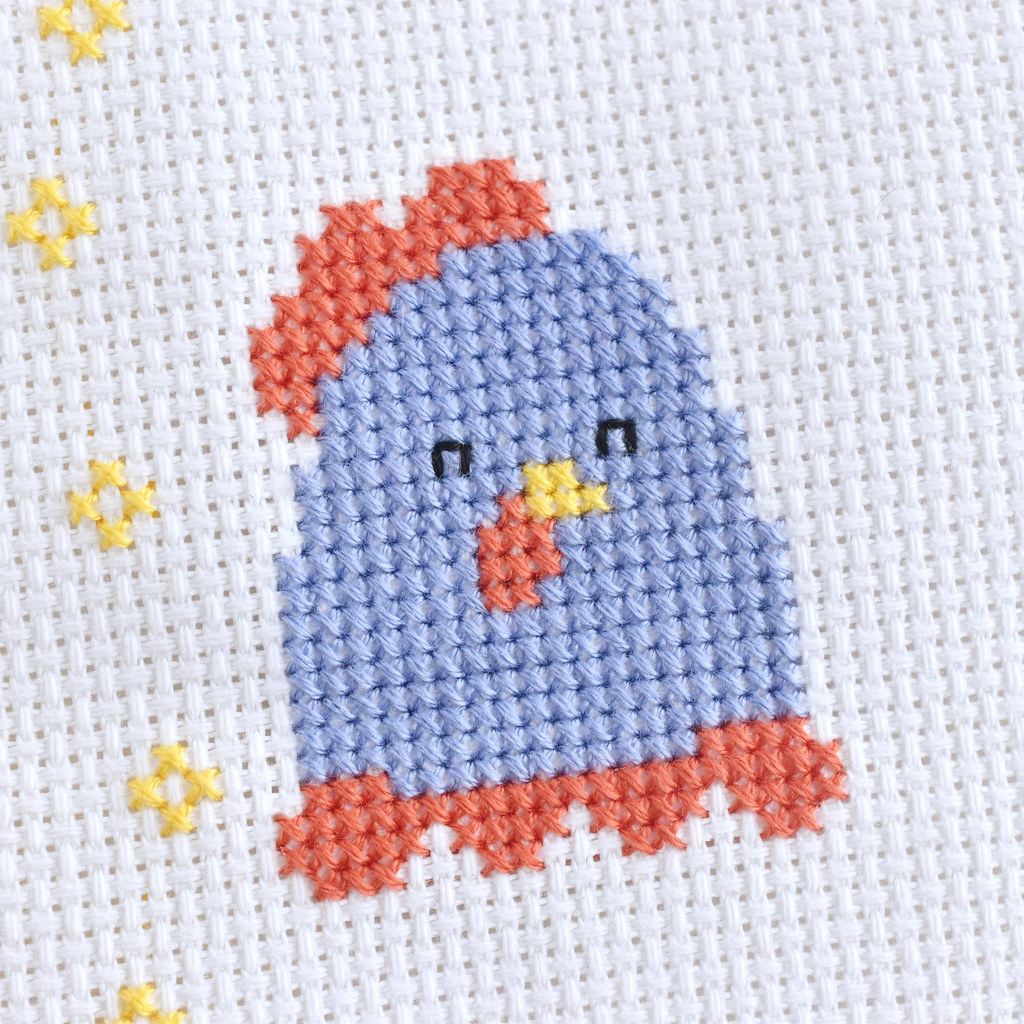
Cal the Chicken Cross Stitch Well, well, well...I actually stitched Cal! Of course, I haven't stitched the weathervane or cloud yet (apparently I'm out of DMC 155, but more is on the way...). Regardless, it's progress. And maybe while I wait for cloud embroidery floss I can do a little catch up on other parts of my sampler. Because here's where I am with the rest of that:

Kawaii Crossing Residents Sampler Progress Oh dear. Poor Les the Lion is nearly maneless. In some ways I feel that I'm falling further and further behind on my own project, but I show you this to say that it's okay. There is no rushing projects that you love. It's perfectly fine to savor them (which is a nice way of saying "pull them out to work on occasionally").

If you're just starting, you're not behind. If you've been at this since January, you're not behind. If you're ahead of me, I'm not behind. Ha! It's all good. And if you are just starting, the border is available to folks who support me with a Ko-Fi coffee at the link below. Or you can just stitch the animals on their own!


On the previous Kawaii Crossing residents (and definitely on future friends), I've included eyes made with whole cross stitches. And then I have to add a note about making them not look dead. Cal the Chicken has smiling eyes, so he's a little different, which makes the timing of this video a little off. But I made this video about crossing stitching eyes and no matter where you are on this sampler project, I think it will be helpful.

Speaking of future animal friends, behind the scenes I'm working on a new baby animal design for folks who pre-order my book Cross Stitch Celebrations: Bundle of Joy! If you're a fan of cross stitching animals and/or gifts for new arrivals, I'd love it if you check it out! Then be sure to get on the pre-order list for all the free bonus gifts.

pattern // les the lion cross stitch

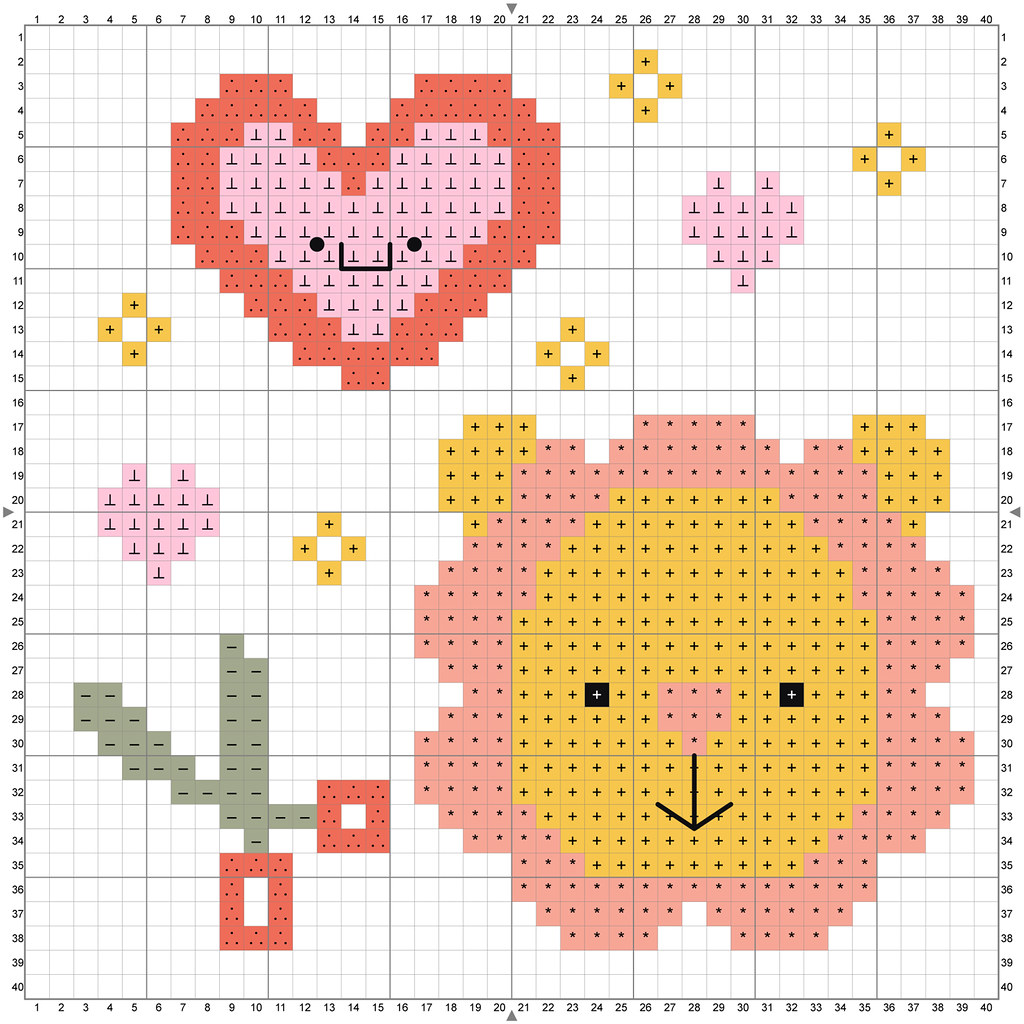
Les the Lion Cross Stitch Chart

Cross stitch friends, it's time to stitch Les the Lion! This Kawaii Crossing resident has their scissors out and ready to cut some paper hearts (and probably lots of other shapes through the year...but I may be wrong!). As with all of the animals friends I'm sharing this year, the downloadable PDF pattern is freeeeeee!!!

I was a little nervous about creating this design because A) the mane on Les is made up of little scallops and curves can be an interesting challenge in cross stitch, and B) the scissors. Listen, I don't really enjoy drawing scissors anytime. Making them small is harder, and then doing that in cross stitch where angles are a whole thing? Yeah. Anyway, I finally made it happen and I love it!

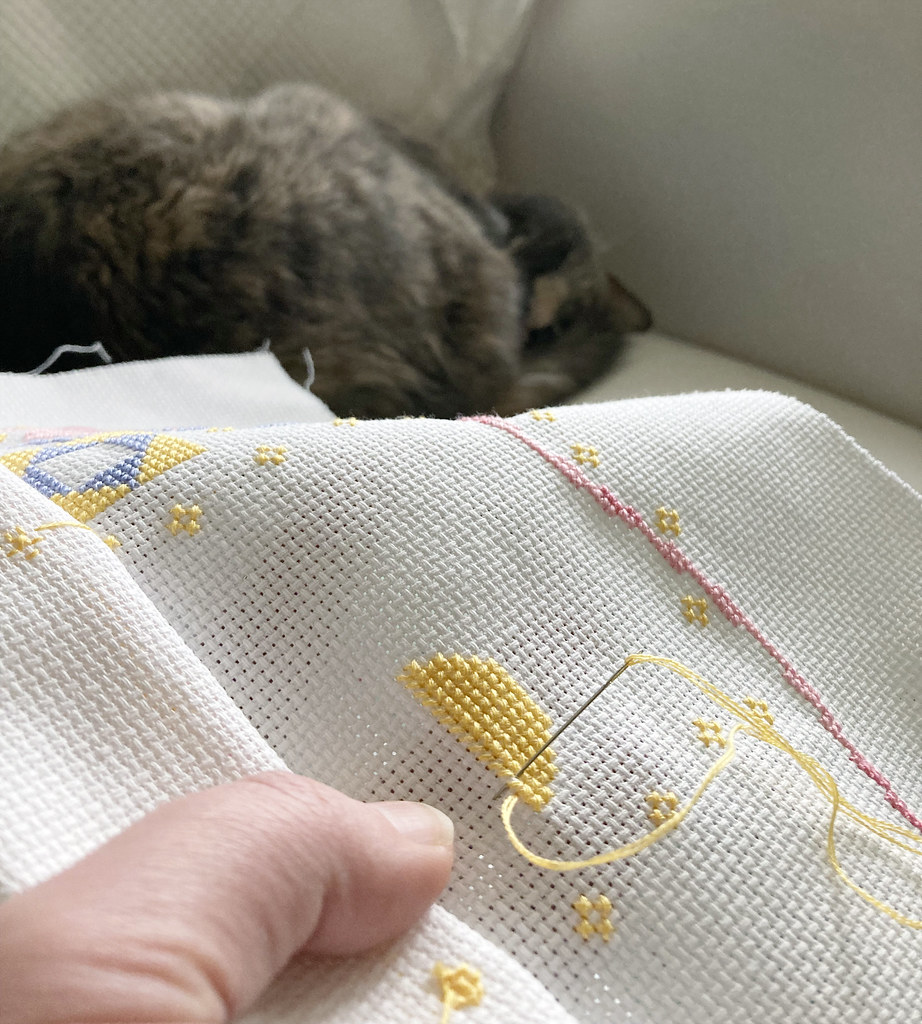
Stitching Les the Lion with Darcy the Cat

Now I'm actually stitching Les. Not less...more...stitching of Les...the Lion. It's slow going right now, but I'm still moving it forward. Darcy the Cat is helping!

Also slow going is the border, but it's a lot further ahead than last month. The ribbon has all of the light pink and half of the dark pink, plus half of the yellow twinkles. It's nice to have the different areas to work on here and there.

If you want to stitch the border to make the full Kawawii Crossing resident sampler, it's available through my Ko-Fi page. Les the Lion, however, is free below.


One little reminder about these faces: If you just stitch the eyes as the full cross stitch, the X can look like dead eyes, which we don't want. This doesn't always happen, but if you are stitching with two strands on 14-count Aida, it can. If that happens on yours, back stitch around the eyes to fill them in a little more.

I hope you have fun stitching this new friend!

pattern // les the lion embroidery

Les the Lion Embroidery

It is always a good time to do some stitching, and that makes now a great time to embroider this month's Kawaii Crossing resident, Les the Lion! Les loves paper crafting, and has a pair of red-handled scissors and a freshly cut paper heart to give to a friend.

Speaking of time for embroidery, I don't know about you, but when I feel like I'm behind on a stitchalong, it's easy for me to think that I shouldn't even bother. Which is ridiculous because that's how nothing gets done. But before I get ahead of myself, let me remind you of the year-long free stitching club that is Kawaii Crossing.

Each month, I'm sharing a mini pattern of one of the residents who lives in my little imaginative town. They work on their own, but they also all fit into a frame that you can get on my Ko-Fi page. (By the way, I share other goodies there too, which unlock with one-time or ongoing support!) Last month's resident pattern was Sig the Sheep who loves quilting.

Now, here's the thing about falling behind. If you've just found out about this little stitching project or you planned on following along but haven't had a chance to start yet, it's okay! Here's my total progress on this:

Les the Lion Embroidery

That's it.

I literally started my stitching this week with Les. I even misplaced the pattern for Sig, and haven't decided which stitches I'm going to use for the ribbon border. (Chain stitch is tempting, but it might be too bulky?)

My thought all along was that the border is a nice thing to work on along the way as each resident comes along through the year, but clearly that hasn't happened yet. But it will. For me and for you. So don't worry about keeping up each month, but do just start!

Of course, to do that, I suppose you'll need this month's pattern...