about shop patterns projects printables extras sponsorship wild olive twitter flickr pinterest subscribe
Showing posts with label cross-stitch. Show all posts

project // cross stitch postage stamp pin

Postage Stamp Cross Stitch Pin

When I think about Valentine's Day, I often think about mailing cute envelopes with adorable stamps on them. Making your own cross-stitched postage stamp as a pin is a natural next step, don't you think?

Just imagine wearing this for Valentine's Day or even beyond!

Postage Stamp Cross Stitch Pin
Hearts Day Mini Stamp Cross Stitch Pattern

This simple project is a great way to stitch something small and get in some slow stitching without the overwhelm that can come from large cross stitch projects. The design I used is from a new cross stitch pattern in my Etsy shop.

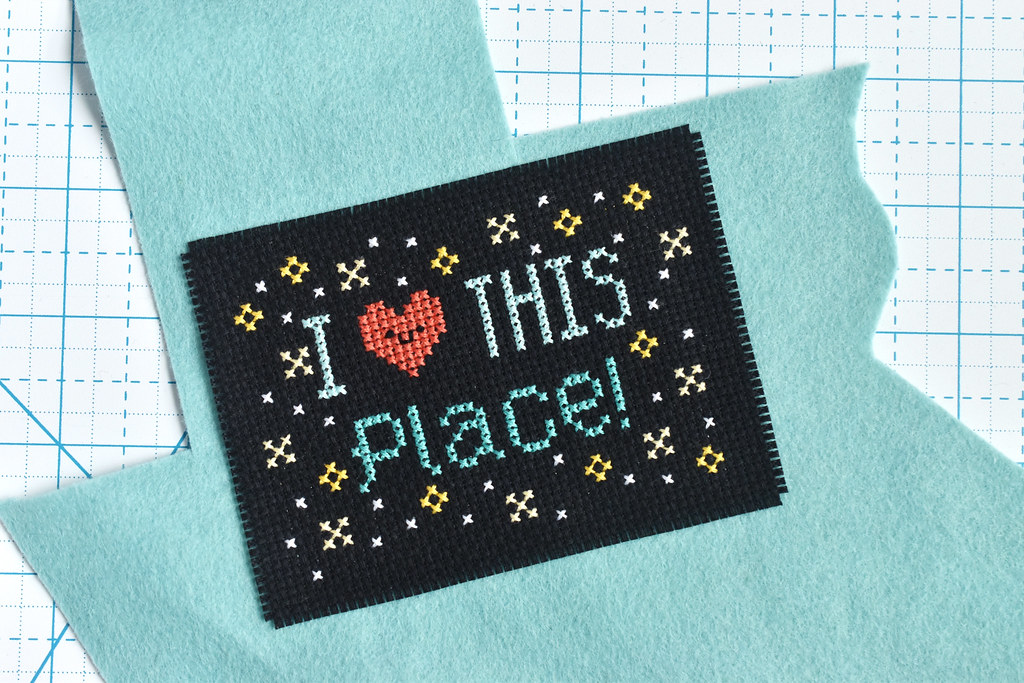
The Hearts Day Mini Stamp pattern features 20 different mini stamp designs, including the one shown in this project. The full pattern allows you to stitch all the stamps with their little perforated border, but for this pin, I used only the inside part of one stamp. You could use ANY of the designs for this.

Postage Stamp Cross Stitch Pin

Instead of using the perforation in the cross stitch, the backing for this pin is felt cut out using the small stamp border in the Stamp of Approval deep-etch die set (affiliate link) I designed for Benzie Design. The dies create a perfect stamp shape every time, and I knew they'd be perfect for this.

Okay, so the truth is that I knew they'd be perfect because I designed the cross stitch patterns with this die in mind. They are exactly the right size when you stitch them on 14-count Aida!

Now, let's get on to this project!

Postage Stamp Cross Stitch Pin

Here's what you need:

Hearts Day Mini Stamp (no perforation) stitched on 14-count Aida
White Felt Stamp cut with small Stamp of Approval die
Embroidery Floss
Needle
Pin Back
Tacky Glue
Note: The pin back I used was a little longer because my stamp is wide. If you make a tall stamp, be sure your pin back will fit.

Postage Stamp Cross Stitch Pin

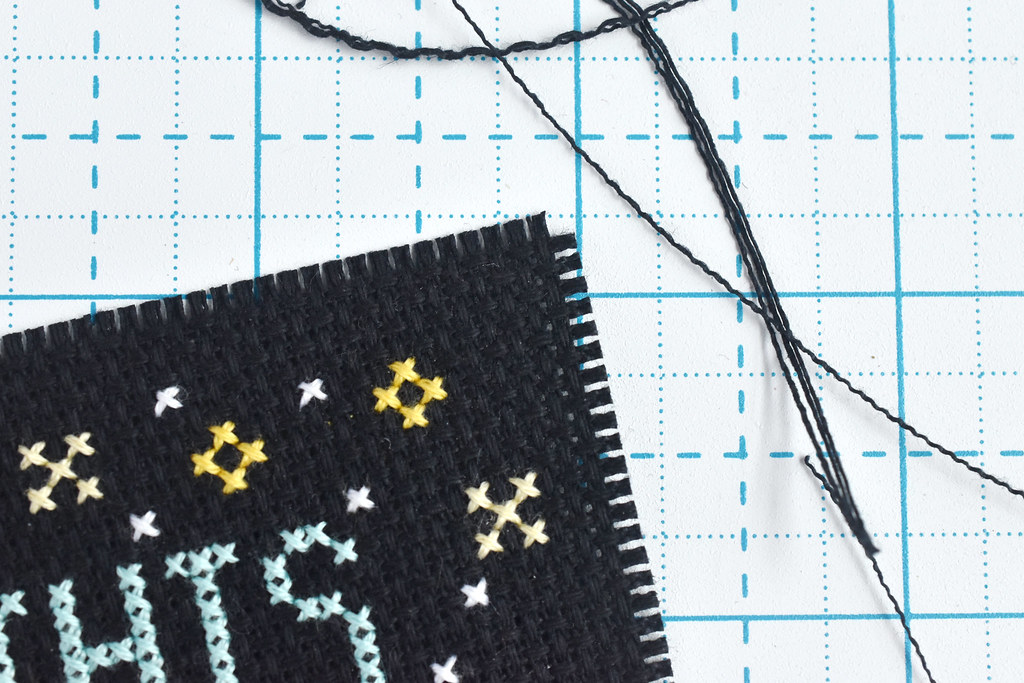
Trim the cross-stitched stamp down so there are two rows of Aida on each side of the stamp. Center it on the felt stamp piece.

Use one strand of embroidery floss and fold it in half, threading the cut ends through your needle. Starting at one corner, come up through the felt and Aida one row away from the stitching. Go back down one stitch away on that same row.

Postage Stamp Cross Stitch Pin

On the back of the stamp, slide your needle through the loop of thread and pull to tighten it. This is the loop method, and it will secure your thread without a knot.

Postage Stamp Cross Stitch Pin

Stitch around the entire stamp with running stitch, making each stitch one square of Aida.

Postage Stamp Cross Stitch Pin

Secure the end of the thread with a knot between the layers of fabric and felt. Use Tacky Glue to attach the pin back. Be sure it's facing the right direction!

Allow the glue to fully dry.

Postage Stamp Cross Stitch Pin

Now you have a postage stamp pin that's ready for Hearts Day! Of course, if you're a fan of mail, stamps, or the like, this is a good accessory any day of the year.

Postage Stamp Cross Stitch Pin Do you love stamps? My grandpa collected them, so I kinda feel like the stamp patterns I've made are an ode to him. Now the big question is, should I design more mini stamp cross stitch patterns?

pattern // autumn cuties cross stitch

Autumn Cuties Cross Stitch

We are officially in the season of autumn here, and I couldn't resist making a new mini cross stitch pattern! This really is a small pattern, but it's a fun way to celebrate my favorite season of the year in a big way. Best of all, it's free!

The chart itself is technically 33x33, but each block with a design is just 15x15 stitches. They are baby charts! This is designed to stitch all together as one mini pattern, but you could very easily stitch each section just on its own. Because they would make ADORABLE pins or magnets.

You can also easily adapt the colors. For example, if you wanted to make the pumpkin on its own, you could use black in the background for more of a Halloween look. Love yellow apples? Swap the yellow and red in that block, and maybe do the same in the leaf block!

Because the design is square, it would be so cute in a tiny frame, but you could also make it into a little ornament like this tutorial from Caterpillar Cross Stitch.


I can't wait to see how YOU make your Autumn Cuties cross stitch!

pattern // finding nemo cross stitch

Finding Nemo Cross Stitch Pattern

If you love Finding Nemo and cross stitch, you've found the right place. Because today I'm sharing something a little different and also very much who I am and what I love. Disney, crafting, and free patterns are very much my vibe.

I'll start by saying the pattern I have for you is kinda big. As in, there are about 12,000 stitches. It makes a design that is a little over 14 inches wide by 4 inches high when stitched on 14-count fabric. That's sort of a weird size, yes, but that's because this wasn't originally a cross stitch pattern.

Back in the spring, I had this idea for making a giant mural that lots of people could work on together. It would feature Finding Nemo characters because the disability ministry at my church would be presenting Finding Nemo Jr. It needed to not be messy (no paint!) and it also needed to be a size and shape that would allow for lots of people working at one time.

Finding Nemo Mural

I was inspired by the murals they have at EPCOT during their Festival of the Arts, because they work on a paint-by-number grid of sorts. Which I saw and thought "I can do that because it's like a cross stitch pattern!" Instead of paint or stitches, I opted for squares of colored cardstock.

So it started out looking like this.

And while I was confident it would work, I really had no way of knowing for sure until it was in progress and eventually finished. In fact, shortly after it got started I found a few mistakes in how I set it up to print. Thankfully, I could fix them.

But the real magic for me was watching people work alongside each other. Most had never met, but they chatted and worked together. Sometimes adding a single square, and sometimes working for a long time to fill in an entire area. Take a look:

Finding Nemo Mural
Finding Nemo Mural
Finding Nemo Mural
Finding Nemo Mural
Finding Nemo Mural

Even a therapy dog paw-sed to help! And I think people had a good time doing this. I know that I did!

Finding Nemo Mural

When the weekend of the musical production was over, we had to move the mural (which, by the way, measures 16 feet long and 5 feet high). It's still hanging out and looks pretty good, but soon it will end up in the trash. But I knew that it could live on as a cross stitch pattern.

There's pretty much zero chance that I'll be stitching this any time soon. Maybe someday though, because it was so special for me to work on this project. In the meantime, you can visualize what the finished cross stitch version will look like by taking in the finished mural:

Finding Nemo Mural

Slight changes have been made to the pattern, such as using symbols instead of the numbers for the mural. I also added in one color and updated the colors to what I think will be better for DMC floss shades.

Finding Nemo Cross Stitch Pattern Colors

I don't have estimates for how much floss you'll need, but I can tell you that it's a lot of DMC 958 for the background!

Now, how about that pattern! It's shown on one page so you can see it all together, but the real chart is spread out over six pages so you can actually read it.


This is, as I said, a bigger pattern that I typically design, but it was too fun not to share. It would make my crafty Disney heart swell to see folks stitch it up, so be sure to tag me or email me so I can see photos if you do!

pattern // mini seashells cross stitch

Mini Shell Cross Stitch Patterns Summer time is coming which means doing some cross stitch outside in the warm weather! And when I think of summer, seashells often come to mind. That and a whole lot of tropical beach things (even if I don't really love the beach).

Now, for all those other summer things, I released a new cross stitch pattern called Summer Vibes, which you can find in my Etsy shop. It has a larger seashell in the set, but I thought it would be fun to have a few smaller patterns too.

So today I'm sharing a set of three mini shell designs. These are all on one chart and you can stitch them in a little group, or you can cross stitch them individually as you seen above. They are pretty small, so they take hardly any time to stitch!

Mini Shell Cross Stitch Patterns

I think they would be adorable on something like a sunglasses case or as a tag on your favorite beach bag.

They use only whole cross stitches, so even beginners can jump right in. The faces use a tiny bit of backstitch and French knots, so if those aren't as familiar to you, you can skip the faces. Or let this be the time you learn how to stitch them!


And if cross stitch isn't really your thing, but you're looking for a under the sea sort of embroidery design, be sure to check out my free embroidery pattern based on lyrics from The Little Mermaid's song Part of Your World!

pattern // tiny quilt blocks cross stitch

Tiny Quilt Blocks Free Cross Stitch Patterns

It's National Quilting Month, and today I'm sharing some free tiny quilt block cross stitch patterns! These are pretty small (most are less than one inch!), so you can stitch them pretty quick. And they are designed more as two groupings: one with the sawtooth star, pinwheel, 8-point star, and antique tile blocks, and the other with the larger grouping of flying geese.

I've made actual quilts, felt quilt blocks, embroidered quilts, embroidery patterns OF quilts, but it was about time that I bring my love of quilts to cross stitch.

Of course, on the 12x12 blocks I added some of my signature smiling faces, but those are done only with back stitch and french knots. You can add them if you like or leave them off if you prefer.

Tiny Quilt Blocks Free Cross Stitch Patterns

Because of the count on these and to make them work out the patterns on a small scale, the individual blocks don't fit easily with the flying geese. There might be a way to make the rows of flying geese into a border for a grouping of the other blocks, but I haven't done that math!

But just like with regular quilting (and cross stitch!), you can move things around, repeat elements, and more. For example, you could choose just one of the small blocks and stitch multiples of them, just changing the color arrangements. This is also a great way to get more comfortable swapping in colors on a cross stitch pattern!

I do think these would be especially cute stitched up as little cross stitched pins (clearly I have a love for small quilty pins!), but they would also just be fun to make teeny tiny designs for your mini gallery wall, or you could line them up and make a bookmark, or...I'm sure you'll find sweet ways to use them. I mean you might even combine them with other patterns all together!

Ready to cross stitch some tiny quilt blocks! I know that I am!


pattern // loth-cat cross stitch chart

Loth-Cat Cross Stitch Pattern

If you've been watching the new Ahsoka show on Disney+ or if you're a fan of animated Star Wars series, you might be familiar with Loth-Cats. My sister loves them, so I created a cross stitch pattern so I could make her a cute little hoop, and now I'm sharing the pattern with you!

Interestingly enough, my sister was introduced to this adorable furry creature at the Galaxy's Edge at Walt Disney World. They have one there that sleeps and snores in one of the shops, but it's in a cage so you can't touch it. Of course, they also sell a stuffed toy version that you can pet (it purrs!) and take home with you. My sister has played with this thing so many times but it's kinda big to carry home and so has resisted the purchase. My plan goal is to convince her that she just needs this thing.

Loth-Cat Cross Stitch Pattern

Anyway, I couldn't resist the urge to stitch a loth-cat and so here we are.

I love making Star Wars related patterns, and the timing of Ahsoka coming out near my sister's birthday made this perfect. Previously I made my brother an Ahsoka Tano neck pillow, but there are lots of other Star Wars patterns for making soft toys, embroidery, and cross stitch all here on my blog.

Loth-Cat Cross Stitch Pattern

This is a pretty easy pattern to stitch. Not many colors, and only whole cross stitches with the teeniest amount of back stitch.


If you are feeling adventurous, you could easily change the colors and the fur markings because these creatures are not all the same. I especially like the lighter colored ones that look like they might belong on a snow-covered planet. I went for the markings that match the plush that my sister loves!

Loth-Cat Cross Stitch Pattern As a reminder, I make these Star Wars patterns just for fun because I love them and so do my family members. The characters are owned by LucasArts, so you shouln't sell any of the things you make with these patterns. But you SHOULD stitch them up and enjoy them!

pattern // retro roller skate cross stitch

Retro Roller Skate Cross Stitch Pattern

It's possible that the new Barbie movie subliminally influenced me while I was designing this roller skate cross stitch pattern. But it wasn't intentional! A few weeks ago I shared a similar embroidery pattern that had lyrics from a Disney Parks attraction. I took this one in a different direction, but it's definitely looking PINK and I love it.

I don't roller skate, but I'm pretty sure that I had a Barbie doll with roller skates. Maybe roller blades? Anyway, I do love pink, so while the embroidery pattern version of this skate was left without any color so you could choose what you like, I needed to add a color to this one. And pink was obvious.

What you see above isn't the full pattern, but the PDF below has the stripes off the back more extended, among other things. And here are a few more notes about the pattern:

I typically use two strands on 14-count Aida. For the eyes, that can leave them looking like Xs, which makes them look dead. To prevent this, outline the eyes with black backstitch or stitch the entire face with 3 or 4 strands.

Even though I went for pink on my skate pattern, I do think it would look excellent stitched in white on black or another color aida. You'd just need to change the color of the back stitch lines near the laces. And maybe also use a different color for the wheels?

There was a mishap with the symbols on the chart, so several colors have matching symbols. Black and white are obvious, and not even relevant with the white (which is only backstitch). The purple and teal and closer to each other in value, and may be tricky for folks who are color blind. Please accept my apologies that I ran out of time to go back and get this all changed.

Speaking of patterns and symbols, my cross stitch patterns, both here and in my shop always have the color plus the symbol. I (USUALLY!) try to keep the symbols obviously different from each other, especially when colors are similar.

I'd be curious to see if you prefer cross stitch charts to be shown this way or if you prefer them to be all in black and white with symbols. Which is easier for you to read and follow?

With all that covered, let's get rolling on this pattern!

project // cross stitch photo frame

Cross Stitch Photo Frame (With Chart!)


When you have a favorite place to visit, you probably have a photo or two to remember your times there. And now you can make a frame to hold your photo and show off your stitching too! This is a quick cross stitch project that you can work on while you travel and finish when you're home again.

This is the perfect project for anyone who already loves cross stitch, but it's also perfect for anyone who wants to just give it a try. The patterns you'll find in this post are small and easy, which means even if you're new to this, you'll be able to complete the stitching in no time. But you also don't have to use the patterns here. You can choose any small design and follow the same basic steps.

Cross Stitch Photo Frame (With Chart!)

When choosing a frame, look for one that is flat on the front and has a large enough area that you can attach the cross stitch. The colorful frame I'm using is from IKEA and they usually also have natural wood or neutral colors too. In the patterns, you'll find the same colors I used listed, but you can use any colors you like and match them to the frame or the photo.

Now, let's get stitching!

Cross Stitch Photo Frame (With Chart!)

Here's What You Need:

Photo Frame (I recommend at least a 5x7 frame)
A Small Piece of Cross Stitch
Felt
Fabric Tape
Craft Glue
Scissors

Patterns

I created the pattern you see in the photos right before I took a trip to Disneyland. Because I LOVE Disney parks and I wanted to have something fun to stitch while I was there. In fact, you can't see my hands in the photo, but I was literally stitching this pattern when this was taken! But my whole family also loves Disney parks, so I created a second version that says "WE love this place." You can find both versions below.

Cross Stitch Photo Frame (With Chart!)

After you've finished your cross stitch, trim the fabric down. I think it's best to trim it to a square/rectangle because you can keep the edges nice and neat. Leave four rows of Aida on each side of the design.

Pull away one row on each side. This will give the fabric a little fringe edge that won't fray.

Cross Stitch Photo Frame (With Chart!)

Place a few pieces of fabric tape on the back of the cross stitch.

If you'd rather skip this material, you can sew (by hand or machine) the cross stitch onto the felt. But I don't recommend glue for this step as it can soak through the fabric and look sloppy.

Cross Stitch Photo Frame (With Chart!)

Peel off the tape backing and firmly press the cross stitch onto the felt. Be sure that there's a little bit of felt showing on all the edges.

Cross Stitch Photo Frame (With Chart!)

Trim the felt down so the edges are all even.

I left just a tiny bit showing and I used a rotary cutter to make it quick. Regular scissors will work just fine, or you could use scallop shears to make it extra cute!

Cross Stitch Photo Frame (With Chart!)

Decide where you want the cross stitch to be positioned on the frame. Some of it will cover what's in the frame, so take that into account.

When you know where you want it, add some glue to the frame and then press the felt side down on the glue. Give it some time to dry before you start taking the frame apart to add an image or standing/hanging it up.

Cross Stitch Photo Frame (With Chart!)

Now you have a frame that helps you celebrate a favorite location! Of course, you can use other small patterns and this same technique. I did something similar with embroidery and it gives you an idea of how you can use other shapes and sizes.

Cross Stitch Photo Frame (With Chart!)

For me, Disney is my favorite place to visit. But home is also a place that I love, so a pattern like this would be a good choice for a picture being home with family.

But I want to know...where is a place that you love? What special moment at that place would you put into this frame?

pattern // congrats grad!

Cross Stitch Celebrations: Graduation Bonus Pattern


My new book Cross Stitch Celebrations: Graduation is available now, and to celebrate, I'm sharing a bonus pattern with all of you! This simple "Congrats Grad!" design is a nice little extra that you can use alone or in combination with the patterns in the book.

There are lots of cross stitch charts to work with in Cross Stitch Celebrations: Graduation, and they're designed to be easily customizable. That means you'll find borders, graduates, mini motifs that represent lots of educational topics, and of course, several alphabets. Something that you won't find, however, is any pre-designed words (numbers, yes, but not really words!). That's so folks of any language could easily work with the patterns.

But I wanted to have some kind of congratulatory message that wasn't just a DIY from the alphabets. So I made one as a bonus!

Cross Stitch Celebrations: Graduation Bonus Pattern

This pattern is quick to stitch when you want to make a card similar to the one that's in the book. Which is what I've done here! You can really use any of the designs, including this bonus chart, to make a cross stitch card.

Cross Stitch Celebrations: Graduation Bonus Pattern

The background color looks a little yellow on this because, well, it's attached to yellow paper! But we'll ignore that.

Cross Stitch Celebrations: Graduation Bonus Pattern

Once you have the card made, add an envelope and you're ready to give this to your favorite grad!

Cross Stitch Celebrations: Graduation Bonus Pattern

The greeting card project in Cross Stitch Celebrations: Graduation is based off of the mylar number balloons that you see at graduation parties, but done in cross stitch of course. And in addition to the 2024 chart that's included (we planned ahead with the dates in the book!) I have tips on how to use the XL number charts to make any of them look like this style.

For the card chart, I also included a simple border and some custom elements like initials and a little graduation cap. The "Congrats Grad!" pattern is just the wording, but you could certainly add a border or other mini motifs.

Cross Stitch Celebrations: Graduation Bonus Pattern


The colors in the chart are the same as what you'll find in the book. In fact, they're the same ones that are in the Celebration Streamers border that you can see on the cover, as well as on page 42. It would be a perfect pairing! I'm thinking, streamer border, congrats message, a smiling graduate, and a year to really mark the occasion.

As a brief aside, since we're talking about colors, the colors and general chart sizes are consistent with those that I created in Cross Stitch Celebrations: Bundle of Joy! That means if you're stitching for someone who would like a vine border for example (it would be great for an ivy-league graduate), you can easily work in that element from Bundle of Joy with the designs in Graduation. Fancy, right? If you know someone of any age who is graduating soon, I hope you check out Cross Stitch Celebrations: Graduation and make them something super special!

cross stitch celebrations // graduation

Cross Stitch Celebrations: Graduation It may sound a little early, but right now is the time to start planning handmade graduation gifts. And I have a new book to help you with that! Cross Stitch Celebrations: Graduation is my latest book and it's ready to help you create fun and special presents for the grad in your life.

Even though I've talked about this book on social media and in my newsletter, this is its first time showing up here on my blog. How did I manage to wait so long? I don't know the answer, but I do know that I'm very excited and so proud of how everything turned out. The actual release date is still about a month away, and more fun will come to the blog then, but I wanted to share a little about what's inside and some of the thought that went into making it.

About a year ago was when this new title and all the ideas for the patterns started taking shape. The idea behind the Cross Stitch Celebrations series (which started with Bundle of Joy) is that you can cross stitch all kinds of things to celebrate life's milestones. Graduation is definitely one of those, but while it's in the title, graduation is not the only event celebrated with the more than 35 designs in this book. That's because I wanted to also make it possible to stitch things for lots of things related to education, whether that be kindergarten, high school, university, and even special certifications.

Because the who, what, where, and when of anything graduation related has so many variables, the cross stitch charts are designed to come together in different ways, with different elements.

Cross Stitch Celebrations: Graduation

There are some motifs like graduates in different poses, a traditional hat and diploma, and several that have areas specifically ready to add extra mini designs. So of course, there are a bunch of mini patterns to use for this (or on their own!). I designed celebration borders and borders that have educational motifs. There are also several alphabets and sets of numbers that you can use for honoring the class of...well...any year you want!

And since many folks who are getting started in cross stitch are more hesitant to make changes to patterns, I have tips along the way about how you can combine or edit the charts. Things like making the graduates look like who you're stitching for or adding in custom text and colors. My goal was to make this as fun and approachable as possible!

Along with the charts for the separate elements, there are several projects with step-by-step instuctions and even more ideas beyond those.

Cross Stitch Celebrations: Graduation

One of my favorite projects is this graduation hat. When I graduated, people didn't decorate the tops of their hats like they do now, but I would have LOVED to have made one of these back then. But even if it's not worn for the big day, I think this is a sweet way to remember a graduation. It's also an example of how the borders can be changed.

Graduation caps are square, but the borders are all sized to fit within an 8x10 inch frame. However...many of the borders have repeats that make it easy to add to or remove a section. Which is what I did for the hat!

Cross Stitch Celebrations: Graduation

This is the full Celebration Streamers border. Can you spot what's missing on the hat above?

I also love how different the design looks on the white and black aida fabric. Now imagine changing the color of the streamers and all the other elements!

Obviously, this is just one small glimpse into this project. For more behind the scenes, be sure to watch my Instagram feed, and I'll share more here soon.

The process of designing, stitching, photographing, and writing a book like this is...well...a process. When I finished it, I felt a bit like I was graduating myself. But really, it's more like when you turn in that last assignment. You know that graduation is coming, but you aren't really done. But now, with Cross Stitch Celebrations: Graduation releasing on March 14, that's my graduation date. That's when the party happens.

For now, you're officially invited!