


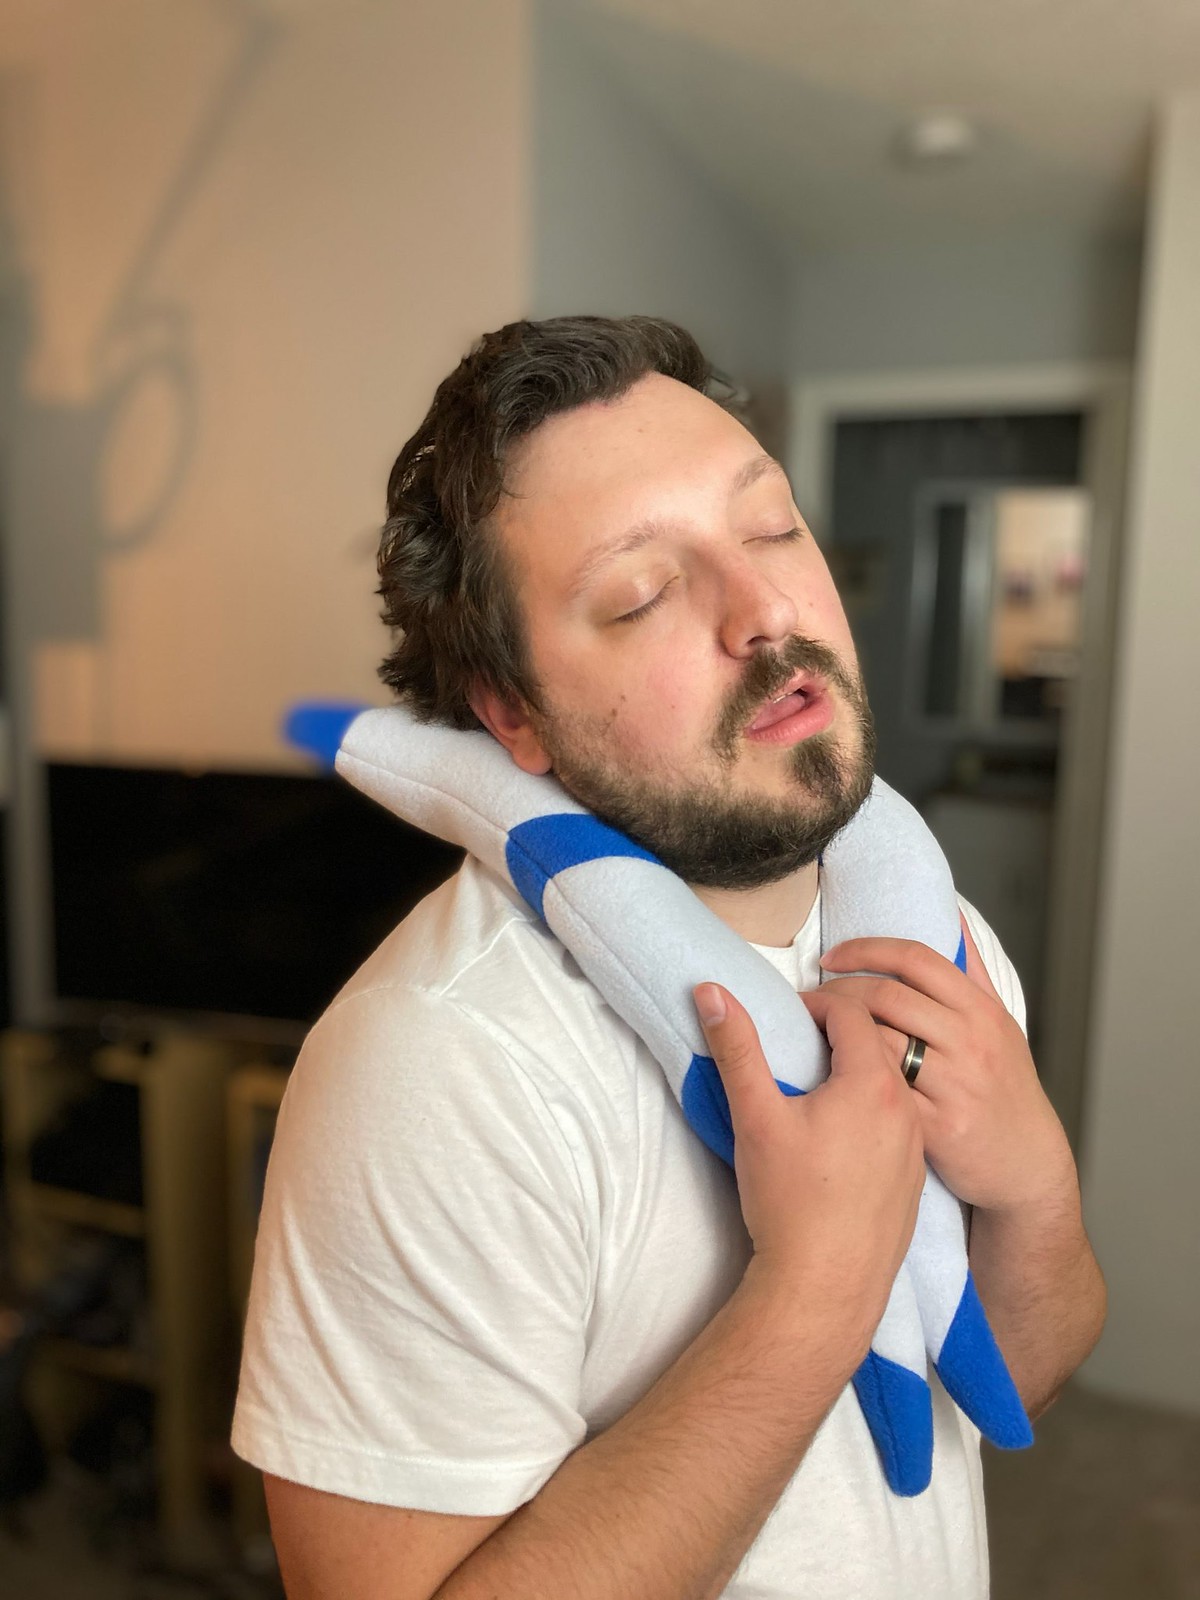
Star Wars Day is upon us (May the 4th!) and I'm so happy to share my latest project inspired by this series of films and now television shows: the Ahsoka Tano Neck Pillow. This pillow is a little silly, but also practical, and sewing with fleece is pretty forgiving. As with many of the Star Wars projects I've made, this was a gift for my brother, who you get to enjoy modeling his present.
Now, let me tell you a little about the process that led to this. It was coming up on my brother's birthday and I knew that I needed to figure out what to make him. Because Ahsoka Tano (SPOILER!) made an appearance in the latest season of The Mandalorian and it was announced that she would be getting her own series, this former Jedi Padawan was my obvious choice. I usually make stuffed figures, and I was mentally processing what that would look like here, when my other brother suggested a neck pillow.
Instantly I pictured it and am so thankful for his brilliant idea!
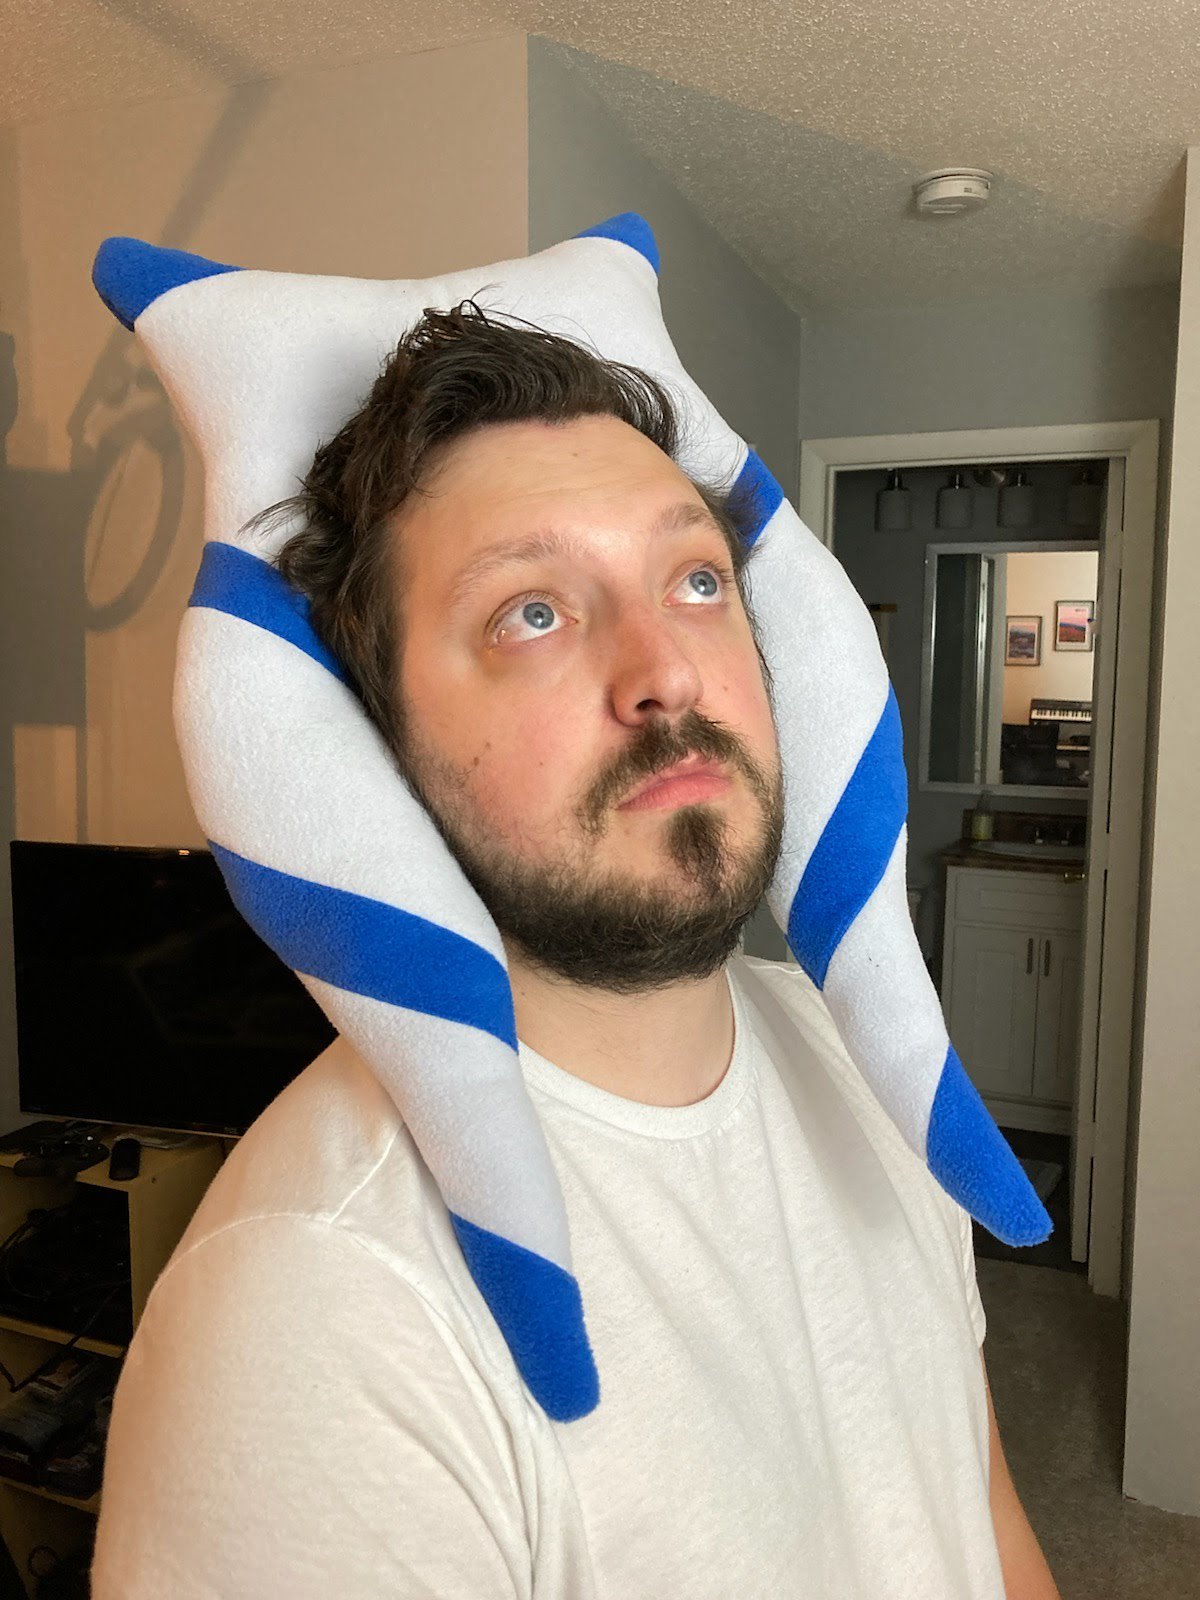
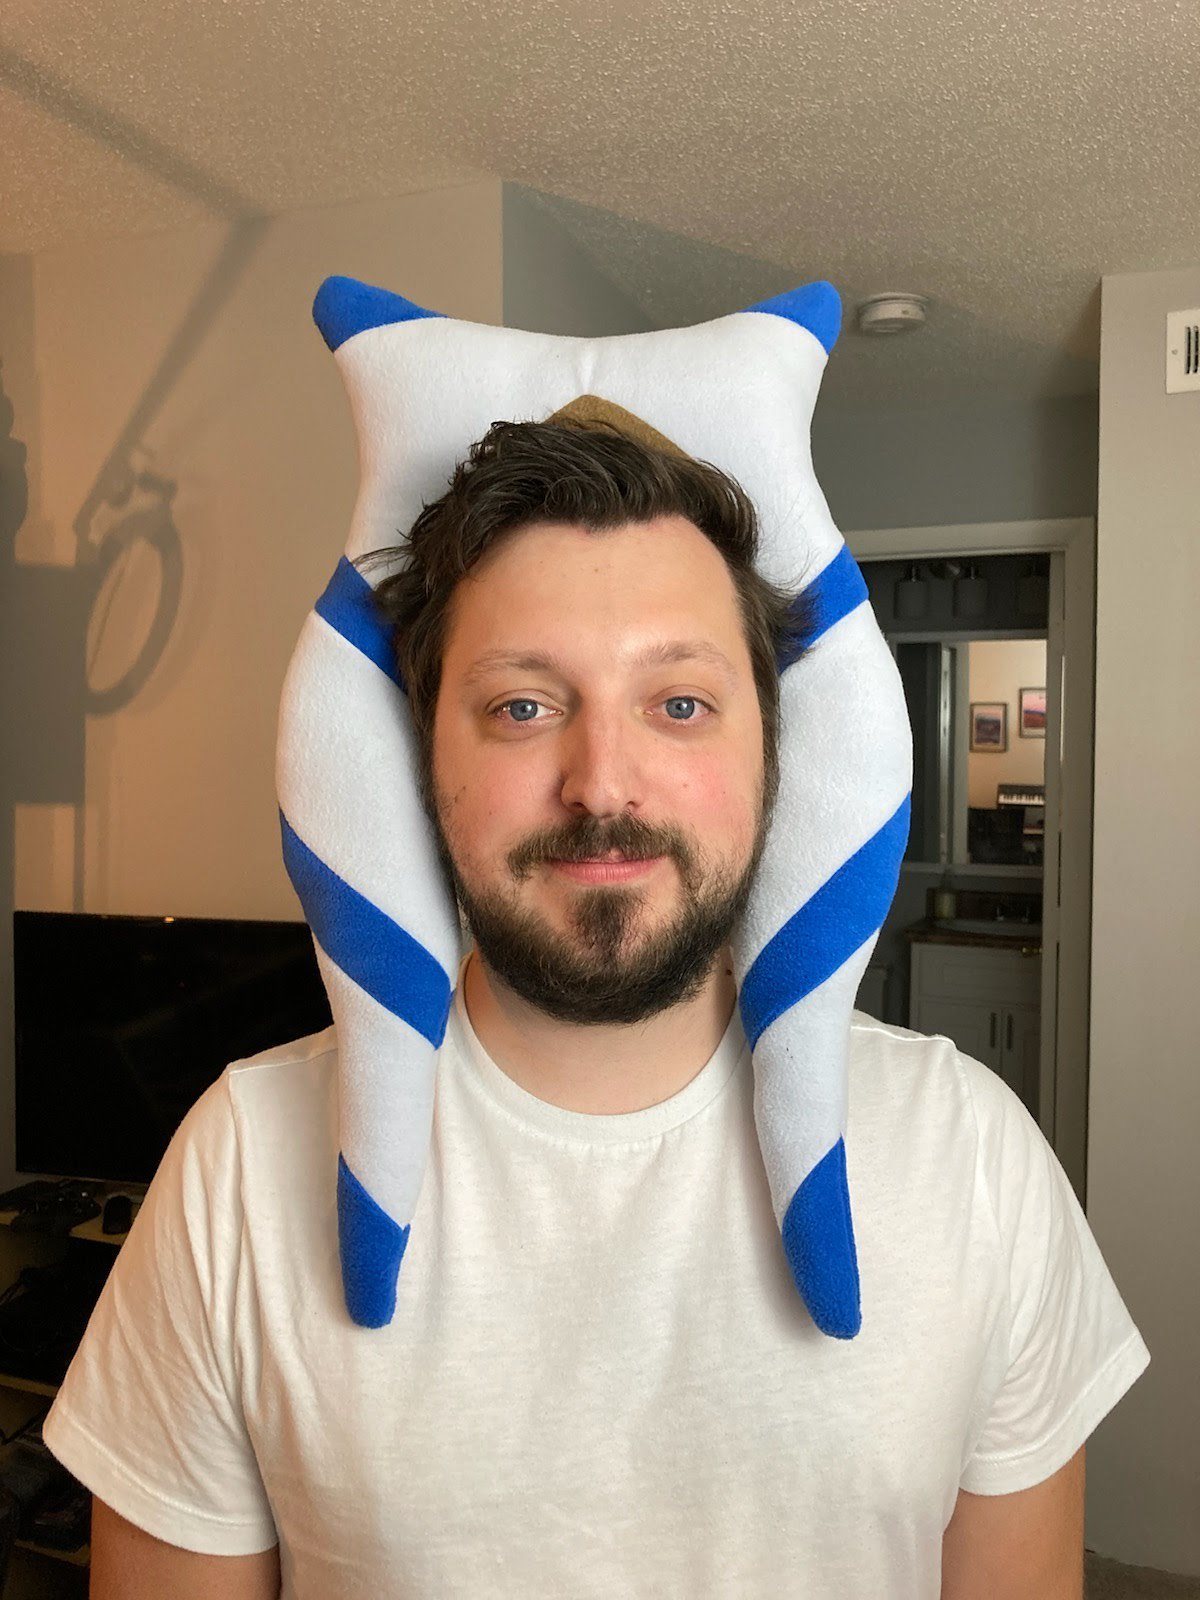
What I love about this is that while it's definitely designed to be worn around the neck, you can also wear it on top of your head to look like Ahsoka! I mean, why wouldn't you? Haha!
As you can see, this corfortably fits an adult male, but it's also suitable for teens. You could probably shrink the pattern if you wanted a much smaller version for little kids, but I'm not sure it would be necessary for elementary ages.
Are you ready to make your very own Ahsoka Tano neck pillow so you can relax and watch your favorite Star Wars episodes? I know you are!

You will need:
Paper and Tape
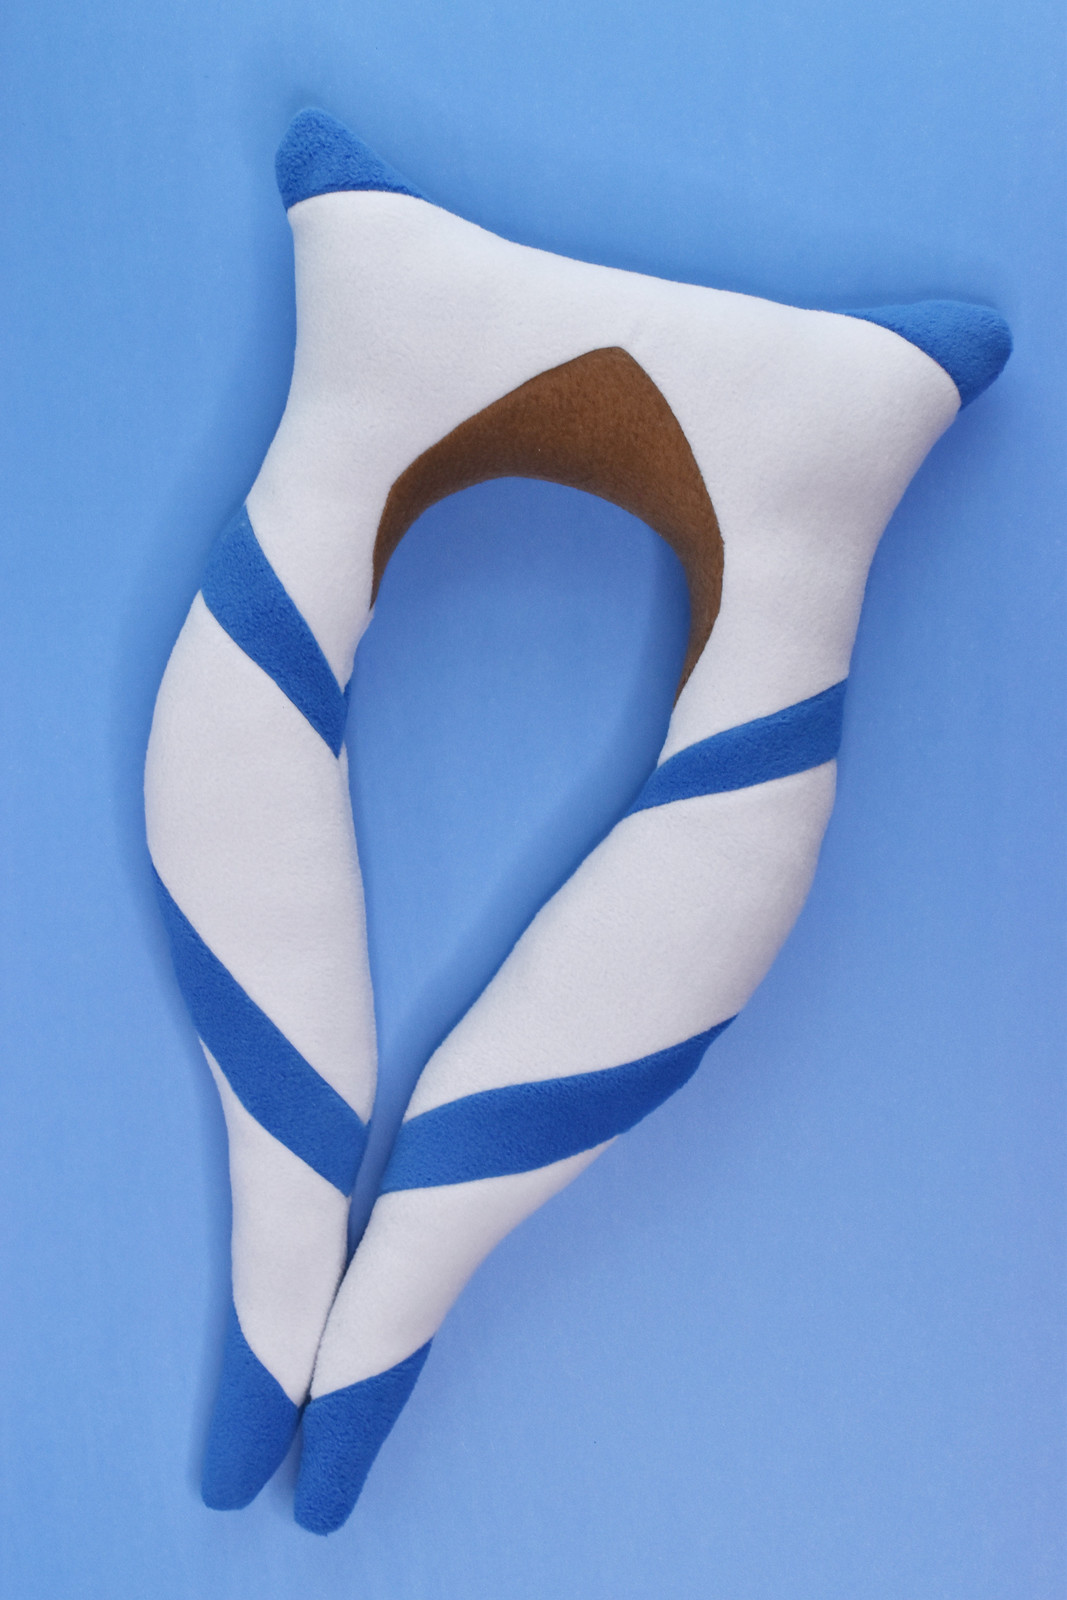
Anti-Pill Fleece in Light Gray (or white), Blue, and Brown
Stuffing
Basic Sewing Tools (including a sewing machine)
DOWNLOAD THE AHSOKA NECK PILLOW PATTERN PDF
A Note About Fleece: You only need a small amount of each color, as you'll see in the pattern pieces. However, because of the stretch, if you're buying fleece by the yard, you need to purchase 2/5 yard of the gray and 1/8 yard of the others. If you have fleece on hand, it's helpful to know that the largest gray piece is approximately 8-1/2 x 13 inches with the long side NOT stretching.
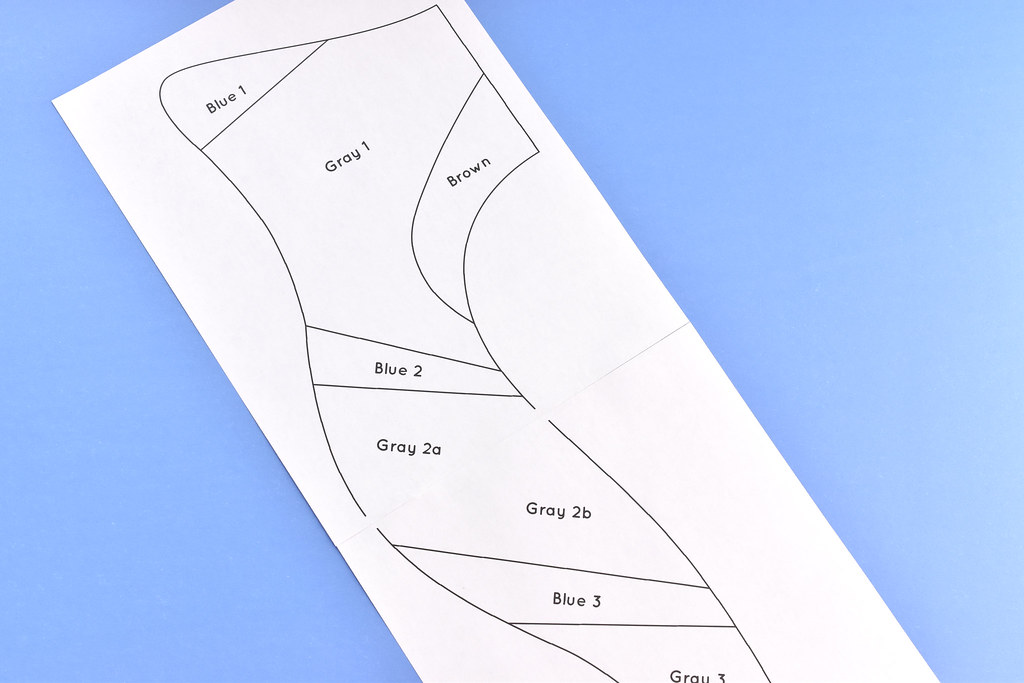
Print the two pages of the pattern at 100%. Tape the pages together so the edges meet. There will be a gap in the printing, but that's okay.
Also, you'll see that the final version is a little different than what's in the photos. I added a line to show which direction the fabric stretch should go.
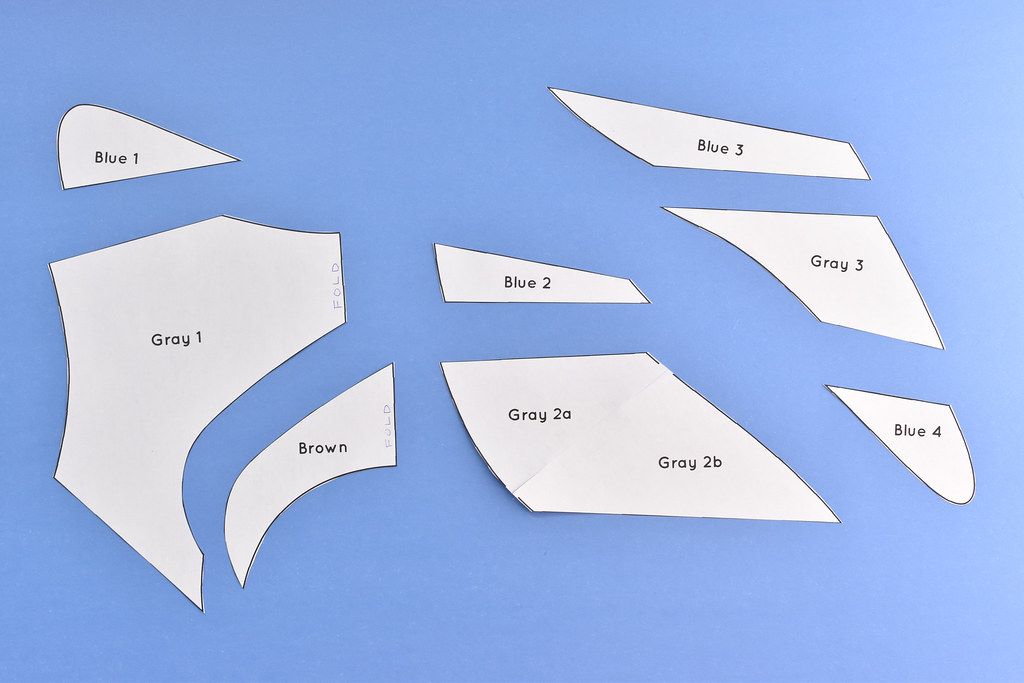
Cut all the pieces apart.
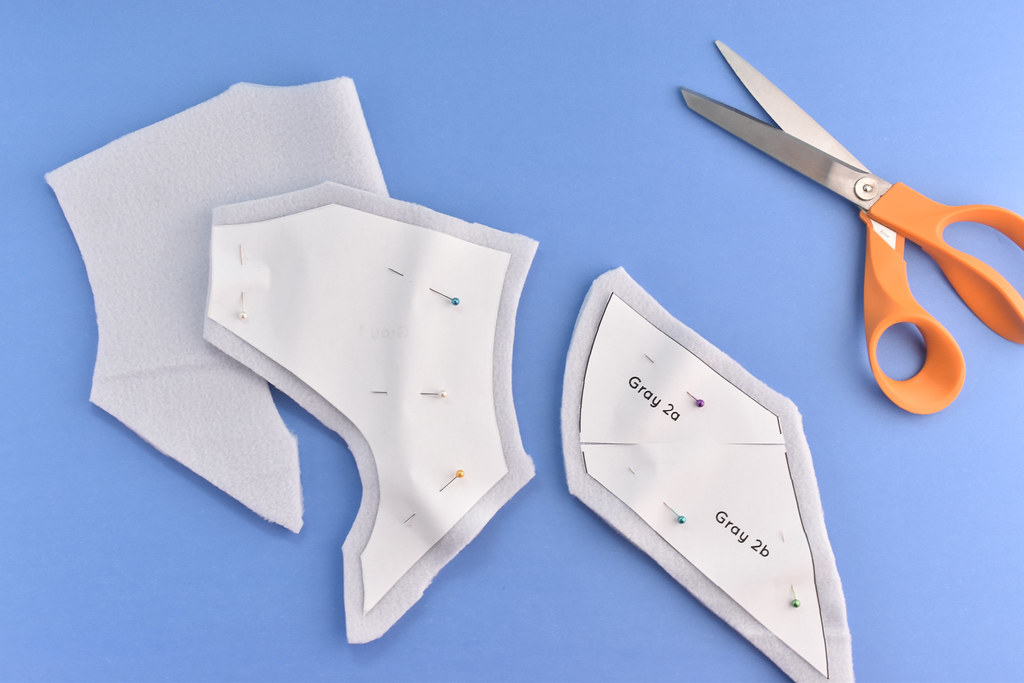
Pin the pieces to the felt and cut them out, adding a 1/4-inch seam allowance.
You need two each of the pieces cut on the fold, and four each of the others (two regular and two mirrored). Remember as you cut these that fleece does have a right and wrong side.

With right sides together, pin the top of the brown piece to the bottom of the Gray 1 piece. Start at the middle and pin towards the edge.

When you finish pinning both sides, it should look like this. Sew this seam with a 1/4-inch seam allowance.

Next, pin and sew the Blue 1 and Blue 2 pieces onto Gray 1. Always remember to pin and sew with right sides together.
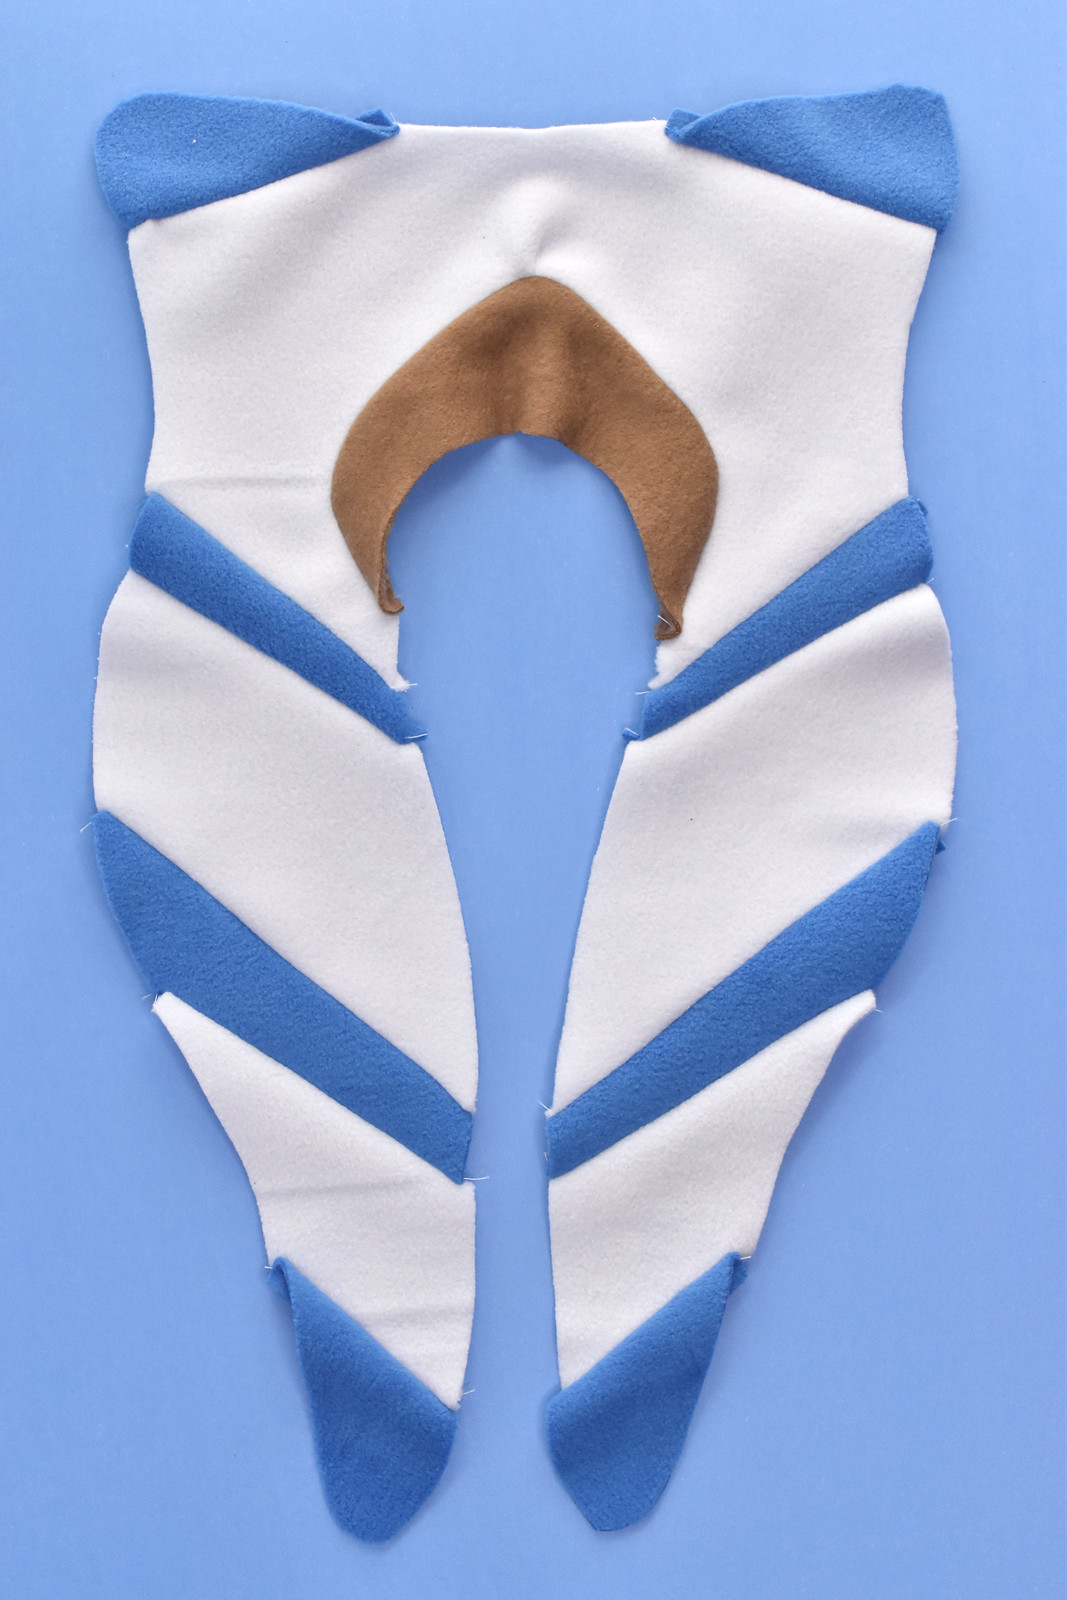
Continue adding pieces, alternating between the gray and blue until you've make the entire shape. Sew a second piece just like this one.
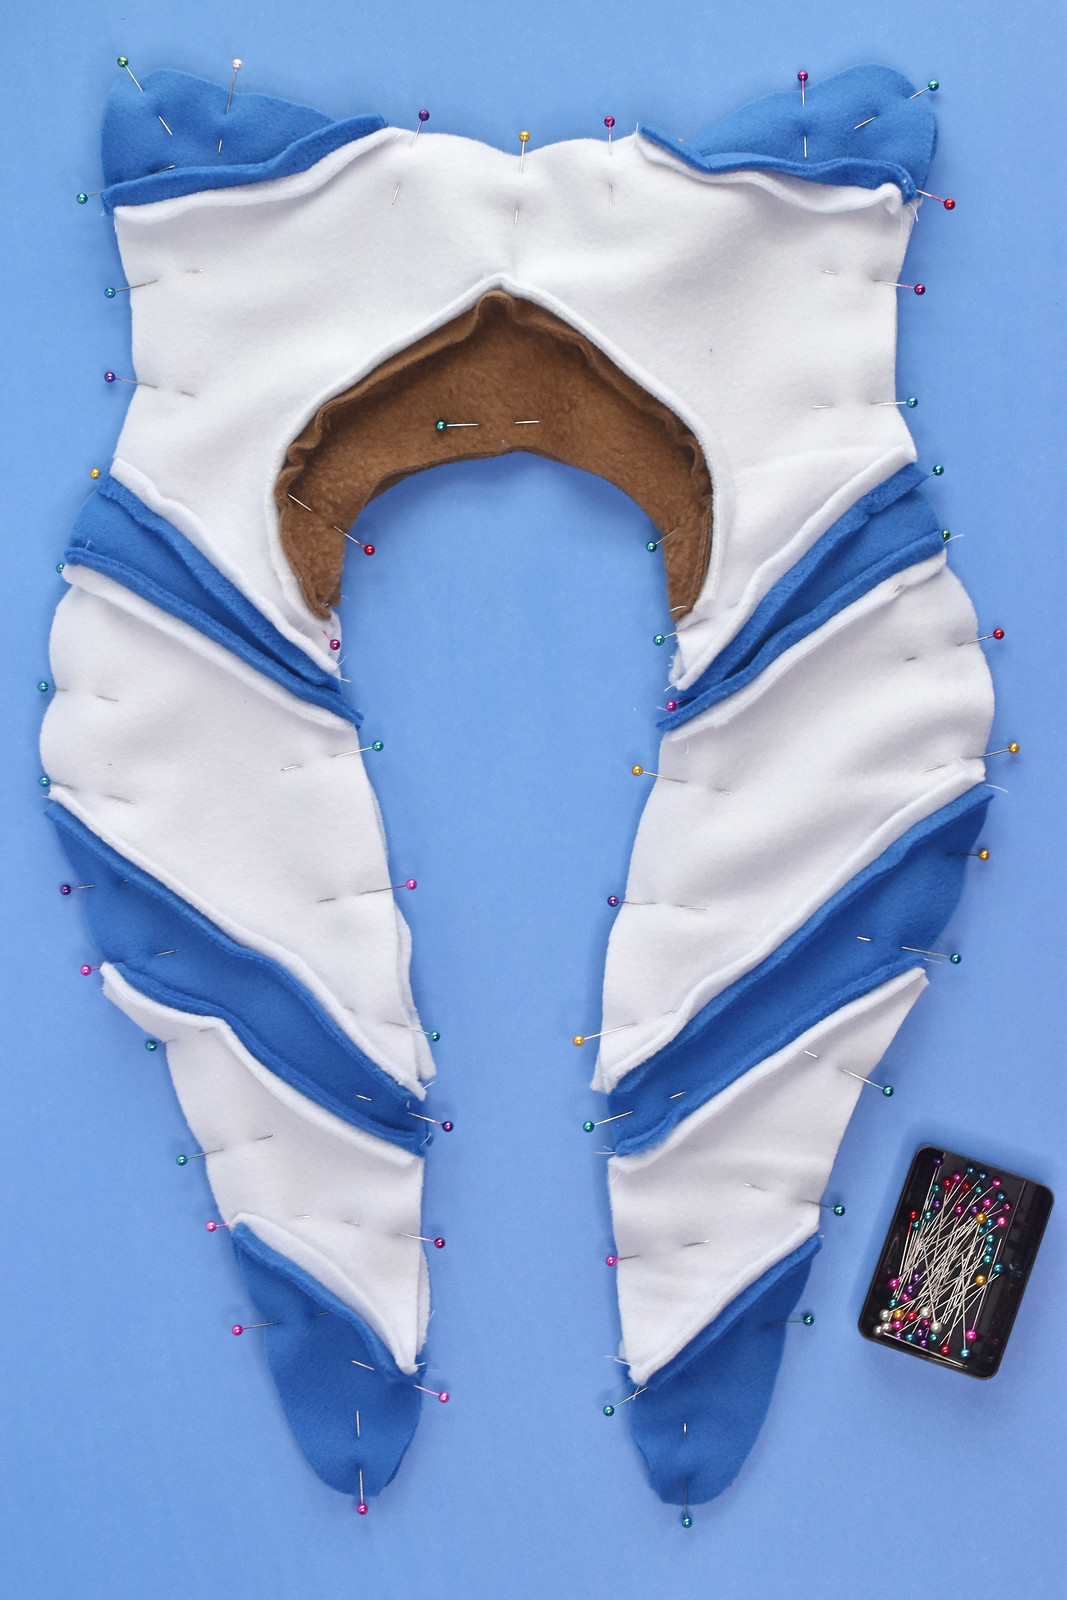
Pin the front and back pieces together. Sew around the edges, leaving a section of the brown open for stuffing. Back stitch at the beginning and end!
Try to match up the stripes/seams, but don't worry about that too much. It's more important to ensure that you are sewing across those seams and you don't have any gaps. Before you turn the pillow right side out, check that all the seams are intact.

Turn the pillow right side out and start stuffing it. Start at the bottom of the head tails (yes, that's officially what these are called!) and fill the pillow so that it's fairly firm. Add the stuffing in small bits so that it doesn't get lumpy.

Sew the opening closed with a needle and thread, using ladder stitch. The fabric stretches, so just take your stitches each about 1/4 inch from the fabric edge.

And now you have an Ahsoka Tano neck pillow! I kinda love it and it was hard to give this away to my brother. In fact, my sister asked me to make one for her too. It hasn't happened yet, but it may still...
Now, my brother doesn't live near me anymore, so I had to mail this off to him and wait to see and hear his reaction. My sister-in-law took these fantastic photos and they're basically recreations of the quick text photos I got when he opened the box. He is silly like this always and I'm not really sure what these are necessarily about, but aparently...

...he felt that this was a big secret? Haha!
At any rate, I hope that you have as much fun making this as I did and as much fun using and wearing this as my brother!
If you loved this project and want to support my work, you can do so by buying me a coffee through Ko-fi. But I do love making and sharing these with you, so there's no pressure!
Finally, many thanks to Hannah Johanson for taking these photos of my brother and her new husband. I promise we warned her about what she was getting into when marrying him.
This is amazing! Just to clarify: Should the dashed lines on the pattern be parallel to the grain when cutting? Thank you for this pattern - I'm excited to make this!
ReplyDeleteYes, the dashed line should be parallel to the stretch grain.
DeleteOh my gosh!! This looks amazing, I love it and will wear it to bed and on planes. It is so amazing. Thank you so much, I hope to see more from you.
ReplyDeleteTHANK YOU