about shop patterns projects printables extras sponsorship wild olive twitter flickr pinterest subscribe
Showing posts with label disney. Show all posts

pattern // it's a small world lyrics embroidery designs

it's a small world!

Love it or hate it, "it's a small world" is a song and Disney attraction that almost everyone has opinions about. Personally, I'm a huge fan. I love the overall vibe, Mary Blair's set designs, and yes, even the earworm of a song. But the meaning behind it all is my favorite. So I decided that it was time for me to make an embroidery pattern (or 3!) to celebrate these lyrics.

I chose a line from each version, including the newest verse that the Sherman Brothers wrote and Disney recently shared and added to the attraction. Then I added a few icons from the ride and the facade.

The designs are sized to fit in a 6-inch embroidery hoop, and I think it would be so cute to stitch all three and hang them as a little grouping. But they would also be perfect for stitching on a tee or hoodie, perhaps to wear on your next park day. Or maybe just for running errands and being around the small worlds we all live in. In times when it feels like things are falling apart, remembering these things can be world-changing, I believe.

it's a small world!
There's so much that we share.

it's a small world!
A smile means friendship to everyone.

it's a small world!
The love we give makes us humankind.

Download the "it's a small world" Lyric Embroidery Patterns

Let's lean into these things. Let's sow love and stitch joy!

PS: If you love "it's a small world" like I do, check out my pattern for making calico goat scrappy hoop art!

project // felt pom snowgies magnets

Snowgies Pompom Magnets

Do you want to build a snowman? Come on, let's go and play with felt poms! Specifically, let's make some little Snowgies from Disney's Frozen!

I promise that this blog is not turning into all things Disney, but as a fan, when I have an idea for something cute to make out of lovely craft supplies, I have to do it. Today's project came to me when I was riding Frozen Ever After at EPCOT. During one scene you see the little Snowgies (and if you haven't seen them, Google them and then watch all the shorts that they appear in...Olaf Presents is especially hilarious).

The moment I saw them (which wasn't the first time), I suddenly envisioned them made from Benzie Felt poms. Fast forward to January, and I got all my supplies and started making them. There was some trial and error, but when I showed this version to my sister, who is a huge fan of Frozen, she gave me the "awwwwwwww" and I knew we were on track.

Snowgies Pompom Magnets

They really are adorable just as they are. They might be fun for kids to play with this way. And I also think there are ways to make them so you could have them sitting to go on a shelf or something. But I've been on a magnet kick lately, so I made mine into magnets that I can stick up near my desk or on my photo clamps just for fun.

Now, let me ask again, a little differently this time...Do you want to build some Snowgies?

Snowgies Pompom Magnets

Here's what you need!

Benzie Felt Balls (affiliate link) in 3 Sizes: Medium, Small, and Extra-Small
Wool Felt Scraps in Black, Light Blue, and White
Magnets (I used super strong ones)
Hole Punch
Scissors
Tweezers
Hot Glue
Tacky Glue
E6000 Glue

Now, I know that three kinds of glue is kinda overboard. You don't have to do this, but it's what I used and here's why: The hot glue is so fast and easy for attaching the poms to each other. The Tacky Glue is a little easier for adding the face. And when using super strong magnets, Benzie recommends E6000 because you really need those to hold to the poms.

If you craft a lot, these are all glues that you should have in your supply storage!

Snowgies Pompom Magnets

Use one medium felt ball for the head, one small felt ball for the body, and two extra-small felt balls for the feet. Attach them with hot glue and press them tightly together so the glue doesn't show.

You can arrange the feet in different ways and if you look at images of Snowgies, you might get some more cute ideas!

Snowgies Pompom Magnets

Use the hole punch to cut out two perfect black circles. If your hole punch struggles to do this, try ironing freezer paper to the felt first. You can also hand cut them if you'd rather.

Cut out the mouth with scissors. The blue part is a 1/2-inch wide half circle. The tooth is a teeny white rectangle.

Snowgies Pompom Magnets

Use Tacky Glue to attach the blue part of the mouth first. I found it helpful to glue the back of the felt piece.

Add the eyes above the mouth. I found it easier to add dots of glue to the head and then add the eyes.

Snowgies Pompom Magnets

Add the teeniest bit of glue to the top of the mouth, then attach the felt tooth. Tweezers are super helpful for this!

Snowgies Pompom Magnets

It's a happy Snowgie!

Snowgies Pompom Magnets

Finally, attach a magnet to the back of the head using E6000 glue. Let this cure before sticking the magnet onto anything else or it may pull off the felt ball.

Snowgies Pompom Magnets

If one Snowgie is good, more Snowgies are better! They can be friends this way, I think that makes them even cuter. You might even try arranging the feet differently or giving them unique facial expressions!

Now my only issue is that I will have the song "Do You Want to Build a Snowman?" in my head for days. And I'm sorry/not sorry if I did that to you as well. We might as well give in and start watching all the Frozen things while we craft!

Psst...if you like Frozen 2, don't miss the embroidery pattern I shared recently! I'm still loving my Do the Next Right Thing hoodie!

pattern // do the next right thing embroidery

DoTheNextRightThing1

In the movie Frozen 2, the phrase Do the Next Right Thing comes up, and Anna even sings about it, and I decided to embroider it! And you can too with my free embroidery pattern!

It's just a little bit kawaii-Mollie, with my signature faces stitched on the crystals around the words.

And I love it's sort of secretly Disney. Only the people who know will know. But the message of Do the Next Right Thing is one that is good for all of us. It's something that I definitely connect with and one that I need a steady reminder of.

I first started thinking about this pattern pretty early in 2024, then decided it would be perfect as a hoodie to wear to Walt Disney World. We had a trip planned for December, so it all felt perfect. Of course, I had all manner of things going on and my Frozen 2 sweatshirt felt like a low priority.

Thinking that I would need to just put this idea off for a while made me sad, but it was fine. And then my mom made a suggestion. What if I were to embroider my hoodie while on the big roadtrip from Illinois to Florida?

And so that's what I did.

DoTheNextRightThing5

Not only did I finish all the embroidery while on the road, but I was able to wear it on our first day of visiting the parks and going to EPCOT, where you can ride Frozen Ever After and walk through spaces that are a lot like Arendale!

Did I take the opportunity to have my photo taken there? Yes, I did!

If you would like to make your own Do the Next Right Thing hoodie (or a tee, or even a pillow or hoop art), you can grab the pattern below. It's sized as I used it for my sweatshirt, but you could print it at a lower percentage to make yours smaller.

DoTheNextRightThing2


For a design of this size, I recommend using Sulky Stick n' Stitch (also called Sticky Fabri-Solvy). It's especially helpful on a thick material like a hoodie.

The colors I used are DMC 964, 958, 156, 211, 3609, and 310. I just tried to space out the colors in a way that wasn't too much of a pattern, but still felt like they were balanced. You could, of course, stitch this in other colors, or all in one color.

DoTheNextRightThing3

For the words, I used three strands and chain stitch, while for the crystals, I used three strands and back stitch. The faces are three strands with French knots and scallop stitch. Like with all my patterns, if the kawaii faces aren't for you, you can just skip stitching them.

DoTheNextRightThing7
DoTheNextRightThing4

Real talk here. Some days life can feel a lot like it did for Anna during the moment of this song in Frozen 2. When I feel that way, I remind myself to do the next right thing. Whatever that might be. Sometimes it's big and sometimes it's small. But do the next right thing.

DoTheNextRightThing6

Happy stitching, friends!

tutorial // muppets christmas carol tees

Muppet Christmas Carol Tees

The Muppet Christmas Carol is an absolute classic so you will love making a custom tee with Gonzo and Rizzo! The characters are made with felt applique, and the come with a fun extra too. But first, let me show you the inspiration (besides the movie!).

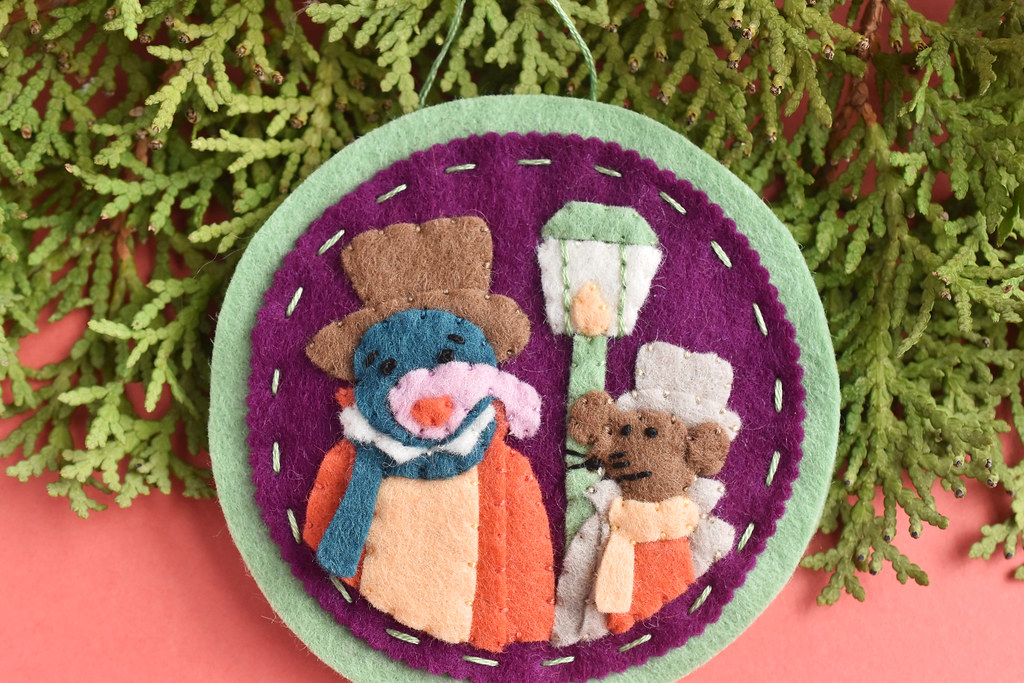
Gonzo & Rizzo in a Muppet Christmas Carol Felt Ornament Last year I made this felt ornament of Muppet Christmas Carol Gonzo and Rizzo with some very tiny pieces. And I used those same patterns to create characters that would fit coming out of the pocket of a long-sleeved tee.

Muppet Christmas Carol Tees

I started with Rizzo, but I couldn't only make Rizzo the Rat, I needed to make Gonzo as Charles Dickens too! And these tees aren't just about the pocket characters, they also have a fun message running down the arms.

In the movie, Gonzo introduces himself by saying "I am here to tell the story" and Rizzo famously says "And I am here for the food."

Well, my sister goes to Disney parks for the food. And with a trip planned, I knew Rizzo's line would be perfect for her! So I made Rizzo for her with his line, and for myself, I made Gonzo. I altered his line a little bit to have it make more sense for me. Because I'm very much about the story, the history, and the full Disney experience (and also the food a bit too...ha!).

So here's what you'll need:

A long-sleeve tee
Wool or wool-blend felt
Embroidery floss
Glue
Stitchable Alphabet deep-etch die from Benzie Design (affiliate link) - optional

DOWNLOAD THE GONZO AND RIZZO PATTERNS

Muppet Christmas Carol Long Sleeve Tee DIY

A lot of this process is like making the felt ornament version. But for this, you may want to pre-wash your tee and the felt to avoid uneven shrinking.

Start by cutting out all of the pieces for your character. Freezer paper makes this a lot easier. Add the embroidery to the pieces.

Muppet Christmas Carol Long Sleeve Tee DIY

Use a bit of glue to hold the pieces in place on the tee. Be sure to place your Muppet into the pocket a little so you can't see the bottom when the pocket opens a little.

Muppet Christmas Carol Long Sleeve Tee DIY

Stitch the pieces down with two strands of matching embroidery floss.

For Rizzo, I used tiny running stitch. And then when I went to make the Gonzo tee, I didn't have the Rizzo shirt in front of me and so I forgot about the runnings stitch and used whip stitch, like I do with my felt ornaments. Either will work!

Muppet Christmas Carol Long Sleeve Tee DIY

Cut out felt letters to add a phrase to the sleeve if you want.

I cut the letters out using the Stitchable Alphabet deep-etch die from Benzie Design (affiliate link). Like with the pieces for the characters, I used a tiny bit of glue to hold the letters in place.

Muppet Christmas Carol Long Sleeve Tee DIY

To stitch the letters, the die-cut letters have stitch markings that let you stitch through the holes. Use six strands of embroidery floss and holbein stitch, also called double-running stitch.

Working in the sleeve is a little tricky at times, but it helps to stitch with the sewing method.

Muppet Christmas Carol Long Sleeve Tee DIY

And now you have a fun shirt celebrating a classic Christmas movie!

Muppet Christmas Carol Tees

The Christmas season is a perfect time to wear this, but especially in a space filled with Muppets EVERYTHING, including PizzaRizzo.

Muppet Christmas Carol Tees

The only thing I might change if doing this again is that I would check the sleeve length FIRST. The sleeves were a tad bit long, and if I knew that, I would have made the lettering higher on the sleeve and maybe a bit tighter. I kept wanting to scooch the sleeves and that wasn't so great for the felt letters.

But I was impressed with how the letters did after a full day at Disney's Hollywood Studios. We'll see how everything does after repeated launderings!

Now, 'tis the season to be jolly and joyous...in an adorable custom long-sleeve tee!

pattern // disney gingerbread cookies

Disney Gingerbread Cookie Felt Ornament

At my house, everyone's favorite treat for the holidays, but also any day, is a Mickey Gingerbread Cookie. And I HAD to make an embroidery pattern of not just Mickey, but some of his pals. But as gingerbread.

The first time my mom had a gingerbread cookie at Walt Disney World, she was hooked. I also had a gingerbread piece from one of the resorts where they have gingerbread displays and it was just so yummy! So I found a copycat recipe and we started making them at home. Simply because we don't want to wait until a trip to the parks to enjoy them!

Along with loving the cookies themselves, we've become big fans of a game called Cookie Swap. It's a simple card game that requires a good memory and a bit of luck, and it's filled with favorite Disney characters all in the form of gingerbread cookies!

With all this love of Disney gingerbread, and with all the Disney Eats patterns I've made this year, I couldn't wait to bake up some new patterns.

You can download the pattern below, which is really four embroidery patterns: Mickey, Minnie, Donald, and Daisy. You can stitch them on anything you like! I made mine into felt ornaments, so I'll show you how to do that too.

DOWNLOAD THE DISNEY GINGERBREAD EMBROIDERY PATTERN PDF

Disney Gingerbread Cookie Felt Ornament

For my ornaments, I used Benzie Design's cinnamon wool blend felt. (affiliate link)

I'll share most of this as a regular tutorial, but first, let me tell you about how this started. I tested out using an iron-transfer pen on felt and my test went great! So I ironed the full pattern and the transfer was uneven and hard to see. So I sort of went over it with pencil.I can't recommend this method, but it is what I did.

I'd probably suggest pre-soaking your felt and then letting it dry, ironing it, and then use Sulky Stick n' Stitch for the pattern. Or you could use tracing paper, but that's a bit harder.

Now for more traditional instructions!

Disney Gingerbread Cookie Felt Ornament

Use three strands for everything. Embroider the outline with chain stitch. Stitch the eyes with scallop stitch (and straight stitches on Minnie and Daisy!). Embroider the mouths and other details with back stitch. Embroider the solid noses, rosy cheeks, and Mickey's large buttons with satin stitch.

Use French knots for small buttons. Stitch the zig zags on the arms and legs with zig zag chain stitch.

Disney Gingerbread Cookie Felt Ornament

Trim around the outside of the embroidery, leaving about 1/4" of felt showing. This makes it look more like a decorated cookie!

Disney Gingerbread Cookie Felt Ornament

Apply a thin layer of craft glue on the back of the embroidered cut out.

Disney Gingerbread Cookie Felt Ornament

Cut a 6-inch piece of string or embroidery thread and tie the ends together with a knot. Glue the knot at the top center of the ornament.

Disney Gingerbread Cookie Felt Ornament

Press the glue side down onto matching gingerbread felt and let it dry. Be sure it's drying flat!

Disney Gingerbread Cookie Felt Ornament

Cut around the cookie, holding the ornament hanger out of the way.

Disney Gingerbread Cookie Felt Ornament

Now Mickey is ready to hang on your tree!

You can, of course stitch the layers of felt together instead of gluing them. But what I like about the glue is that it also gives the felt some stiffness and that's nice for a cookie like this.

Disney Gingerbread Cookie Felt Ornament

Now I just need to stitch up more of the characters...and then design even more cookie patterns!

project // disney churro felt ornament

Disney Churro Felt Ornament

Who doesn't love a good churro? And it's even better when it comes from Disneyland! So I'm honoring this classic snack in a felt ornament.

Now, I started this by saying that churros at Disneyland. And I stand behind that. Normally when I talk about Disney snacks, I include Walt Disney World in the mix, but this is a time where the Disneyland (and Disney's California Adventure) churros are superior. So many options! So many flavors!

Here are two amazing ones I've had:

Peach cobbler churro at DCA
Disney Eats!

The first was peach cobbler and the second was almond cookie flavor. So good! Almond Cookie Churro at DCA

The only sad thing is that these flavors don't stay around for long so you won't find these at the parks right now. Maybe the almond cookie one will come back for the Lunar New Year's celebrations though!

Of course, the good part is that there are always new flavors to try. It makes me wish I lived closer and could try them all on rotation.

Disney Churro Felt Ornament

For the felt ornament version, I went for the orginal churro. They are just as tasty as the fancy ones!

The stitching is tiny, but those lines really make the shape stand out.

Disney Churro Felt Ornament

Like my other Disney snack felt ornaments, I don't have a full tutorial. Just a little overview of the process. They go together pretty much like my other felt ornaments.

The felt is wool blend from Benzie Design (affiliate link). I cut the all the circles with my Circles and Scallops die, also from them, but you can use the circle templates in the PDF with plain or decorative scissors if you'd like.

Cut out the pieces with freezer paper, and embroider the face and lines through the paper before carefully tearing it away.

The pieces are stitched down to the front circle with a tiny whip stitch and two strands of embroidery floss. If you want to add extra toppings for your churro, you could stitch those on too!

To assemble the ornament I used running stitch around the edges, then I filled in with a second round of running stitch so it looks the same on the front and back.