about shop patterns projects printables extras sponsorship wild olive twitter flickr pinterest subscribe
Showing posts with label EPP. Show all posts

project // epp biscornu

EPP Biscornu Pin Cushion

Have you ever stitched a biscornu? It's a type of pin cushion with an unusual shape. Last year I made a cross stitch pattern for a mushroom-themed biscornu (cross stitch is probably the most common way to make these), but I wanted to try using English paper piecing.

For full disclosure, it was actually that I found these adorable heart buttons and I knew they'd be perfect on a biscornu. But yes, I did also want to use EPP to see if it would work the way I anticipated. And I think I can safely say that it did work! In fact, this turned out exactly as I expected and now I want to make more. Perhaps with some embroidery next time.

But for now, a simple biscornu that's just in time for Valentine's Day.

EPP Biscornu Pin Cushion

The design for the the piecing is based on a bow tie quilt block, but I used one fabric for the center square and another fabric for all the rest. It's slighly different on the bottom. I wanted a way to show off the heart buttons while making this easy to sew by hand. If you've ever sewn a biscornu, you know that it can be a little mind bending. The EPP shapes made it simple to follow.

I'm not going to go through the basics of English paper piecing here, but if you need help, I have a few YouTube videos.

You will need:

Fabric
Cardstock
Scissors
Glue stick
Needle and Thread
Stuffing
Sewing Clips or a Pin
Two Buttons (those with 2 holes are easier to use)

DOWNLOAD THE BOW TIE EPP TEMPLATE PDF

EPP Biscornu Pin Cushion

Print the templates on cardstock, cut them out, and then baste the fabric on the pieces. I recommend thread basting for this, but you don't need to stitch through the templates.

Assemble the top and bottom into the bow-tie block design.

EPP Biscornu Pin Cushion

With the right sides facing, stagger the top and bottom pieces as shown. Each side of the square has two sections, so you can align the ends of the staggered sections.

Sew the overlapping section with tiny stitches. Because this is a pincushion, there will be some stress on the seams.

EPP Biscornu Pin Cushion

When you reach the end of the first section, it will look like this.

EPP Biscornu Pin Cushion

Fold the entending end down to meet the edge of the section that is "around the corner." Pinch it together and continue sewing.

Repeat this process around the edges. It will feel weird at times, but as long as you sew the next section of the top to the next section of the bottom, it will work. This is why the EPP sections help you keep the stitching even and guide the process.

EPP Biscornu Pin Cushion

When there is just one section left to sew, it should look like this. You can see the shape of the biscornu now. At this point, I recommend knotting the thread, but leaving it connected.

EPP Biscornu Pin Cushion

Remove all of the templates and turn the biscornu right side out. Gently poke the corners into shape.
EPP Biscornu Pin Cushion

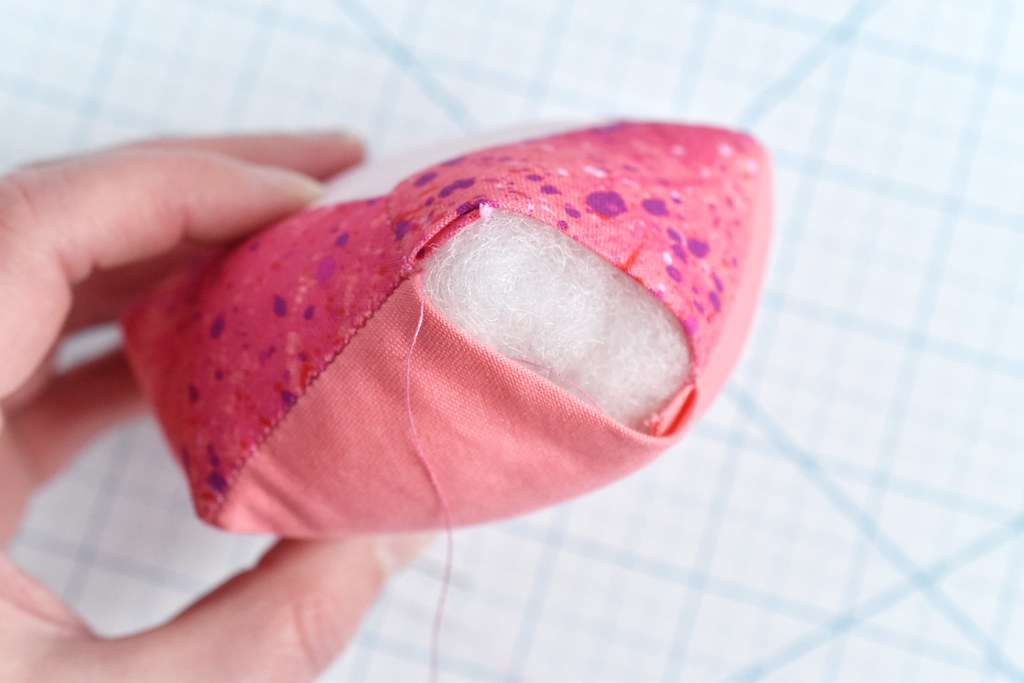
Fill the cushion with stuffing, working it into the corners. You want it full and firm-ish.

EPP Biscornu Pin Cushion

Clip or pin the open edges together. Use your thread that's still connected (or start a new one) and sew the opening closed. To make this as invisible as possible, I used ladder stitch. Again...tiny stitches!
EPP Biscornu Pin Cushion

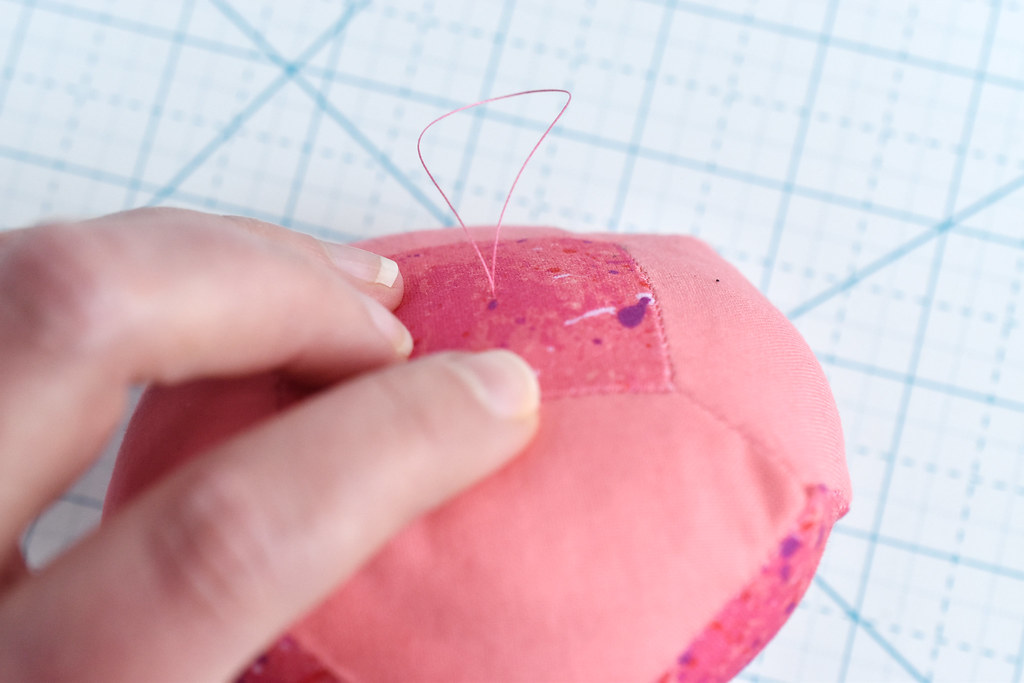
You can leave it just as it is, but to add a button, thread your needle with a doubled piece of thread. A longer needle is helpful here. The ends should be through the eye of the needle with the folded loop at the other end.

Come up through the center of the biscornu, leaving the thread loop exposed.
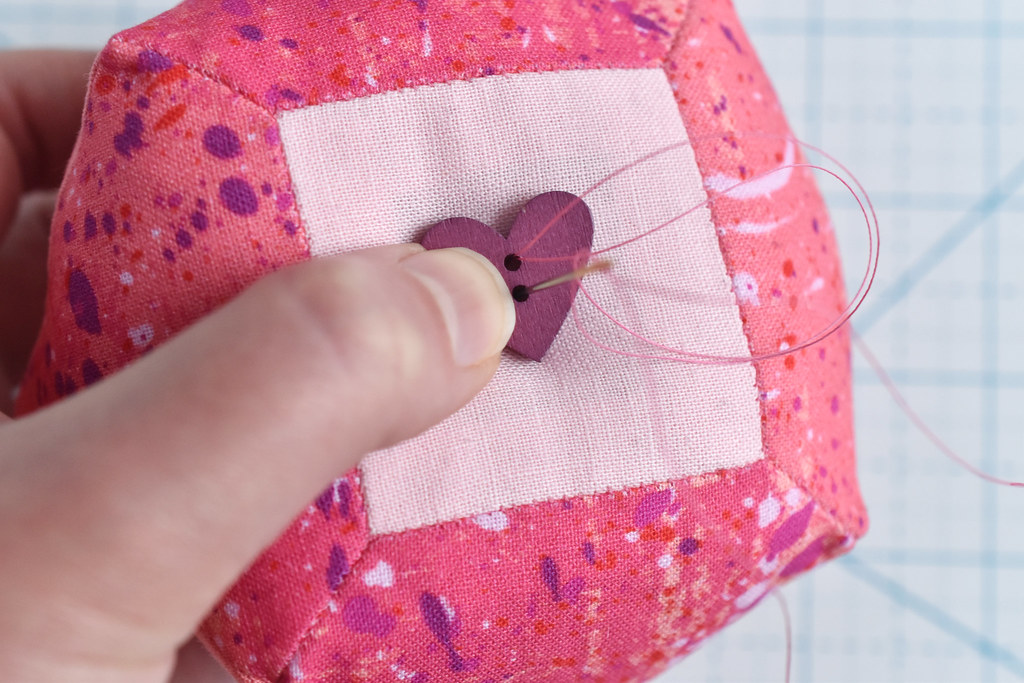
EPP Biscornu Pin Cushion

Thread a button onto the thread and then go back down through the button and the biscornu.
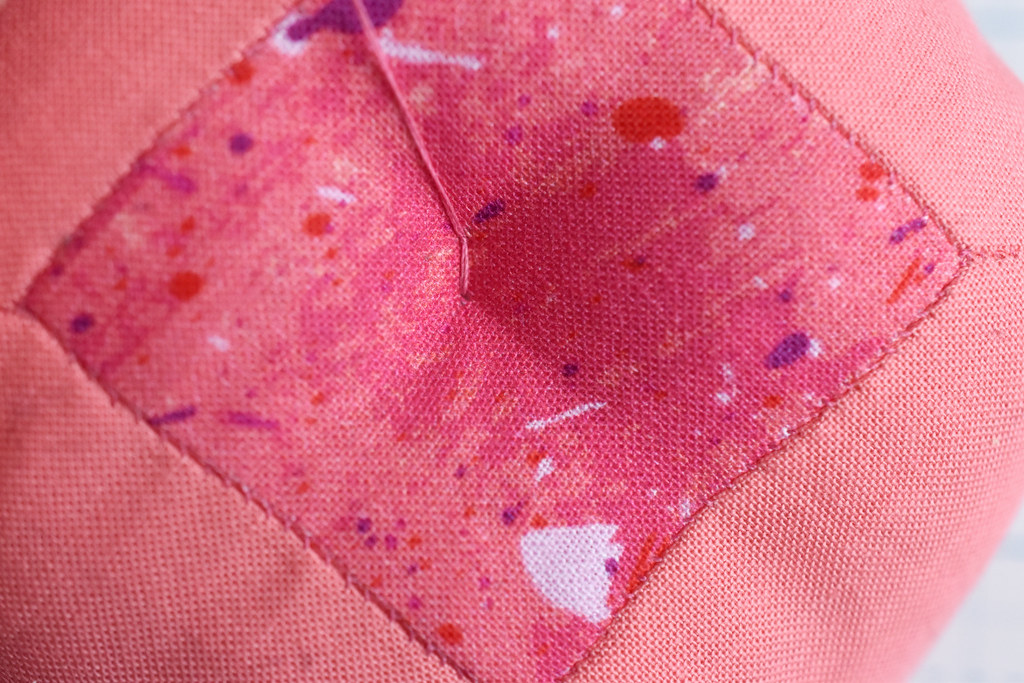
EPP Biscornu Pin Cushion

Bring the needle through the loop of thread and pull it tight to secure it.

EPP Biscornu Pin Cushion

Add a second button, and go back through the biscornu, pulling the thread enough to draw the center in slightly. It gives your pin cushion a little dimple in the middle.

Go back and forth from the top and bottom a few times, working through the button holes (this is the trickiest part!).

EPP Biscornu Pin Cushion

End off the thread with a secure knot. I tied mine around the button stitching, plus added a knot and popped it through the fabric, all hidden under the bottom button.

EPP Biscornu Pin Cushion

Obviously I had to find all my pink and purple pins so I could coordinate the whole thing! I love the way the sides come up and show off the fabric from the bottom. It really just makes me smile!

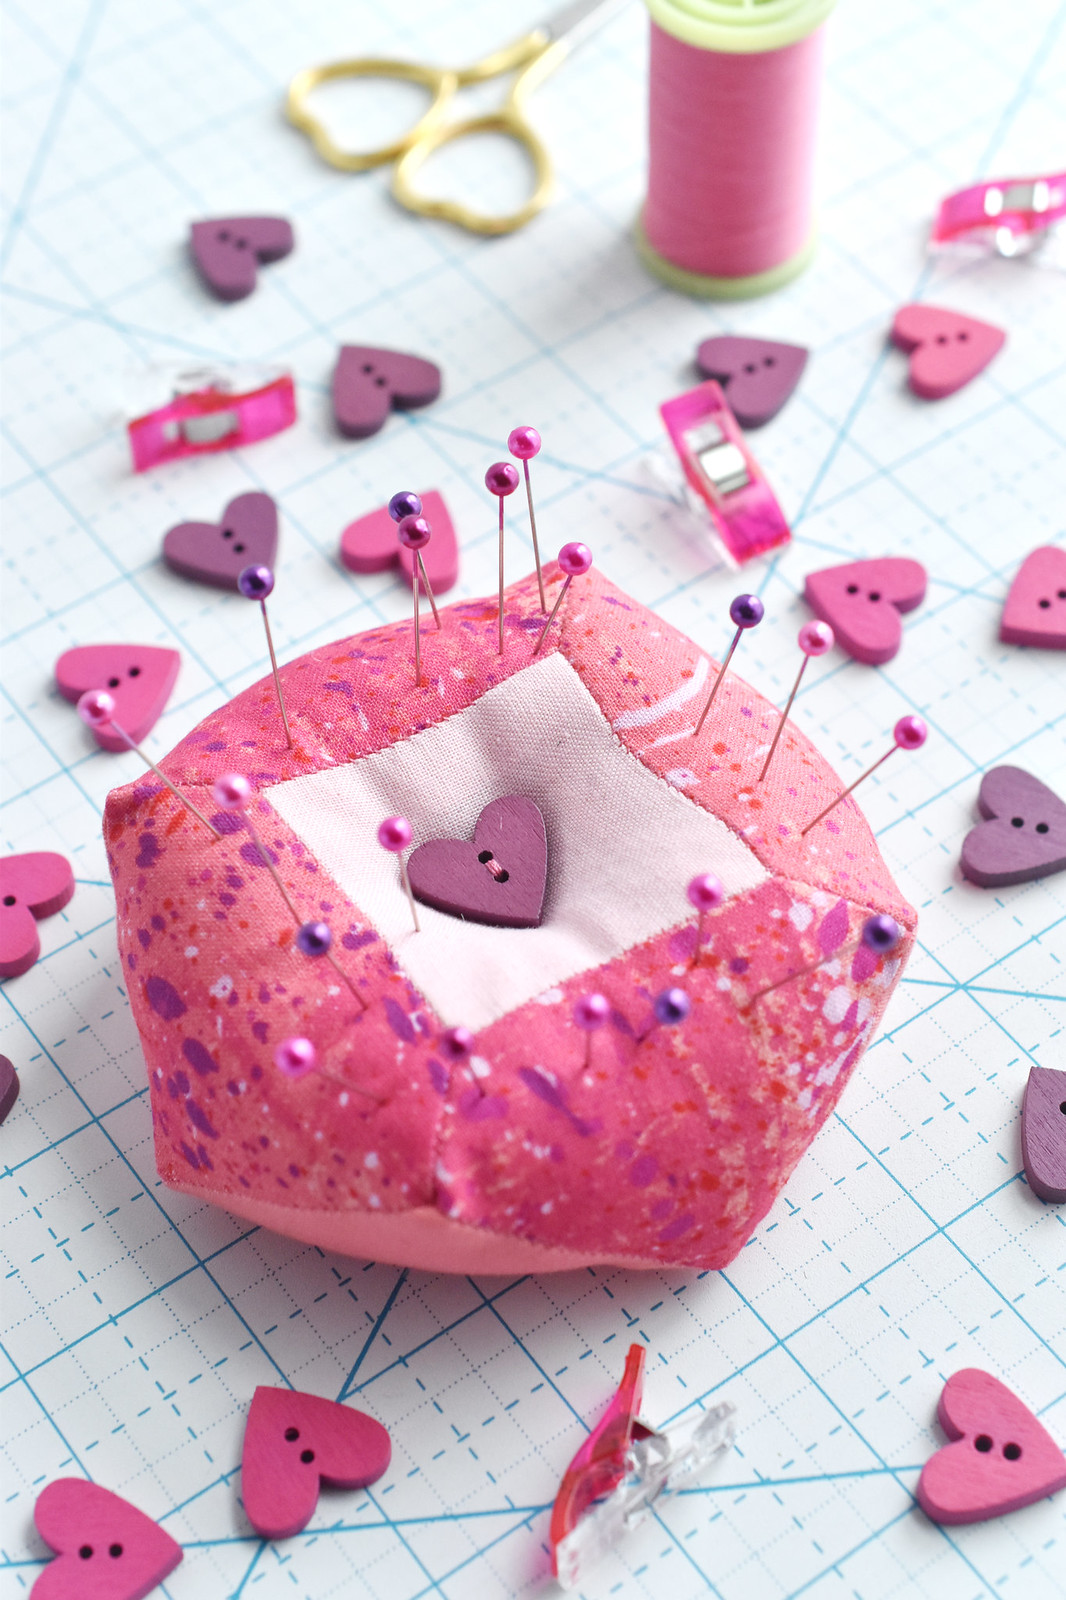
EPP Biscornu Pin Cushion

What do you think? Should I try some more biscornu EPP patterns...maybe with embroidery too? By the way, if this looks entirely intimidating to you, I promise it's actually pretty simple and quick to stitch up. Give it a try!
introducing the kawaii alphabet stitching club!

Kawaii Alphabet Stitching Club

It's time for another Wild Olive Stitching Club! And if you love my kawaii style, you're going to love this one. The Kawaii Alphabet Stitching Club features 26 super cute embroidery patterns and a unique English paper piecing pattern to make a lap quilt.

Everything in this is about super cute stitching and connecting with a group of fellow stitchers as you craft something special. More than any of my clubs before, I'm not showing off the patterns so it can be a surprise for those who like the mystery. But I have plenty of information for you and you can always ask if you have questions!

Embroidery

Embroidery is the heart of the project and it's what ties everything together. The theme is kawaii alphabet, which means super cute objects and animals that represent the ABCs (of the English alphabet). Many of the designs are iconic of the Japanese kawaii aesthetic, but they are all things that you'll recognize in one way or another. The patterns are a secret until they are released each week, but there are a few sneak peeks that lurk around here...

The patterns all have their accompanying letter as part of the design, along with some cute little elements all around. They're larger than most of the stitching club patterns I've made before (about 3-4 inches), but they're still fairly quick to stitch up. The size also makes them ideal for embroidering other projects that aren't part of the quilt that we're making.

When starting this project, it's best to know a few basic embroidery stitches.

English Paper Piecing

If embroidery ties everything together, English paper piecing or EPP is what literally holds everything together. This technique involves attaching fabric to cardstock templates. Those templates make it easier to put everything together...without a sewing machine! Each alphabet pattern becomes part of the larger hand-stitched project. A lap quilt, to be precise. You could make it into a giant wall hanging in child's bedroom or you can actually use it while cuddled up on the couch and watching something super cute!

Hand sewing a quilt together isn't a fast process, but EPP makes it easy, precise, and portable. The shapes are a mix of hexagons, squares, and a special shape that's like a skewed hexagon. Mine is made with kawaii, candy-colored solids, but you can use any fabrics you like. One person suggested to me that the large pieces would be great for showing off some of the larger scale prints that don't always work for English paper piecing!

And it's okay if you've never tried EPP before, because I'll show you the basics!

Community

This is a stitching CLUB, not just a project. When you sign up, you get patterns and tutorials, but you also get to connect with others who are stitching along. And thanks to a new site where I'm hosting the club, that will be easier than ever. Club members can comment and interact, as well as upload images of their progress.

There's no pressure to participate or interact, and you don't even need to stitch at a set pace. But connecting with others can really help you stay on track to finish your project!

Kawaii Alphabet Stitching Club

All the Details

If you've never done one of my stitching clubs before, here's what you can expect:

• New pattern PDF released every Monday while the class runs (if you join after the start, you'll instantly have all the previously released patterns and content).
• Printable templates for the English paper piecing (available as soon as you join)
• English paper piecing instructions
• Lap quilt finishing instructions
• Kind folks who love stitching cute things as much as you do

If you've done one of my stitching clubs before, you can also expect these new features:

• An online portal to access everything all in one place (no hunting for all the emails!)
• Video tutorials along with written instructions
• A private community to interact with other club members and share your photos

The entire club lasts for about six months because that's how long it will take to get through the alphabet with one letter a week. I've set it up this way so you can work on the embroidery and EPP week by week at an easy pace. That means we'll be finishing in November, with just enough time to catch up (if needed!) by the end of the year and gift-giving season. But also, it's completely okay to let this take longer than the six months. You'll be able to come back to the patterns and tutorials after the club ends.

The Kawaii Alphabet Stitching Club launched on May 29, 2023, but you can join any time!


I really can't wait for you to see all of these adorable alphabet patterns and stitch along with me and a fantastic community of super cute stitchers!

blog tour // purr-fect patchwork by pamela jane morgan

PurrfectPatchwork_Blog_Flatlay

Do you love sewing and cats? Do you know someone who loves either of those? Yes? I thought so. And you're in the right place. Because today I'm sharing something paw-sitively delightful: The Purr-fect Patchwork Blog Tour! This brand new quilt book by Pamela Jane Morgan is filled with quilts, bags, and sewing accessories, each showing off adorable kitty cats.

Part of this blog hop is about showing off Purr-fect Patchwork, and part is about a giveaway! But before we get to the giveaway and the rest of the stops on this tour, let me show you what I made. I decided to try something a little different with one of these super cute designs, so are you ready?

Purrfect Patchwork Blog Tour


I pulled out some bright fabrics to stitch together a very sweet kitty. Working on this was so much fun and I loved seeing the tiny pieces come together.

Purrfect Patchwork Blog Tour

Okay, but you know what? If we're talking about a book filled with cat-themed projects, Darcy Cat simply MUST be part of this right? Thankfully, she obliged and jumped in to a little photoshoot!

Purrfect Patchwork Blog Tour

Just look at this helpful little kitty! She officially approves of this pattern.

PurrfectPatchwork_Needlebook
PurrfectPatchwork_Needlebook2

The project I chose to work with is the Tale of Two Kitties Needle Book. (Don't you just love it? And isn't that sewing machine amazing?) What's unique about this project (besides the kitty piecing) is that it's not just a needle book, but also a little sewing pouch. It's purrrrrfect for keeping with your embroidery or English paper piecing.

Purrfect Patchwork Blog Tour

Speaking of paper piecing, the original instructions call for using foundation paper piecing to make the cat sections as well as the row of flying geese. I won't go into the details of sewing FPP, but basically it involves sewing the fabric and the paper in a way the adds precision piecing without the cutting getting to complex.

I have done foundation paper piecing exactly one time, but I have used FPP patterns to do my favorite technique: English paper piecing. Here's how that goes.

Purrfect Patchwork Blog Tour

For this, I cut apart all the pieces from the FPP pattern. And then as soon as I did that, I realized that there were a couple pieces that I could baste without cutting the sections apart. So I recut them together.

This is one of the things that you can and should look out for when using FPP patterns for EPP.

Purrfect Patchwork Blog Tour

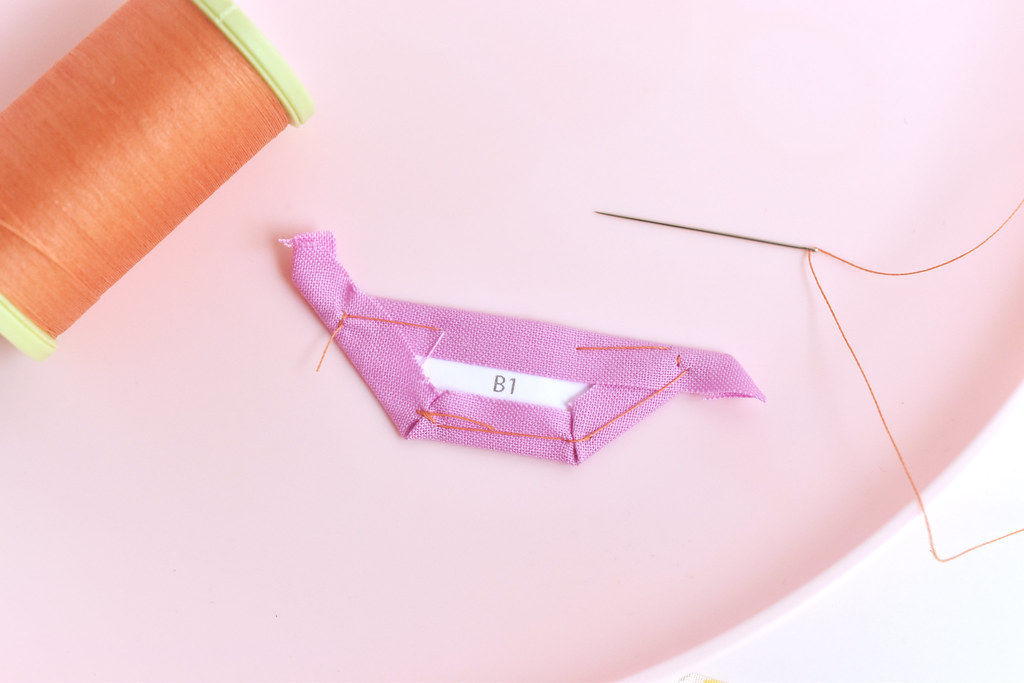
Now we get into standard English paper piecing. I glued the paper pieces to the fabric...

Purrfect Patchwork Blog Tour

...cut all the fabric...

Purrfect Patchwork Blog Tour

...and started basting the pieces. Most of the pieces are small, so I could just stitch through the fabric. A few are larger and I stitched through the fabric and paper. If you've never done this before, you can see how I baste pieces in this video.


Purrfect Patchwork Blog Tour

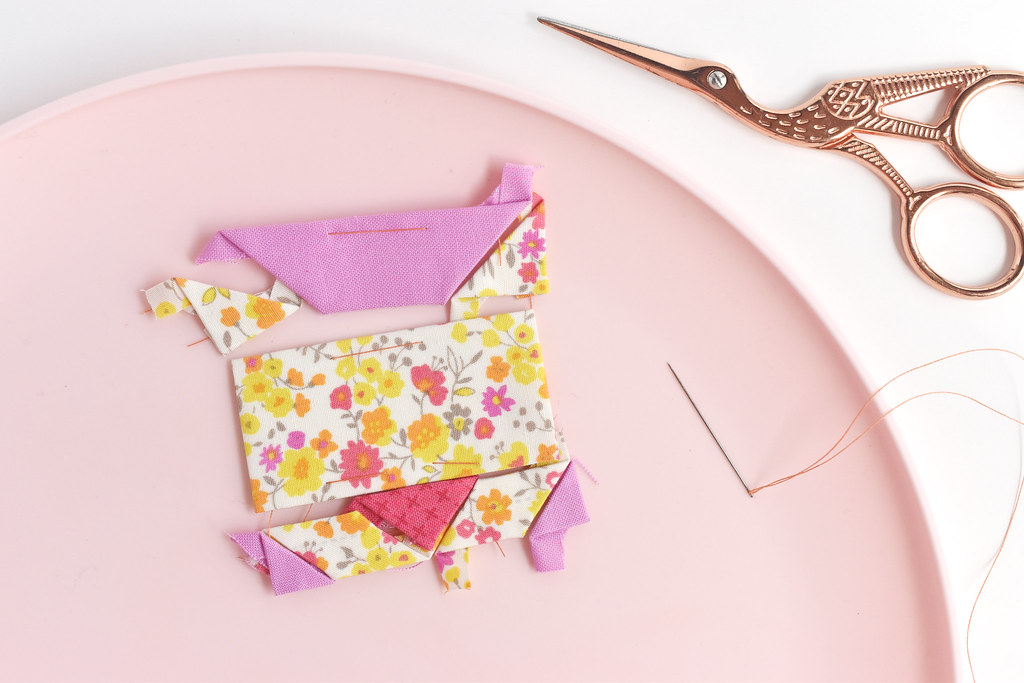
With each new kitty piece basted, I added it in and it was like making a puzzle!

Purrfect Patchwork Blog Tour

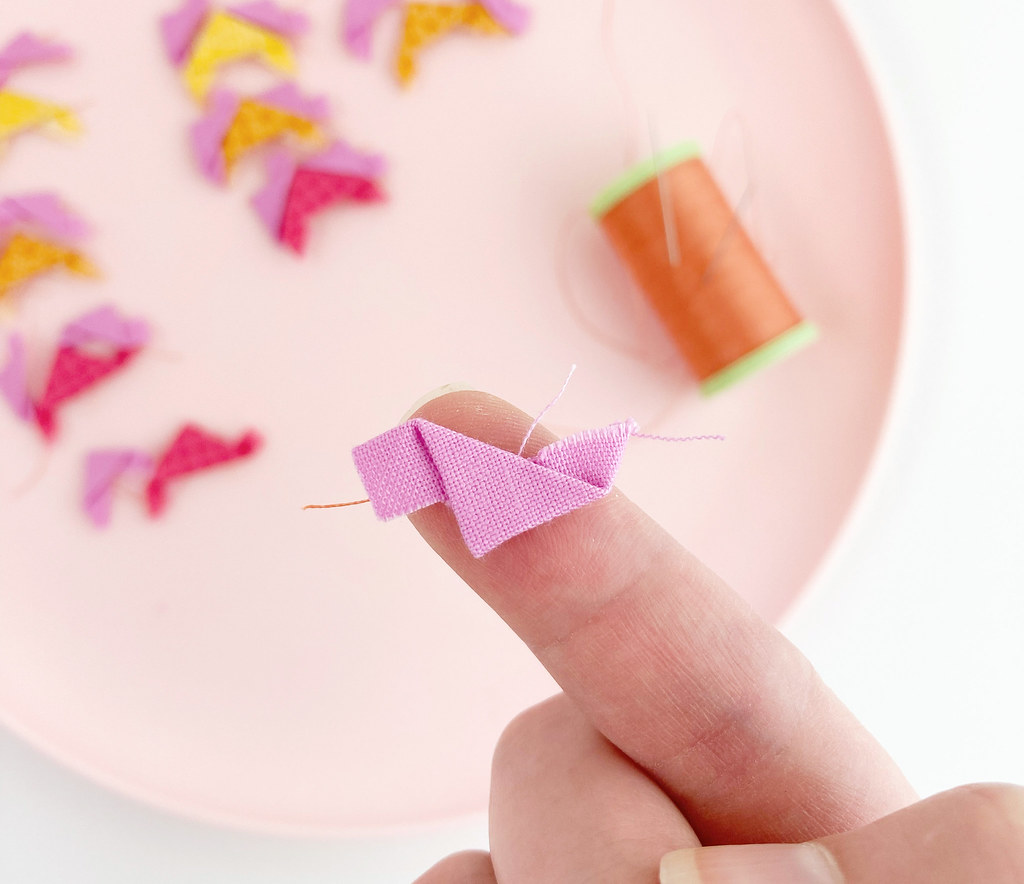
Also, I have to point out that these are the tiniest EPP pieces I've ever worked with. Like, tiny tiny.

Purrfect Patchwork Blog Tour

One of the great things about tiny pieces is that they join together in a hurry! I used whip stitch for this project.


Purrfect Patchwork Blog Tour

Just look at these itty bitty flying geese coming together! I'm a sucker for flying geese and I've always thought they would be fun in EPP. Now I know that I can do it!

Purrfect Patchwork Blog Tour

Now if you noticed in the background of one of those photos, I also basted these extra pieces that are the add on pieces for making the needle book. Here's where things went a little sideways in the transfer from FPP to EPP.

I based the sizes of the pieces off of what sizes were listed for these when sewing them on traditionally. But what I didn't account for was how the overall size of the sewn together EPP would expand slightly because of the thickness of the seams. When I went to sew them on, they were a "litter" bit off and the pieces just didn't match! Womp, womp.

I was left with two options: make new templates and try again or remove the EPP papers and sew them on traditionally.

At this moment, I've hit paws. But I'm leaning toward making new templates so that the whole front of the needle book is hand pieced.

Purrfect Patchwork Blog Tour

Darcy agrees!

Now, let's get to this giveaway. Pamela and C&T Publishing are giving away an eBook copy of Purr-fect Patchwork. To enter, leave a comment on this post and enter your info through Rafflecopter. The giveaway ends on August 29 and winners will be notified by email.

But that's just the start. Every stop on the blog tour has a giveaway for an eBook, so you have LOTS of chances to win. AND there's a grand prize giveaway for a physical copy of the book, a #catsonquilts button, and a ton of goodies from sponsors. To enter the grand prize giveaway you just need to leave a comment at every stop on the blog tour.

What are you waiting for? Start making the rounds!

Fri. August 20:
Pamela Jane Morgan | pammiejane.com/blog | IG: @pammiejane
C&T Publishing | http://www.ctpub.com/blog/ | IG: @ctpublishing
 
Sat. August 21:
Sherri Noel | https://www.rebeccamaedesigns.com/ | IG: @rebeccamaedesigns

Shannon Fraser | https://shannonfraserdesigns.com/ | IG: @shannonfraserdesigns
 
Sun. August 22:
Lorna McMahon | https://sewfreshquilts.com/blog | IG: @sewfreshquilts 
Tracy Brittain Loyek | https://www.purplekatzquilting.com/blogs/news | IG: @purplekatzquilting
 
Mon. August 23:
Natalie Santini | https://sewhungryhippie.com/blogs/tutorials | IG: @sewhungryhippie
Kaitlyn Howell | https://knotandthreaddesign.com/blog/ | IG: @knotandthread


Tue. August 24:

Audrey Mann | https://www.theclothparcel.com/blog/ | IG: @theclothparcel
Charisma Horton | https://charismascorner.com/ | IG: @charismahorton )


Wed. August 25:

Mollie Johanson (That's me!) | http://blog.molliejohanson.com/ | IG: @molliejohanson
Corinne Sovey | https://www.corinnesovey.com/home/blog/ | IG: @corinne.sovey

Thu. August 26:

Melissa Averinos | https://yummygoods.com/blogs/yummy-goods-blog | IG: @melissaaverinos
Jeni Gaston | https://woolenwillowdesigns.com/blogs/jeni-s-blog-at-woolen-willow-designs| IG: @jenifergaston 


Fri. August 27:

Tonya Alexander  | http://stashlabquilts.com | IG: @stashlabquilts

Nichole Vogelsinger | https://wildboho.com/ | IG: @wildboho

Sat. August 28:

Stacey Day | http://www.staceyinstitches.com | IG: @staceyinstitches
Amanda Niederhauser | http://www.jedicraftgirl.com | IG: @jedicraftgirl


Purrfect Patchwork Blog Tour

video // epp basting and joining

EPP Hexagons

While I enjoy a lot of different crafts, English paper piecing or EPP is one of my most favorite. So it's about time that I have more EPP basics tutorials around here!

I've shared lots of free patterns for EPP projects and of course I do stitching clubs every year that combine embroidery and EPP. But it's been ages since I just made a basic tutorial here on my blog. Enter my plan to make videos. This started back in November, and one of the videos included here is from then. But I wanted one easy post to send folks to that has the two key processes for this hand-sewn quilt technique.

The first step for English paper piecing is cutting and basting the pieces. In this video I show you two methods for thread basting, which I still prefer over glue basting. These work for all shapes with straight edges.


If you're looking for the happy hexagons I used for the sample in this, you can find the free printable here on my blog!

After you prepare your EPP shapes, you need to stitch them together. Over the years, I've worked with three methods to join my pieces, and I truly think it comes down to what you like. It's about finding what works for your hands and how you feel about the way the stitches look.


After you finish joining all your pieces together, the last official step for the EPP portion is to remove the paper pieces from the back of your work. If you have large pieces that you basted through the paper, you need to snip and remove those basting threads first. Then just pull out the papers. It's sooooo satisfying!

From there, each project you do is likely to have a specific set of instructions for proceeding, but it's usually a lot like any other quilt!

If you're looking for some EPP inspiration, be sure to look through my EPP posts!

introducing the 2020 holiday stitching club

Days like today always get me excited. Why, you ask? Because I have a new stitching club to share with you. It's filled with embroidery, English paper piecing, and Christmas!

Five years ago I released the Holiday Stitching Club and dated it 2015, planning to release more...maybe each year. You may have noticed that didn't exactly happen. Sure, I've released Christmas patterns since then, and even some that were stitching clubs of sorts, but not the embroidery/EPP combination I love.

This year, that needed to change, so I present to you, Wild Olive's 2020 Holiday Stitching Club!

Wild Olive's 2020 Holiday Stitching Club

Unlike my previous clubs, this one is coming to you all at once. No need to wait for an email each week because you can jump right in with all the patterns! Of course, you can work on a design each week, stretch it out longer, or zip right through it. The choice is up to you!

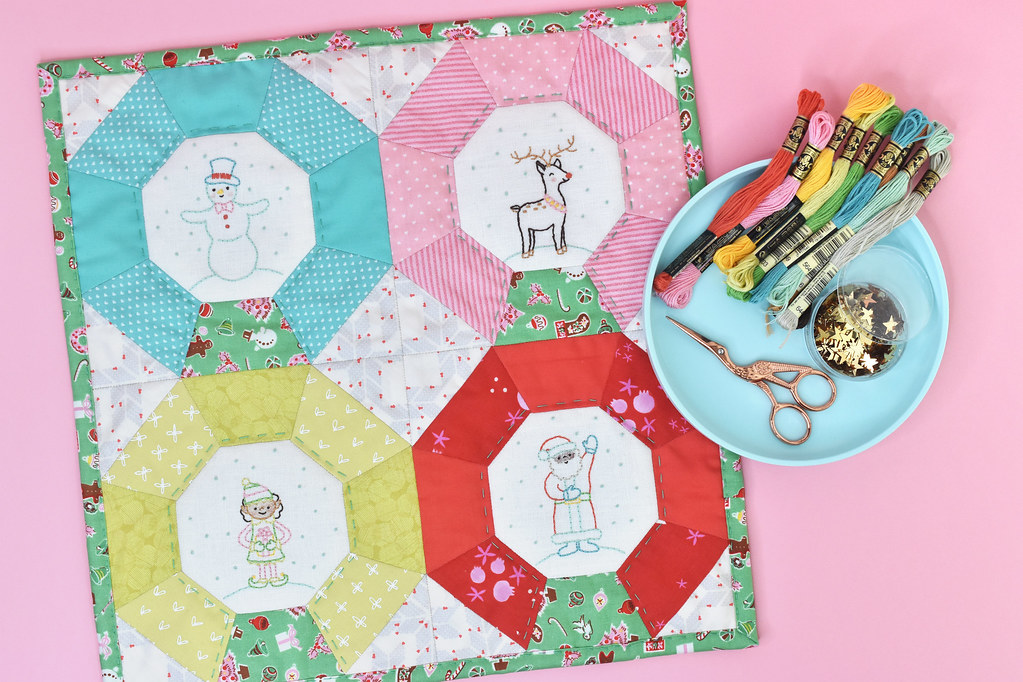
But here's the basic idea: four Christmas characters as embroidery patterns, and each of them fits inside an EPP snow globe, and they all come together as a mini quilt.

Wild Olive's 2020 Holiday Stitching Club Wild Olive's 2020 Holiday Stitching Club

The complete PDF includes a materials list, tips, basic assembly instructions, printable EPP templates, and embroidery patterns. It doesn't go into the specifics of how to embroidery or do English paper piecing and other quilting skills. 

If you've done any of my clubs before, you already know what you need to know. I'm also planning to create videos showing more of these basic skills, hopefully a few of those will be coming along even as you start to stitch your project!

Wild Olive's 2020 Holiday Stitching Club

I'll also be hosting a stitch-a-long on Instagram so you can still work week by week on this like my other clubs. Because the community and connecting with others is half the fun!

Now, who's ready for some holiday stitching? 


As always, if you have any questions, reach out in the comments!

pattern // kawaii crossing sewing shop embroidery design + epp mini quilt

Golden Thimble Sewing Shop Embroidery Pattern

Embroidery fans, it's your turn to get started on the Kawaii Crossing patterns for 2020! As you may have seen already, this first design is for a happy little thimble that happens to house a sewing shop. Because every year should start with sewing and crafting and stitching of some kind, right?

Now, I have a tendency to want to do all the things in a very unrealistic sort of way. When I decided to commit to only doing the cross stitch version of each of these patterns each month, I had no idea how hard it would be to resist doing the embroidery too. There's a very real chance that I will stitch up at least a few along the way. But I'm at least trying to start the year by giving myself fewer things to work on.

Which is why you don't see an embroidered example above. In the free pattern below, you'll find the following: a color sample, the pattern, the pattern reversed, and a larger version of the pattern/reversed version. You can stitch the pattern with whatever embroidery stitches you like. I'm partial to back stitch, french knot, scallop stitch, and chain stitch for thicker lines.


The larger pattern size is for making a project idea that I'll share soon. Spoiler: It's a Kawaii Crossing banner! If you want to wait for that, it will be a week or so before I post the tutorial.

The smaller pattern size is for another EPP mini quilt!


Again, I'm not going to be stitching this up (unless I give in!), but I thought it would be fun to make a design you could use. Each embroidery pattern fits on a house shape EPP piece, then they line up to make little rows of shops with roadway pieces. The stripes on the road are a perfect way to quilt this by hand! And of course, you can make the house shapes with the embroidery any color you want. But it could be fun to make it rainbow!


As with all my patterns, be sure to print everything at 100% (or all pieces at the same percentage) so that things match up. If you have any questions, I'll do my best to help you out!

Oh, and for those who asked for the cross stitch patterns as individual charts, here's the link to download the first one! Going forward these will be posted along with the updated larger chart.

epp // jam of the month club mini quilt pattern

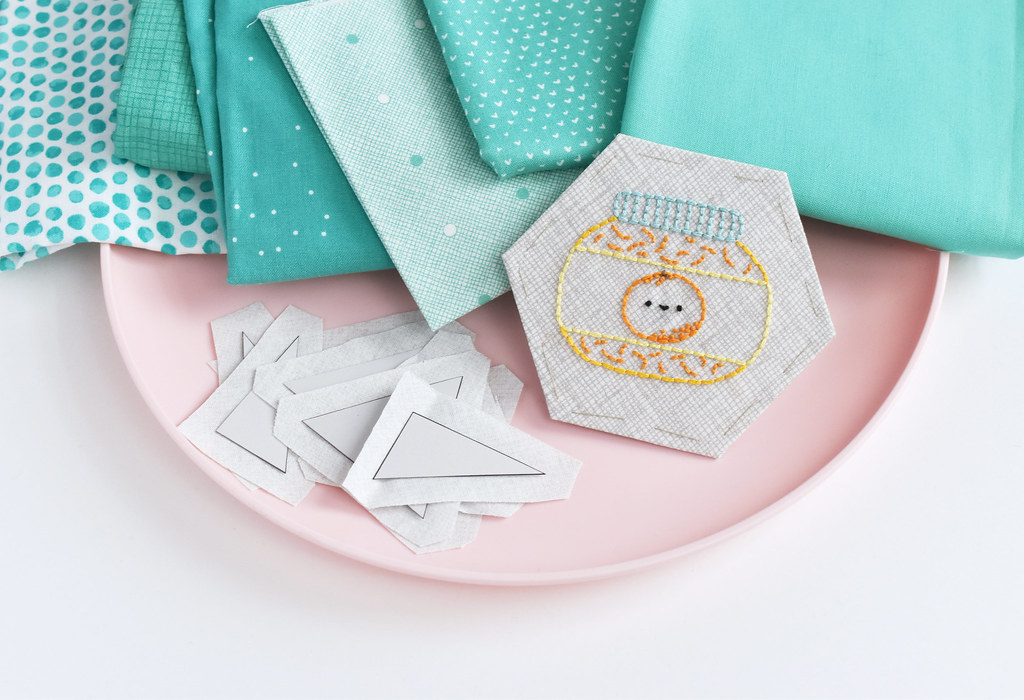
Jam of the Month Club EPP Mini Quilt Pieces

Want to stitch a free mini quilt with me? You may have already seen the first pattern in this yearlong free embroidery stitching club. If you haven't, jump back and check it out.

The embroidery is only part of the fun with this. Of course, you can use the embroidery patterns on their own, but I like to piece them together with English paper piecing. But what to do? Well...

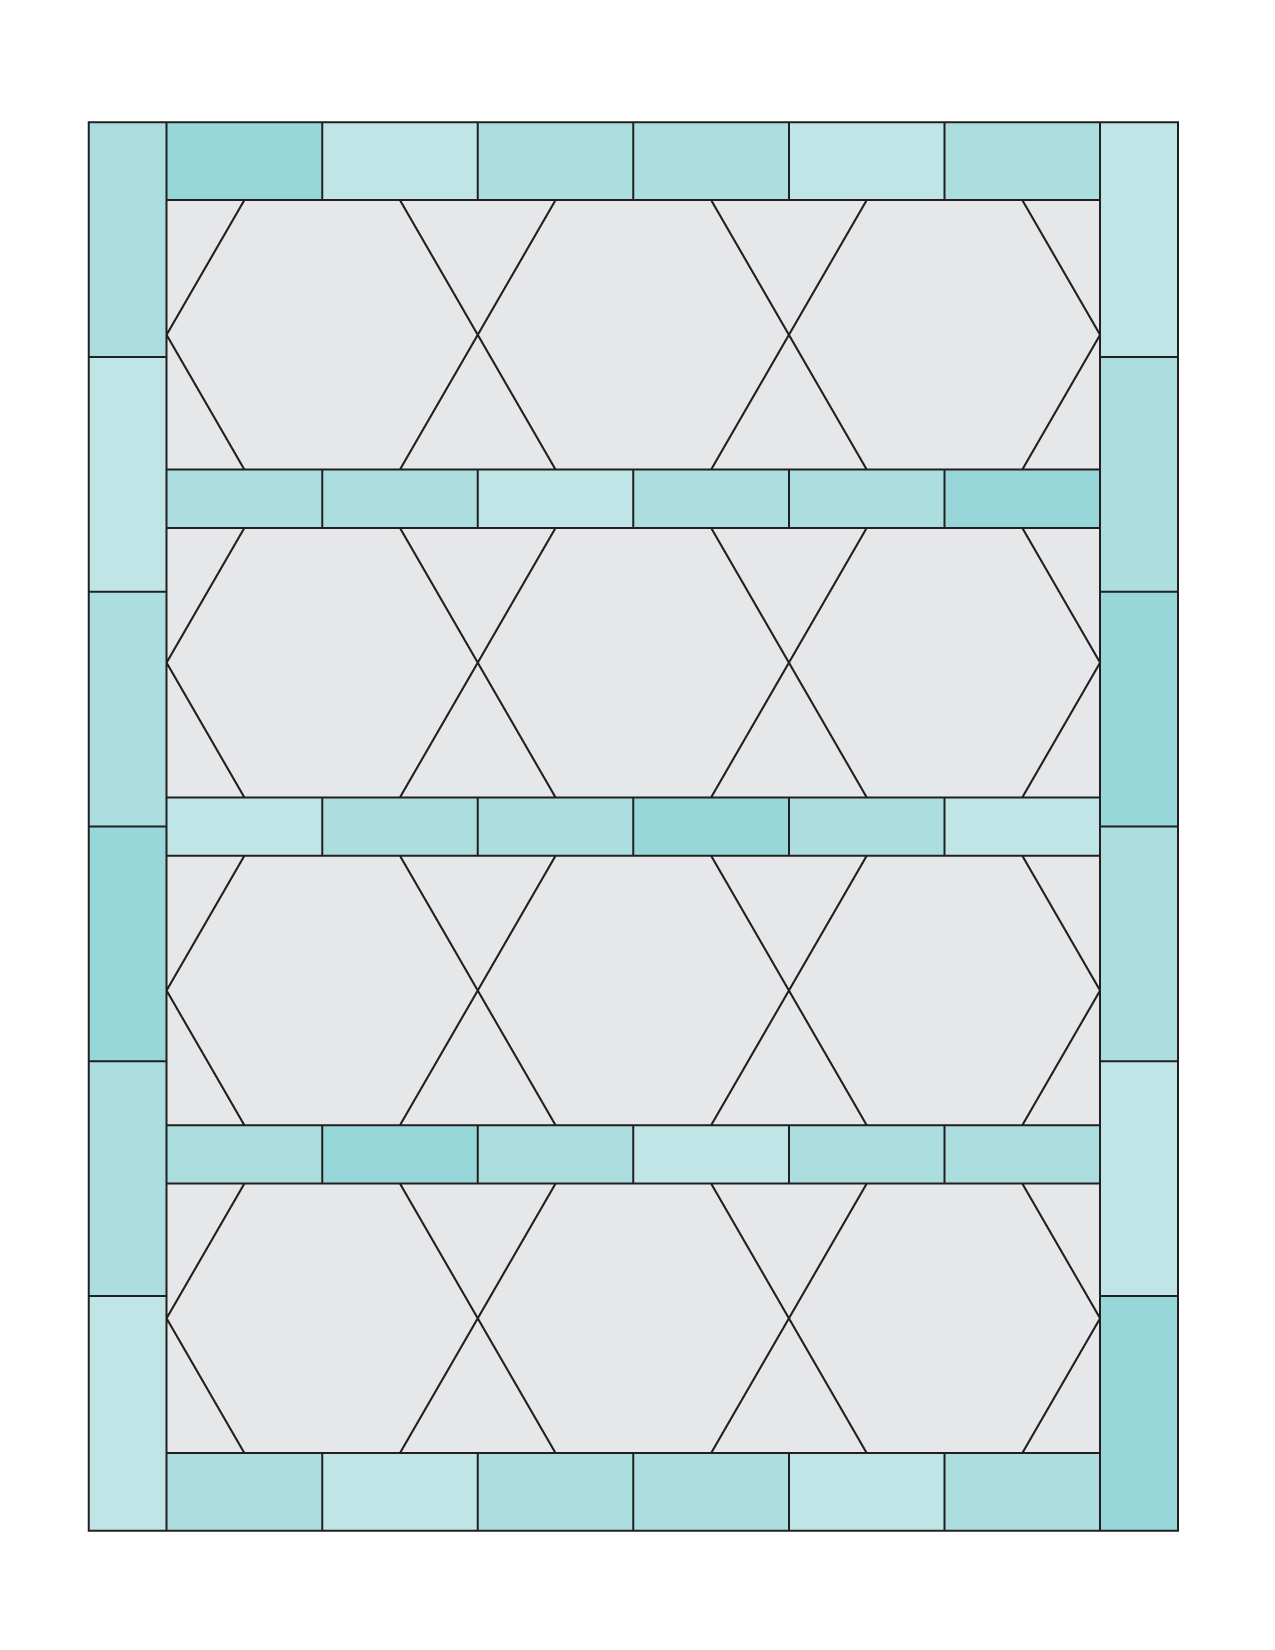
There's something so charming about shelves lined with, well, almost anything when they are cute and color coordinated. But I thought that it would be especially adorable if I were to take all the Jam of the Month Club embroidery patterns I'm making this year and place them on EPP shelves in the form of a mini quilt.

That's the idea behind this:


The printable templates have all the pieces you see in the graphic. I'm not including full piecing instructions, because it's pretty easy to follow the diagram. If you're new to English paper piecing, I have a few tutorials around on my blog, plus the stitching clubs in my shop have full photo tutorials.

I'm using a light gray crosshatch fabric for my embroidered hexagons and the triangle pieces (basically the back of the shelves). For the shelves and the sides, I'm using the mix of aqua fabrics in the photo above. All the colors in the embroidery will be light, bright, and kawaii.

You can use any colors you like, but to get the shelf effect, it'll work best to have similar colors for all the shelves/sides, and for each shelf backing. You could even change the color for each shelf backing, but keep in mind that you're stitching over these.

This is my big quilty project for 2019. I can't wait to see this come together. Both for me and for you! Be sure to tag your photos #wildolivestitchingclub.

Questions? Leave me a comment or reach out via email or social media!