september's desktop...
My mom and sister found this globe in the trash today. What an amazing find! It works, and came with the light bulb. It is a little out of date (as in, you'll find the USSR on here!), but that just gives me an easier time of figuring out approximately when it's from. I'd like to find a way to fit it on my desktop, but it's a wee bit full. Actually though, I love how it looks on the floor too...
Speaking of desktops, I have a new September calendar desktop for you! September! It features Sticky Glue, which means that I'll be figuring out a gluey project for this month's workshop. Hmm...I have to think about this one.
the day behind, the week ahead...
Today was Baptism Sunday and the church picnic at our new church. Wow! I have experienced both of these types of events plenty of times, but never like this. It was a wonderful day. The whole thing happened outside, so if you look closely at the picture, you'll see that I'm more than a little red. In fact, my neck and shoulders are especially crispy. Lovely.
Now I look at the week ahead. Or maybe the weeks.
I have an ever growing list of new things that I'm working on. Oh so much fun to be had! It's another one of those times of plenty ideas. New illustrations to make digital, a new type of product that I'm trying, and some patterns to play with: sewing, embroidery and the kind that will be printed on fabric.
Hello new week! You and I will be busy!
mask it...
I know I've written before about the delight I find in the Japanese Washi colored masking tape. There are tons of colors and patterns that you can find...and Etsy is a great source. It's all so pretty! But I haven't had a use in mind, at least not one that would warrant my spending $20 on tape.
So imagine my glee when I found this colored masking tape at the American Science and Surplus store by me! This is not Japanese, it is not translucent and colors were limited. But it was a whole lot cheaper.
Now I'll have a chance to play with it and see what kinds of uses I find. Then I can order the real deal. Or not. Maybe this will suit me!
I also found all kinds of other goodies at American Science and Surplus, but resisted. It's the kind of place that would be great to go to if you were putting together art kits. In fact, it makes me want to do that. For now, I'll try and resist that too. As if I need more paper type stuff around!
elements of style...
Yesterday was my sister's birthday. I'm pleased to say that I managed to finish her gift in time, even though it was different than my original plan. I made her three small things.
This simple headband, which is just a large button sewn onto an elastic headband. It looks so cute on her! I have some other cool old buttons (bigger still!) that I am going to try playing with too.
This bracelet, which I almost didn't want to give up. Again, super simple. These are just some vintage buttons threaded onto vintage yarn as I braided. Easy and cute!
The third part of the gift I'll share after the weekend. I still need to take pictures. And it will also be my next thing to do with embroidery. I'll give you a hint though...it's another wearable. Fun!
My sister is a source of style for me. She's young and much more hip than I think I am. But then, what do you expect from a 22 year old? It's the 4 year old that surprises me with her elements of style. She knows what she likes, she puts it together, and she works it:
I love this look and totally wish I could pull it off!
things to do with embroidery...part nine...
If you've been reading a while, you may note that a favorite movie quote of mine, especially around this time of year comes from You've Got Mail:
"I would send you a bouquet of freshly sharpened pencils, if I knew your name and address."
So wonderful.
You may also remember that last year I made some printable pencil toppers featuring Dull Pencil. They remain very popular, and people still find this blog because of them. Go figure.
With all of this in mind, I bring you the latest edition of things to do with embroidery. Embroidered Pencil Toppers!
I started out with my Dull Pencil pattern from the Homework Helpers pattern set, and stitched him onto some muslin like fabric. It's thicker than muslin though and has a bit of stretchiness going on, so it stays fairly stiff.
After it was finished, I trimmed around the embroidery (leaving at least 1/4"), and cut a second piece at the same time. And you know me...I like the raw, fraying edges. Those eyes are buggin' me...the french knots are off a bit...but oh well.
Then I figured out about how much room I would need for the pencil to fit in the bottom, and just running stitched around the edge.
Again, when I got to the other end, I checked for the opening to be sure the pencil would fit. It did, so I tied it off and slipped it over the pencil. Super simple and cute!
I would recommend this for small pieces, but they wouldn't have to be long and skinny like the pencil. The Crafty Crow has some great links today for other pencil toppers to make, and they'll give you some other fun ideas! (My brother says that our family has good timing...an idea reinforced by the fact that I was planning to post this today and The Crafty Crow also posted these!)
Have fun, and if you know someone who needs a pick me up, try freshly sharpened pencils. They say "I love you" at back to school time. Right?
old embroidery hoops...
I love these. So much. They are some vintage embroidery hoops that I received from my grandma's house...or maybe it was my aunt's house. I can't remember. Anyway, there is something so charming about them.
The wood is all smooth and well used (as is the cork inside the metal hoop), and most are simpler to use than the modern versions. Framing finished embroidery in a hoop is my favorite method, and the old hoops make it look more special. Which is good, because unfortunately, the smooth well-used hoops are not especially great for stitching. They don't keep your work tight for too long.
Remember the Beet that I made from my Vegetable Produce Pals pattern? I framed it in an old wooden hoop, then added a running stitch frame around it, and trimmed it about 1/4" outside of that. And now it's hanging in the kitchen...perfect against my mom's vegetable wallpaper. It's the one thing that she was unwilling to change when the kitchen was updated a few years back. I kinda don't blame her, it's pretty cool.
But I'm getting off track again. This was a great use for one of my hoops that I'm careful of parting with. They are hard to come by at a low price, and ordering 1 or 2 at a time off of Ebay is too time consuming for me. So I wait until I can find a lot, or better yet, I tell my aunt who sells at flea markets that I'm looking for them. And then they just show up!
How do you like to frame and display finished embroidery? (You know, that you aren't using for other fun things to do with embroidery...)
on my desk and in my head...
There are bits of projects all over my desk. Some are from completed projects, some are for current things, and some will be used soon. I love this.
I think that having the crafty mess around inspires me to keep working on things. And speaking of messes that inspire me, this lady continues to keep me always working on new things. I think that a big part of it is that she is always working on new things. And living the dream of being a maker. A creator. An artist. In small amounts, I'm doing that too, but perhaps someday, it will be more.
And on the Elsie topic, I'm taking Elsie and Rachel's fall online class. It should be a good time, filled with lots of inspiration to make Christmas gifts and such. The one thing that I worry about is that sometimes things like this get me thinking like others, and not like Mollie. As much as I admire others and what they are doing (there are so many talented people out there!), I don't want to be them. I want to be Mollie. I want to think like Mollie. I want to create what Mollie creates.
orange and raspberry...
The colors orange and raspberry are favorites of mine right now...they are wonderful and bright and oh so cute together.
The flavors of orange and raspberry became favorites of mine tonight. I made a basic sponge cake recipe, and added some orange zest. Then I put a layer of raspberry filling in between, and topped it all in an orange flavored glaze. Easy and yum.
I hope you've had a lovely weekend! This week will be filled with good things, especially after Thursday, when I can show pictures of things I've been making for my sister's birthday!
hello saturday...
Life is happening, but in the middle of it, I'm doing a bit of stitching and listening to music today.
Good things to be doing on a Saturday, don't you think?
an august workshop for you...
I finished up this August workshop project two days ago, and it took everything in me to wait until today to post it. I get far too excited about these kinds of things.
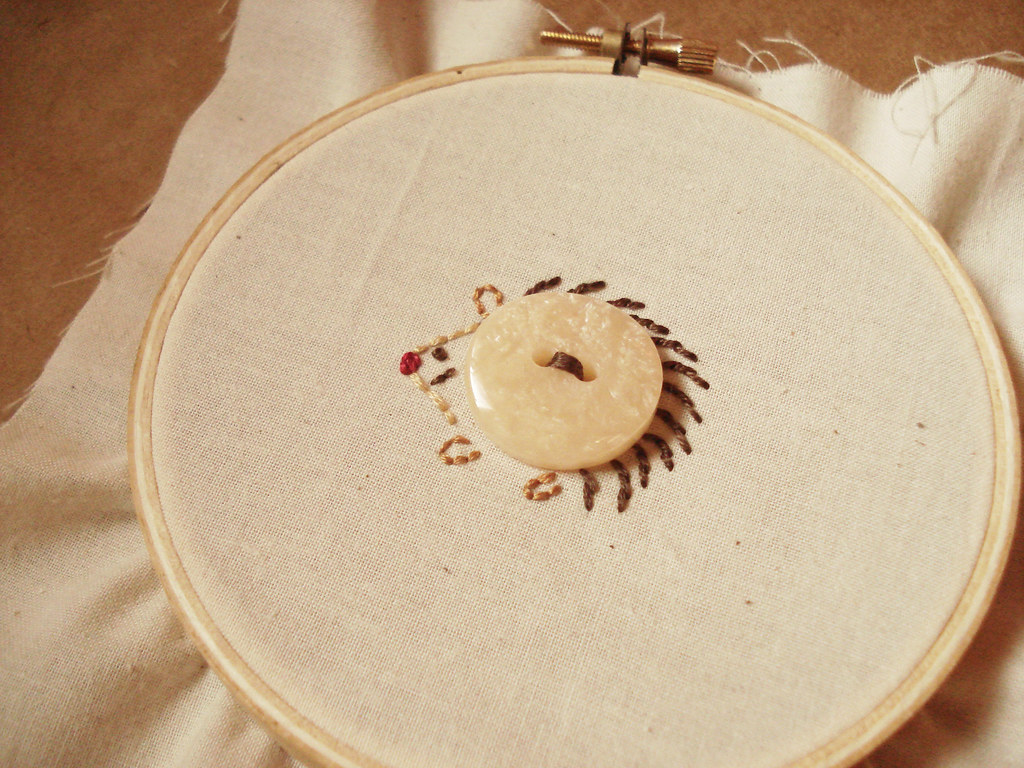
August's Make. Do. Create. crafty characters are the Extra Buttons. In the PDF you'll find instructions for making Button Buddies, a great use for your extra buttons! The workshop includes six woodland animal patterns: Hedgehog, Rabbit, Owl, Chipmunk (or perhaps Skunk, depending on your color choices), Bear and Raccoon. They are sized for 1 inch buttons, but you could enlarge or reduce if you want.
I'm sure you'll find all kinds of fun places to stitch these up...remember, you can add your photos to the Wild Olive Flickr group!
help for me...a download for you...
Wonderful friends of Wild Olive:
You know how I talked not too long ago about having some Spoonflower fabric printed? Well, I've started working on designs, and plan on ordering some samples tomorrow during their free swatch offer. In the meantime, they opened up their Christmas fabric contest to anyone. I've entered, and my Cookies for Santa pattern is in the first round of the contest! Here's what it looks like:
Would you be a dear and go and vote for me? Please? If I win, I'll receive some free fabric, plus the fabric will be available in the Spoonflower Etsy shop for a while, and anyone can buy it! Woo Hoo!
Now, something for you.
I'm all about the index cards right now (it's the back to school spirit!), so I've made some Ice Cream Socializers printable index cards. Download yours here!
Thank you in advance!
in the works...
Hello friends! Sometimes I like to keep new projects a secret, sometimes I like to tease, and other times I just have to tell all. This new thing I'm working on is a tell all project.
For the August Make. Do. Create. workshop, I wanted to use buttons in some way. So I've created some little patterns to stitch woodland creatures with button bodies. Today I'll be doing some stitching and taking pictures along the way...I can't wait!
Also in the works, I need to come up with a fun new printable for September's Sampler. I'm leaning towards something Christmas, as this is typically a good time for that. But...I don't know. I'd much rather choose something fall-ish. Thoughts?
Speaking of new printables, right now in the shop, you can get a free Homework Helpers printable index card PDF with any purchase! And tomorrow you can get Ice Cream Socializers index cards here!
But when it comes to things being in the works, how about something that NEEDS to be in the works. Like my sister's birthday gift. Anna turns 22 in 9 days, and although I kind of started something big, I know that it just won't come together that fast. Instead, I have another thought for a bunch of small fast things. I really must work on this, or else become a horrible sister!
I hope you have some fun things in the works right now...care to share?
things to do with embroidery...part eight...
Yay! I'm finally ready with my next thing to do with embroidery! I was inspired to make this after seeing this mobile. To me, it screamed "make an embroidered mobile!" Originally, I was thinking that the hanging pieces would just be stitched on canvas and backed with perhaps a print? Or felt? And maybe there would be one or two things per string. But then as I continued, it became a different project. One that uses my Ice Cream Socializers pattern. Here's what I've made:
And here's how I've made it!
I started out by making pattern pieces that were basically trimmed around what would be embroidered. I used a pattern rather than just trimming so that all would match up. Then I cut out the pieces from felt. My mobile has a cone, three scoops of ice cream and a cherry on top. So I cut two cones, six scoops (each a different flavor/color) and two cherries.
Then I stitched all of the patterns on. To stitch on felt, I print out my pattern, trim it down and stitch through the paper and the felt at the same time. I made sure that I was stitching a regular and a reverse side for each scoop, cone and cherry. The scoops and cones were similar, but the cherries were obvious. Pay attention to the shapes...you'll be happier later. Also, I did mine with regular paper, but thin tracing paper is much easier. There are other options too, but I like tracing paper.
When I'm done stitching, I carefully tear away the paper. I'm especially careful around the french knot eyes.
Once all of the pieces were done, I started assembling. Using crochet thread (or a lightweight string) on a needle, I tied one one end to the back stitching of one cone. Then I also threaded it under the stitching at the top of the same cone.
I continued in this way on the scoops of ice cream, looping the string around the back stitching so that it wouldn't be able to slide on the string. Try not to notice that I used knots (GASP!) on the backs of the faces.
After all scoops and the cherry were in place and secure, I stitched the second side of each piece to its mate. To do this, I used two colors of thread (something I just saw from Jenny Hart), two strands of each color. I wanted both sides to be represented (you don't want your blue Superman ice cream feeling bad!). Then I just whipstitched around the edges, being careful around the mobile's string.
And that's it! I'll hang it with a loop of the extra string at the top. The best part is that the flavors change with a breeze (which they were doing frequently while trying to take this picture!)....so yummy and cute!
I think there are a lot of possibilities with something like this. Like in the mobile that inspired this whole thing, you could have things hanging from a single stick or dowel rod, or you could have more than one. You could have different sized embroideries that balance, with only one thing hanging from a string.
The biggest thing, I think, would be to be sure that your embroidered pieces were stiff enough to remain flat when hanging. So either stitch onto something stiff, or back it with something like canvas or felt, or you could even add some stabilizer sandwiched in the middle.
No matter how you make this, I think you'll love having your embroidery hanging in a new way!
And here's how I've made it!
I started out by making pattern pieces that were basically trimmed around what would be embroidered. I used a pattern rather than just trimming so that all would match up. Then I cut out the pieces from felt. My mobile has a cone, three scoops of ice cream and a cherry on top. So I cut two cones, six scoops (each a different flavor/color) and two cherries.
Then I stitched all of the patterns on. To stitch on felt, I print out my pattern, trim it down and stitch through the paper and the felt at the same time. I made sure that I was stitching a regular and a reverse side for each scoop, cone and cherry. The scoops and cones were similar, but the cherries were obvious. Pay attention to the shapes...you'll be happier later. Also, I did mine with regular paper, but thin tracing paper is much easier. There are other options too, but I like tracing paper.
When I'm done stitching, I carefully tear away the paper. I'm especially careful around the french knot eyes.
Once all of the pieces were done, I started assembling. Using crochet thread (or a lightweight string) on a needle, I tied one one end to the back stitching of one cone. Then I also threaded it under the stitching at the top of the same cone.
I continued in this way on the scoops of ice cream, looping the string around the back stitching so that it wouldn't be able to slide on the string. Try not to notice that I used knots (GASP!) on the backs of the faces.
After all scoops and the cherry were in place and secure, I stitched the second side of each piece to its mate. To do this, I used two colors of thread (something I just saw from Jenny Hart), two strands of each color. I wanted both sides to be represented (you don't want your blue Superman ice cream feeling bad!). Then I just whipstitched around the edges, being careful around the mobile's string.
And that's it! I'll hang it with a loop of the extra string at the top. The best part is that the flavors change with a breeze (which they were doing frequently while trying to take this picture!)....so yummy and cute!
I think there are a lot of possibilities with something like this. Like in the mobile that inspired this whole thing, you could have things hanging from a single stick or dowel rod, or you could have more than one. You could have different sized embroideries that balance, with only one thing hanging from a string.
The biggest thing, I think, would be to be sure that your embroidered pieces were stiff enough to remain flat when hanging. So either stitch onto something stiff, or back it with something like canvas or felt, or you could even add some stabilizer sandwiched in the middle.
No matter how you make this, I think you'll love having your embroidery hanging in a new way!
more of PJs sewing...
Here's PJ's latest project. A felt iPod.
Here's how these have been going lately. PJ comes to me and says, I'd like to make a "_________". Can you help me? Since these are new for him, I've been figuring out the construction part. Then I cut out the pieces and explain how we'll put it together. I get him started, and lend a hand when needed, but otherwise, he does the stitching.
For the iPod, he chose the white thread, and on the screen and click wheel I like that. I wish he would've gone with blue for the rest, so as to hide some stitching. Oh well. He requested help with the corners, which I understand...those take time...and actually, he sort of did the last one. And I think that his favorite part is taking the pictures at the end. He uses props, like the old iPod Shuffle dock that you see in the background above.
His new request is to make a felt cactus. Should be a challenge, I'm thinking. Anyone know of a good, easy, free cactus pattern? If not, you may find one here someday soon.
sheep and the big weekend...
Watch Sheep in the Big City - episode 1 / pilot in Animation | View More Free Videos Online at Veoh.com
The other night I saw a preview/commercial for Shawn the Sheep. Cute! I do love Nick Park. But it reminded me of another sheep show that I loved years ago. Sheep in the Big City. You can watch the entire pilot above, and there are few more episodes to be found online, but otherwise, it is not available. So sad, because there are so many fun things in there.
Anyway, today I worked on the new embroidery project, which I'll be sharing with you probably on Sunday. It's almost finished, and I'm loving it.
Also today, PJ did some more plushie making, with a bit of help from me. I need to get pictures all ready, but tomorrow you can see that here.
And finally, I'm working on some new printables for you dear blog readers as well as the Mailing A-List (join in the sidebar!) and Wild Olive shoppers.
I think it's going to be a good weekend!
made by a 9-year-old...
After I made the bird Jordnot, PJ wanted it. He waited, not so patiently, until I had photographed it so he could start loving it. Then he wanted it to have a baby and an egg, which he intended to make himself. And guess what? He did!
I helped him cut out the pieces, figuring this would help me save on felt, but he'll learn this part soon. He also requested that I stitch the face for him and get the thread going. Everything else was him. I love that!
printable ice cream...
Since I've fallen in love with the ice cream (well, that happened long ago...here I'm talking about my new pattern), I've been thinking that I'll never get tired of them. I have a feeling there will be a few things showing up around here with the Ice Cream Socializers.
Like this free printable bookmark! It comes in two stacks of flavors. And I promise, it won't melt on your pages...
Oh, and the shop update is finished! I'll be replenishing listings as needed, so if you miss something, don't worry...it'll be back!
UPDATE: If you'd like to color your own, here's a B/W version!
almost ready...
tasty paste...
Did you ever eat paste as a child? I did. I used to eat it in Sunday School. I loved the slightly minty scent/flavor. And I think I remember a little boy in my class who did the same thing, but that part is vague. Now when I mention paste to the kids in my life they are mystified. What's paste?, they wonder.
Whether you ate paste, or actually used it for sticking things together, you can stitch up some Tasty Paste! I made this pattern for The Sampler, and have been waiting until it was available to tell you about it. So exciting! I've mentioned The Sampler before, but I will again, because it is so fun!
Head to the gallery section of the site and you'll be able to see all of the lovely things that people have contributed, plus check out people's shops. While you're there, you'll find the Tasty Paste pattern download.
Have fun, and don't eat too much paste!
i scream, you scream...
Look at all of those yummy colors spread out on my desk! This afternoon I pulled out my embroidery floss and treasured wool felt so that I could decide on what ice cream colors I wanted. Yes, these will become a wonderful embroidery project that I can't wait to share with you! And...if you look closely, you can see a bit of the new pattern that WILL be in the Tuesday update!
Can I just say how much I love making things?
i needed it...
So, to say that I NEEDED a new computer may be stretching it. But not by much. My Power Book would have required a lot of upgrades for me to stay remotely up to date with software for my freelance graphic design work. So, I guess I sort of needed it.
Anyway, now I have a fancy camera built into my iMac, so I can, on occasion, greet you with my tired, er, shining face!
ambition...
...or stupidity?
I'm going to go out on a limb here and say that Tuesday there will be a Wild Olive shop update.
The motivation of announcing the update usually helps me. But I am feeling like I may not get everything finished in time. We'll see. Here's what I've been up to, and what (hopefully) will be in the update:
Sewing Jordnöts, along with some lovely ladies who helped me test the pattern. You can see some of what they've made here. This pattern will definitely be listed.
Stitching a cabbage, and a peanut. Mini patterns, also, definitely in the update.
Setting up recipe cards. A new fruit and vegetable set is all ready to go!
More stitching: a kiwi and a beet. Two new pattern sets, fruit and vegetables, are almost done.
Continued work on ice cream designs. I'm nervous about these getting done in time...they are not so ready. But when they are, I have a feeling they'll be fun. Plus, I already know that I'll be using this pattern for my next thing to do with embroidery. That's motivation right there!
a few of my favorite (vintage) things...
What is it about old stuff that is so appealing? Here are a few Etsy shops that feature amazing vintage. So much to love...
26olivestreet has all kinds of great stuff. Lots of large numbers for decorating, and some fun old supplies like above. And how cute are their poladroid item shots?
I was so sad to miss out on a "practice filing set" index card box from abbacadabra. Now I'm loving these Debbie Reynolds Colorforms...
In place of that card box, perhaps this rolodex from WeThinkWeCan is what I need...
Finally, oh man...don't you just NEED this Polaroid? Perhaps not as much as the nearly impossible to find film. Unfortunately, only the "display piece" camera is available from PonyParty.
Truly, this is nothing compared to what is in these shops...you must check them out. And I'll probably have to share more vintage loves soon...there are so many lovely shops collecting and sharing so many lovely things!
Subscribe to:
Posts (Atom)