about shop patterns projects printables extras sponsorship wild olive twitter flickr pinterest subscribe

calendar: print and post for april

april wallpaper...now for ipad!

It was just this year that I finally got to making wallpaper for iPhones, and now my brother has convinced me to make some for iPads too! I don't have one, so in order to get the photo above, it meant my 18-year-old brother had to make this pretty lavender calendar his new wallpaper. I'm kinda hoping that it keeps it for a while!

The iPad version is made so it will work whichever way you have your screen turned. Fancy, huh?

Now, welcome April, and grab a calendar!


Prefer the analog method? Download the printable version, and tack it up on your bulletin board!

look back: easter egg finger puppets

Sometimes I like to take a look back at the posts that were shared a few years back. Since it's Easter time, I thought it was a good time to bring these egg finger puppets back for those who are new readers and might have missed them!

Easter Egg Finger Puppets

Are you ready for Easter? Do you have time for one more quick project? Of course you do! These egg shaped finger puppets are really easy to put together (kids could even do it), and they are sure to bring smiles to young (or not-so-young) faces.

eggpuppets1

You'll need: felt and embroidery floss in Easter-y colors and this pattern.

eggpuppets2

Use the egg pattern to cut out two pieces of each color that you'll be using. You can use the same pattern for all of the designs. You'll also need two ears for the bunny, and one fluff of feathers for the chick.

eggpuppets3

For the egg, you can add some decorative stitching first, including a face. Stitch around the edge with a running stitch, leaving an opening about 1" wide.

eggpuppets4

For the bunny, embroider on a face. Position the ears where you want them and pin them in place. Stitch around the edge with a running stitch. Make sure that you catch the ears in your stitching. (You can also add some detail to the ears at the same time.) Leave an opening about 1" wide.

eggpuppets5

For the chick, embroider on a face. Position the fluff of feathers at the top and pin in place. Stitch around the edge with a running stitch. Make sure that you catch the fluff in your stitching. Leave an opening about 1" wide.

Aren't they sweet!? My plan is to give these to my brothers and sisters on Sunday, but, well...I've been having a lot of fun with them, so we'll see. Actually, my sister already tried to take the chick. I suppose I could make a few more so that I could share...

Oh, and hey! If you make some of these, you can add your pictures to the Wild Olive Flickr group. Have fun making!

now in the shop

MerryMateys1

March hasn't been as productive for the shop as I had hoped it would be. Other things have required my time. But I did get two new items listed this week!

The Merry Mateys embroidery pattern is something that I think I should have made long ago. I love pirates, so why haven't I made a pattern for them sooner? Oh well, they are here now!

Mugwrap10

I've also wanted to make a pattern involving quilt blocks, and so I incorporated them into this project PDF for a mug wrap. The PDF includes 7 little patterns, plus the instructions and templates for the wrap.

A few printables are nearly finished, but sometimes it's just a slower process...ya know?

stitch swap: mailing time

mailing

I can hardly believe how fast this month has gone by. It's not quite over yet, but it will be soon.

For those who are in the Stitch Swap, this is a friendly reminder that the 31st is coming up, which means it's time to get your piece in the mail! I know that many of you already have mailed and even received your swap embroidery, and a few have had some extenuating circumstances delaying mailing. The rest are working and waiting excitedly! Do keep in mind that some of these are traveling a great distance, so it could take a little while for them all to arrive.

If you're not in the Stitch Swap: A) Don't worry...there will be another one in the fall, so you'll have another opportunity to participate! B) Take a look at the pool of amazing work that these swappers have been stitching!

I mentioned it on Flickr, but I need to say it here too. There is much talent being expressed with this swap, and even though I'm only the host, I feel a bit like a proud mother hen. Well done, everyone!

printable: tiny easter egg dominoes

Dominoes

Yesterday I shared some tiny Easter egg embroidery patterns, and today I have some even tinier eggs on printable dominoes!

This is a full set of double sixes, so it makes for a fairly short game. I'm usually okay with that, because my favorite way to play dominoes is in a domino rally. (The printable ones just don't work as well for that though.) After that, I like playing train dominoes. Can you play that with double sixes? I'll have to try.

Dominoes
Dominoes
Dominoes

I recommend printing these on card stock, and maybe even laminating them if you expect to play with them a lot. You can also add scrapbook paper to the back before you trim them out. It makes them more opaque...and they look pretty!


Dominoes

Do you like playing dominoes? Do you have another favorite game?

a heart-felt winner

heartfelt1

If you entered the giveaway for Heart-Felt Holidays, I'm sure you're interested to find out if you won. But first...

I have a giveaway going on over on My Girl Thursday right now! Head on over there and enter to win a membership in the Project of the Month Club! The winner will receive the first three projects right away (a banner, a mug wrap, and a wind chime!), and a new project every month for the rest of the year.

Now, about the winner of the book...Congratulations to Leah who said:


Leah, please email me to claim your prize! (molliejohanson [at] gmail [dot] com)

For the rest of you, would you like to do me a favor? If you like what you've seen about this book, go to Amazon and click "Like" right under the title.

And if you didn't win, don't worry...there's the giveaway listed above, and there will be another (different) book giveaway coming in a few weeks!

pattern: tiny easter eggs (and a polka dot stitch!)

Tiny Eggs

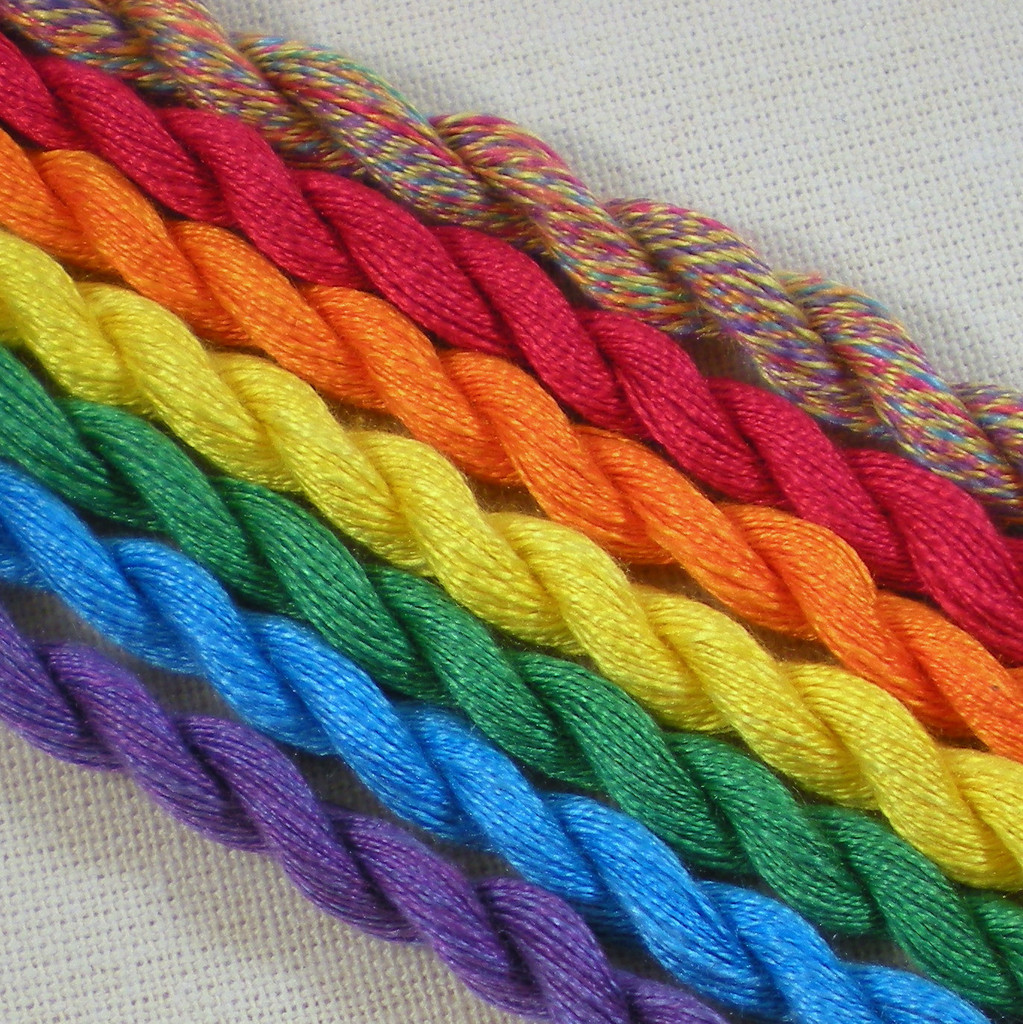
I love stitching at a small size, something you've seen here before, and will definitely see again. (In a big way soon...but that's still a secret!) For Easter, I thought it would be fun to stitch some tiny Easter eggs. Somewhere I have some not quite finished counted cross-stitch eggs that are similar, but I don't think I've seen that work in progress for, oh, 15 years or more!

These new eggs, on the other hand, were quick to stitch, and they are already done! At least, the three that I chose are done. Because in the PDF pattern that I have to share with you has a total of NINE egg designs, and each is just 1.5 inches tall.

One of the eggs has polka dots, and I did that to use a new stitch that I learned and thought you'd like to try! I found this stitch in an old book, and it was listed as a variation on the lazy daisy. Hmm...It sort of is, but it's not a stitch that I've seen anywhere else. And the diagram made it confusing, so I'm going to revise it with photos and call it the Polka Dot Stitch!

Here's how to do it:

Polka Dot Stitch

1. Bring your needle up from the back, just inside the bottom of the circle.

Polka Dot Stitch

2. In one stitch, go down just outside the bottom of the circle, then back up just inside the top of the circle. Don't pull it through yet. (The original diagram numbered it in such a way that you would need to make a loop like this. It's just too difficult!)

3. Loop the thread around the needle point that is poking out at the top. Make two loops that are circular, then pull the needle through gently so as not to pull the circles.

Polka Dot Stitch

4. Go back down just outside the top of the circle. This small stitch holds the top of the circle in place.

5. Bring the needle back up just outside the bottom of the circle, then go down just inside the bottom of the circle. This small stitch holds the bottom of the circle in place.

Polka Dot Stitch
Polka Dots

It take a few practice tries, but then they go fairly quickly. They make good tiny flowers, or polka dots for eggs!

If you know more about this stitch or what it's really called, please let me know!

Tiny Eggs
Tiny Eggs

Now, how about stitching up these eggs? On their own they'd make lovely little pins or patches, or you could stitch a whole row of them for the edge of a towel or table runner!


Tiny Eggs
Tiny Eggs

Come back tomorrow for a printable with some tiny Easter eggs!

we're praying


We are currently in the season we call Lent. It's a time of preparing our hearts for Easter, and it's a good time to make a change in your life. As Ann Voskamp put it, "Lent isn’t about forfeiting as much as it’s about formation." This Lent season (and hopefully the days, weeks and months following), I want to spend more time in prayer, and I'd like to invite you to be a part of it. Sundays on Wild Olive will (at least until Easter) be prayer posts. Please feel free to leave a comment with any prayer requests you have.

Last Sunday, as comments popped up in my email, I realized that this has become something special. Something I didn't anticipate when starting up Sunday prayer posts. This has become a little community in itself...women coming together to pray with and for each other. I feel connected and blessed.

This week, would you pray with me for my friend Terry? She's been dealing with some health issues, with unpleasant tests and possible surgery in the works.

Now, let's pray.

snapshot saturday

hello spring

This week, the flowering tress started...flowering! It wasn't a bad winter, but I'm still very happy to be welcoming spring!

weekend links

Look over in the sidebar. See those sponsor ads? They are from some very talented ladies, and I think you know that. Just in case you haven't had a chance to check out their sites, here are a few handpicked links for you to check out over the weekend!


Leisi from Too Crewel discovered a new love of stitching feathers. They came out so well, I think I need to stitch some like this!


Crystal from Two Little Aussie Birds is making quilt blocks using this adorable kit from her shop. I applaud her both for her ambition and the sweetness of these stitches!


Daphne from The Imperfectionary has all kinds of cute handmade in her shop, and these strawberry hairclips are calling my name! ("Mollllieee! Wear us!!!")


Sécia of Petite Insanities shared a recipe, which, if you follow me on Pinterest, you may have already seen. I can't wait to make this!


Shoppa is an app for Nook and Android, and right now they are featuring some under the sea items. Recognize my Sweet Otter? That's how it looks when you're shopping on Shoppa!


Liz of Dragonfly-Lotus Designs spins the most delicious embroidery floss, including these petite (2-ply!) mulberry silk threads. I seriously want them all!

If you'd like to be featured as a sponsor here on Wild Olive, check out my sponsorship page, or send me an email! (molliejohanson {at} gmail {dot} com)

new books and a new series

new japanese craft books

The other day I went to the Japanese bookstore that's not too far from here. It's a risky move, because I can spend a lot in a short amount of time when I go there. But I was ready for a new book fix. Fortunately, there weren't too many books in the craft section that were my kind of craftiness, so I only bought three!

I haven't stopped poring over them, and have already gotten all kinds of inspiration for new kinds of things to make. I've also added to my list of things to make as gifts for little people at my house. And new kinds of supplies to look for...

See? Risky. I'll never be able to get through all of this!

new japanese craft books

These books are so wonderful, I decided that to share them with your properly, they each need their own post. Which got me thinking, maybe all of my Japanese craft books could stand to have their own post...you'd like that, right? So...coming soon, watch for a ongoing series of craft book posts.

Hopefully this won't feed my need to buy more books, but keep me looking in the ones I already have! Kat at Zakka Inspired has given herself a challenge to make something from one of her Japanese craft books each week, and she's documenting it on her blog and on Flickr! I think it's a brilliant idea, and one that I should probably try to do as well...

project: felt scallop pencil tube

pencil tube

Whenever I'm out, I like to make sure that I have a way to jot down or sketch out ideas that come along. You really never know when they'll turn up, so having paper and writing tools is important. Usually, I have a few pens and pencils of varying types, and until now, I've kept them in a case for my sunglasses. With my sunglasses. Not ideal...so I decided I needed something similar, but designated only for drawing equipment.

A full case that closes isn't really what I wanted, because I like to just reach into my bag and be able to grab a pencil. I wanted something that would just keep them handy, but tidy. This pencil tube was my solution.

pencil tube

If you'd like a pencil tube, here's what you need:
Felt in two colors (the second color is optional, but I rather like it!)
Embroidery floss
Scissors
Needle
Pins
Hole punch (optional, but fun!)
Pencil Tube template PDF

pencil tube

Use the template to cut a large piece from felt, then cut down the template and cut a smaller piece of scallop. This pink felt is some that I dyed myself!

You don't have to be too fussy with the scallops. They look cute when they are a little bit funky.

pencil tube

Layer the small scallop behind the large piece, roll it into a tube. Make sure that there is at least 1/4" overlap past the scalloped part.

pencil tube

Stitch the tube along the overlap using a running stitch. It's a good idea to peek inside the tube with each stitch, just to make sure you're catching all three layers of felt.

pencil tube

Check to be sure that your tube is still approximately the same size as the circle template. If it is, cut out a circle of felt with the template. If not, adjust the size of the circle when you cut it out.

Stitch the circle onto the one end of the tube. I used a whip stitch.

pencil tube

With your hole punch, punch some holes along the scallops. This one makes 1/8" holes. You could also do this before you stitch it all together, which would be easier if you want to make more holes further in from the edge.

pencil tube
pencil tube

Fill your pencil tube, and add it to your purse or bag!

pencil tube

Simple things like this make me happy...especially when they have little details like this does. Now I'm wanting to take some of the elements from this (scallop flap, punched felt, etc.) and apply them to other ideas...I best get to work!

pencil tube

stitch swap: extra goodies

extras for my swapee

We're closing in on the end of the Stitch Swap, and I thought it would be fun to do a post dedicated to the extra goodies that are so much fun to send and receive with something like this.

With my hoop (which shall be mailed in the next few days!) I'm including some of my favorite loose tea, an eraser from the Japanese market, and some embroidery floss. There might also be an extra surprise for my swapee (someone used that term in a posting, and I loved it!)...

extras in my swap

In with the hoop I received, there were so many goodies...I feel quite loved! Chocolate, a fat quarter, embroidery floss and a handmade pincushion!

Speaking of handmade, take a look at these extra treats that people have made to include with their swap packages:

Pincushion from Poppy
heart badge
Stitch Swap- Buzz-1
Embroidery Hoop and Zip Pouch

Yes, the Buzz Lightyear is an extra...not even the regular hoop! And I'm a huge fan of those zippy pouches. Oh, but all of these are delightful, and made with such care. And I'd like to point out that participants aren't expected to add these things in. They are invited to, if they want...that makes these little gifts even more impressive to me!

I'm so excited to be watching everyone's work coming together and getting ready to be sent!