about shop patterns projects printables extras sponsorship wild olive twitter flickr pinterest subscribe
Showing posts with label vintage craft. Show all posts

vintage craft // weave-it and crazy daisy tools

Vintage Crazy Daisy Winder

Vintage craft tools and supplies always excite me, whether they are completely different from what we use now, exactly the same, or something in between. And I recently played with two such tools that aren't all that different from more recent creations, but they were still the first time I'd used anything like them. They are the Crazy Daisy Winder and the Weave-It pin loom.

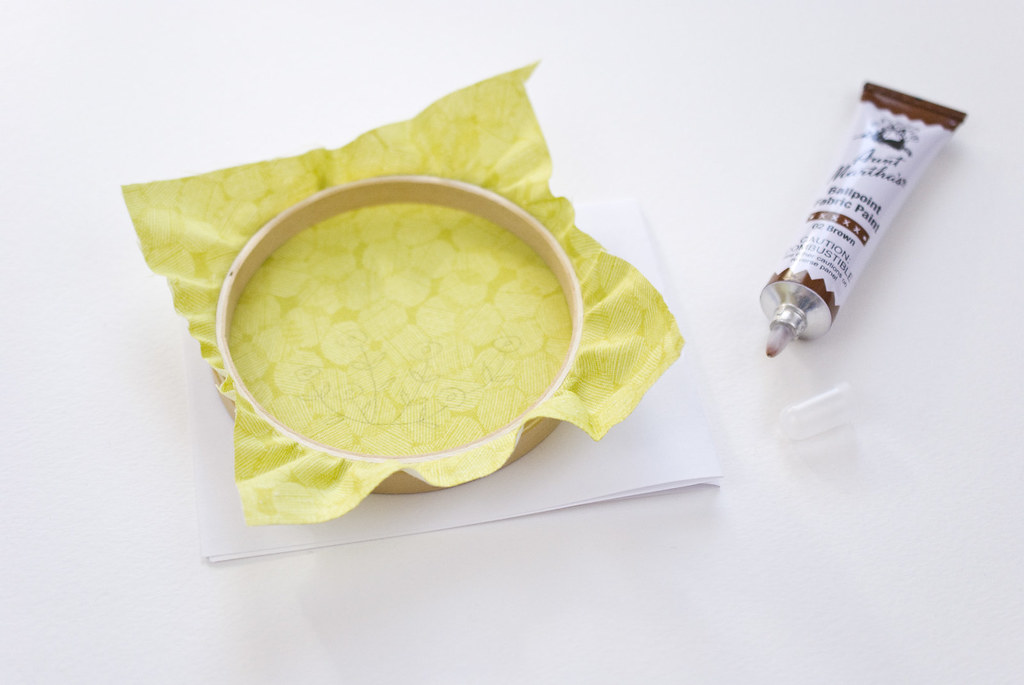
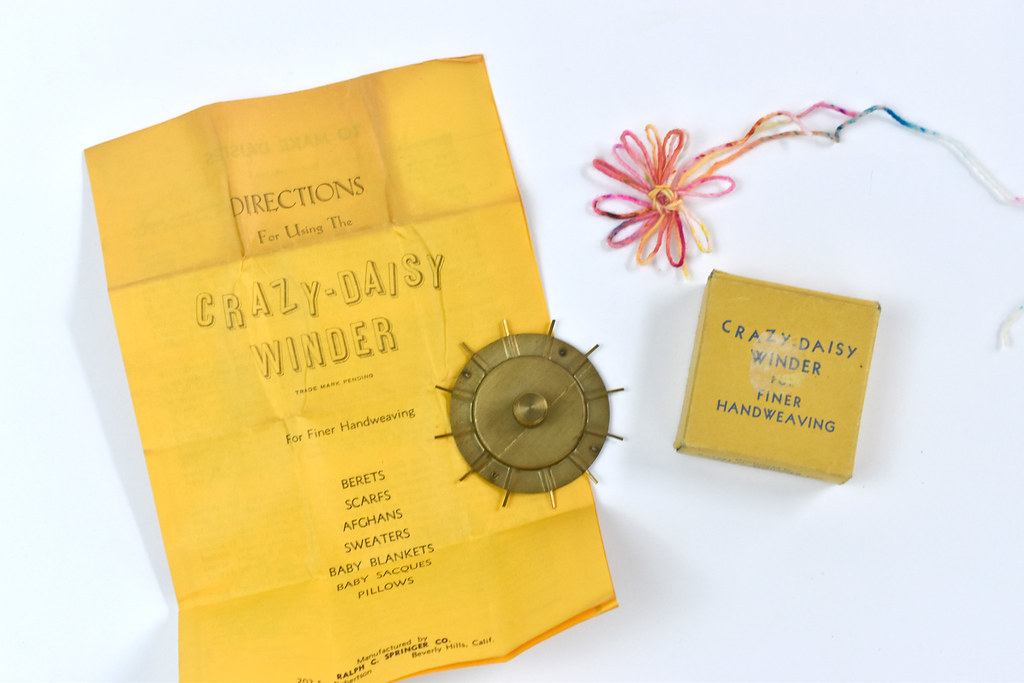
I have no idea how long I've had this Crazy Daisy Winder. Undoubtedly it belonged to one of my relatives, but this was the first time I remember paying any attention to it. Thankfully, the well-preserved box still held the instructions along with the incredibly well-made brass winding tool.

Vintage Crazy Daisy Winder

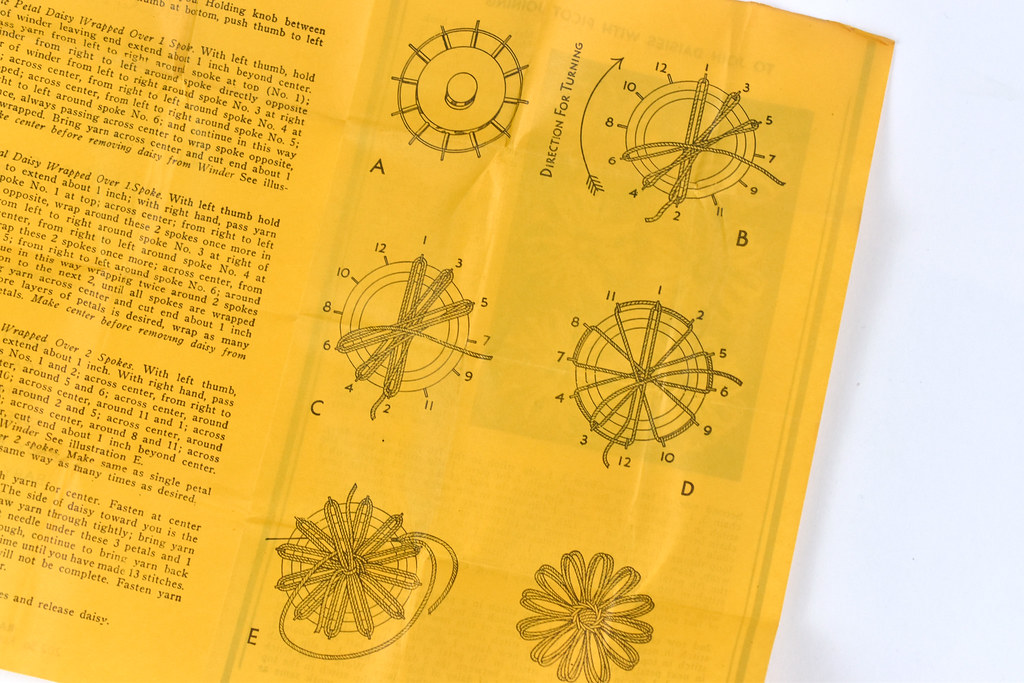
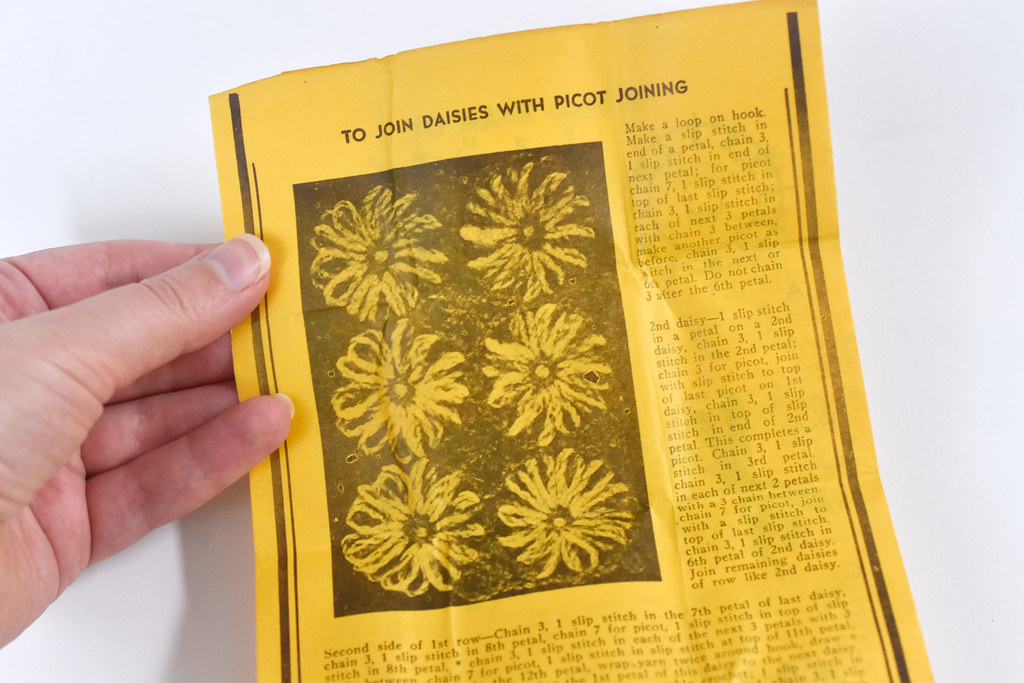
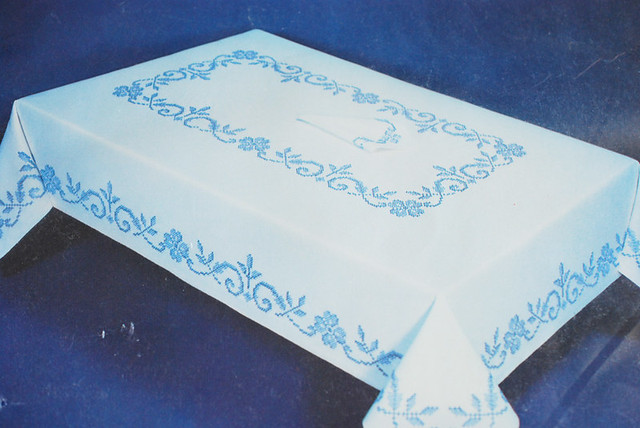
It's pretty simple to wind one of these, and I love that they show you how to join them to actually use them for something. In fact, if you search for Crazy Daisy Winder on Ravelry, you'll still find a few patterns! They're sometimes used for shawls and tablecloths.

But now, let's take a look at how this went for me!

Vintage Crazy Daisy Winder

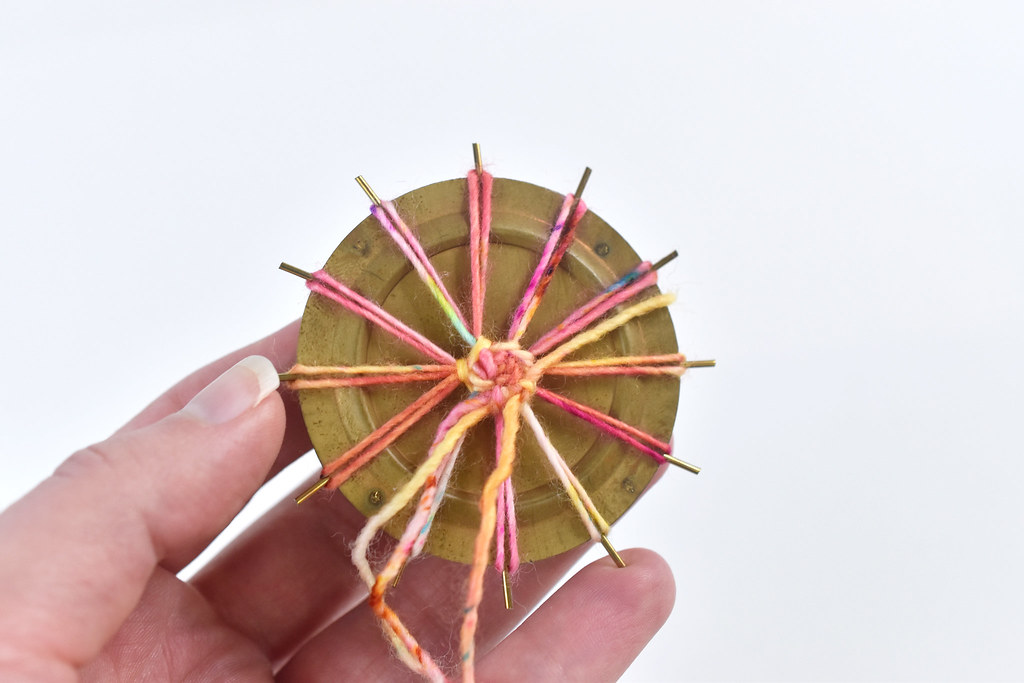
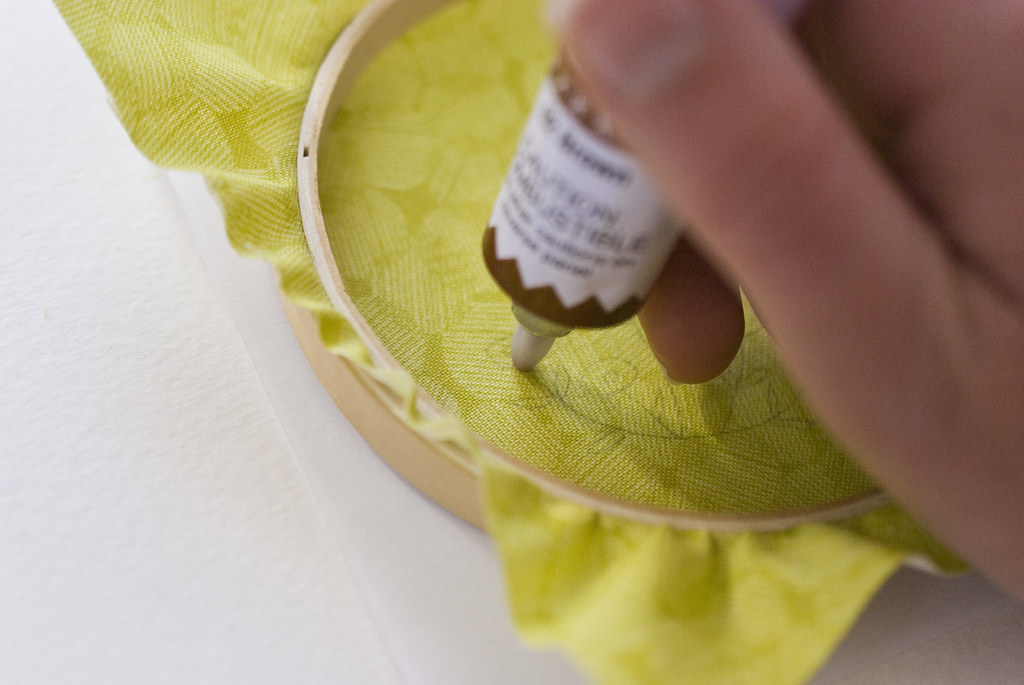
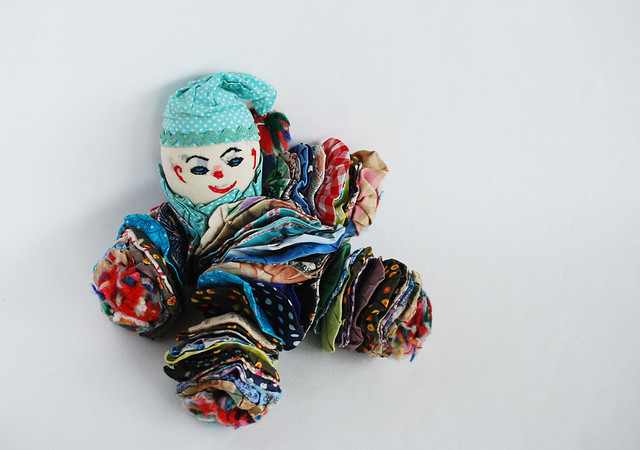
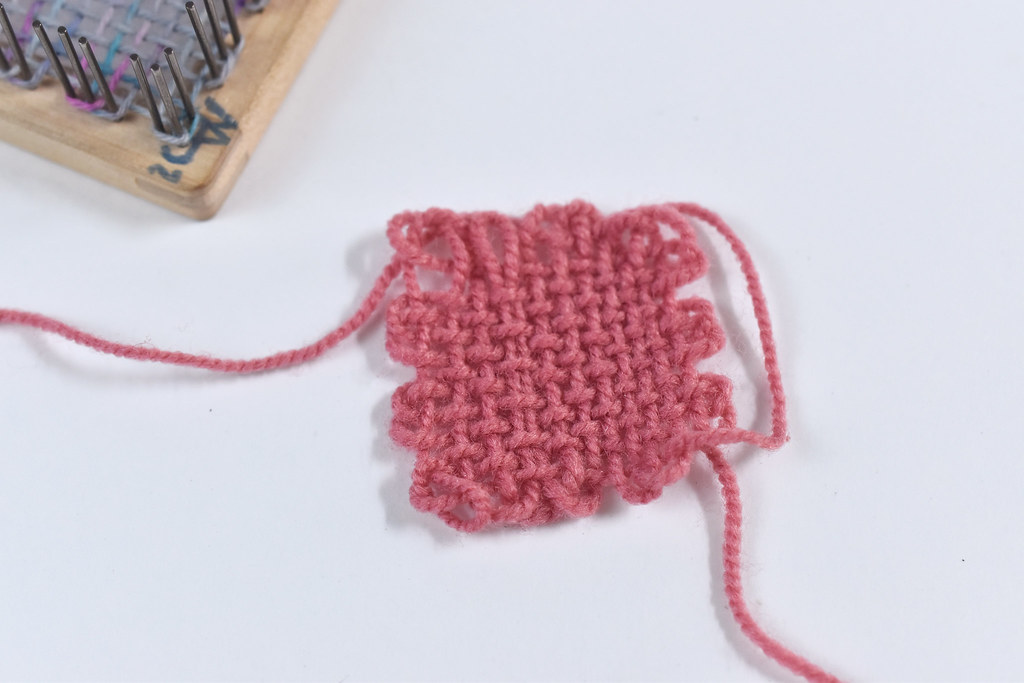
I used some extra Lemonade Shop sock yarn for my test. The wrapping process is very easy, although the weaving part gave me pause. Mainly because I wasn't sure if I had secured it enough. I probably overdid it, although it's also possible to add even more rounds in the center to create a different look.

Vintage Crazy Daisy Winder

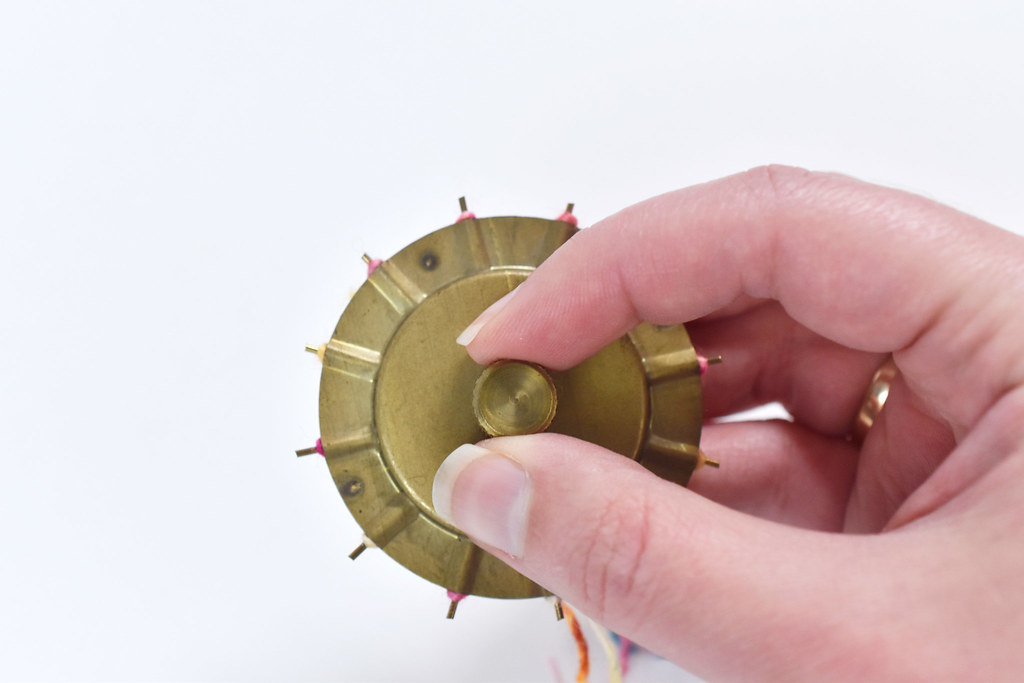
After the center is secure, you turn the little handle, which retracts the pins and releases the daisy. I find this part to be highly satisfying.

Vintage Crazy Daisy Winder

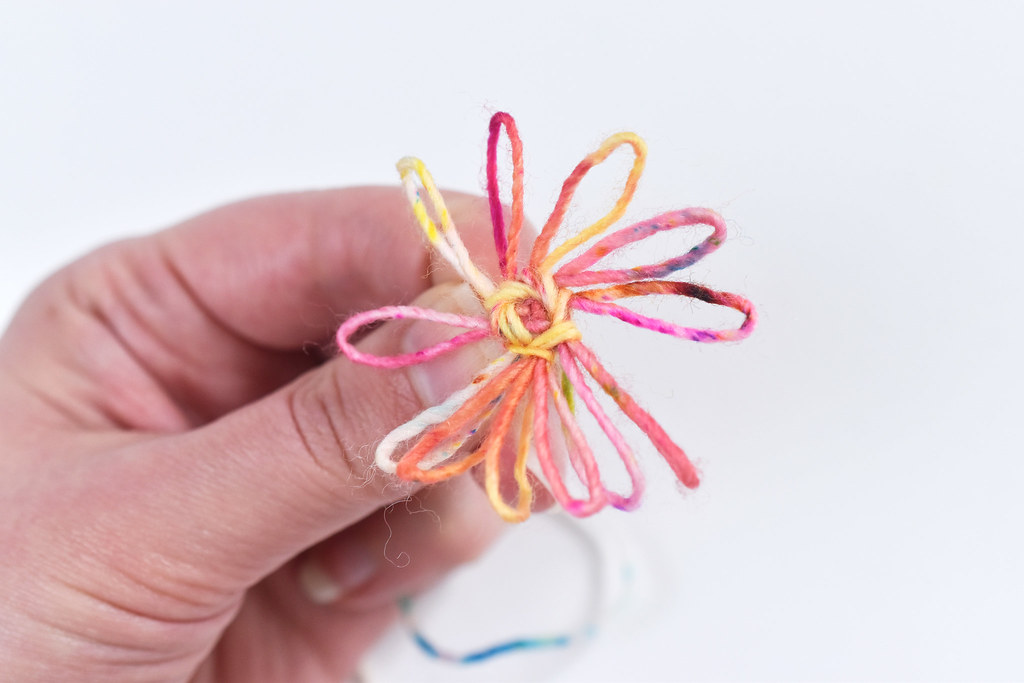
And that's a finished daisy! I wouldn't call it a huge success, but it is a flower!

This is a single daisy, and I have a feeling I'd like the look of a double one better. Using thicker yarn would also change the look.

Vintage Weave-It Tool

After my Crazy Daisy Winder experience, I jumped right into trying one of the Weave-It tools I inherited from my grandma.

Vintage Weave-It Tool

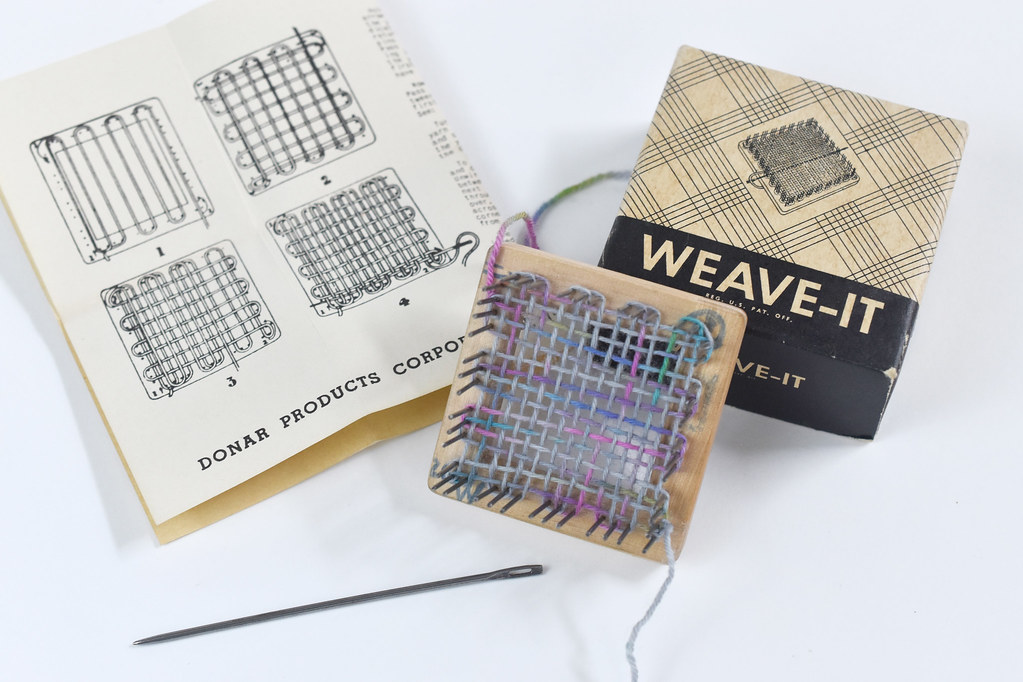
I've been fascinated with these since I was a child because I remember a drawer filled with this vintage WIP at my grandma's house. And the Weave-It pin loom was in there with it too. And of course, all the yarn needed to continue the project. Apparently these were actually extras or possibly a second Afghan because my mom tells me that another completed one exists somewhere.

Vintage Weave-It Tool

While I don't recall ever using one of these tools before, when I opened the Weave-It box, I found this little loopy square. It looks suspiciously like something a young Mollie would have made.

Vintage Weave-It Tool

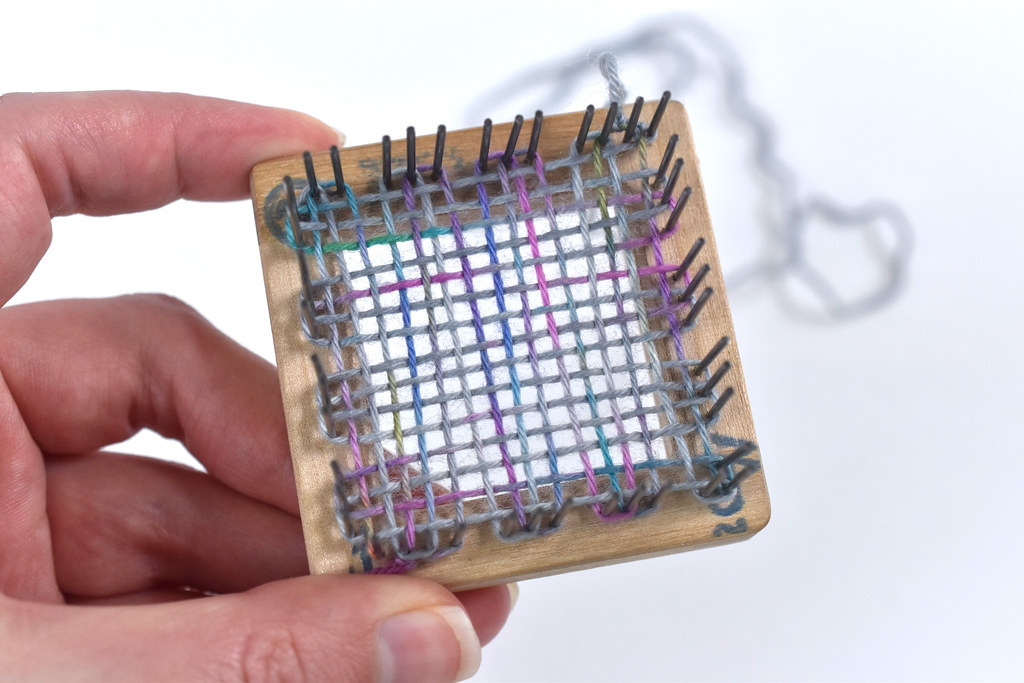
Once again, I used sock yarn, which, as you can see when it's on the loom, is a little thin for this. Still, you can see the weaving for this purpose.

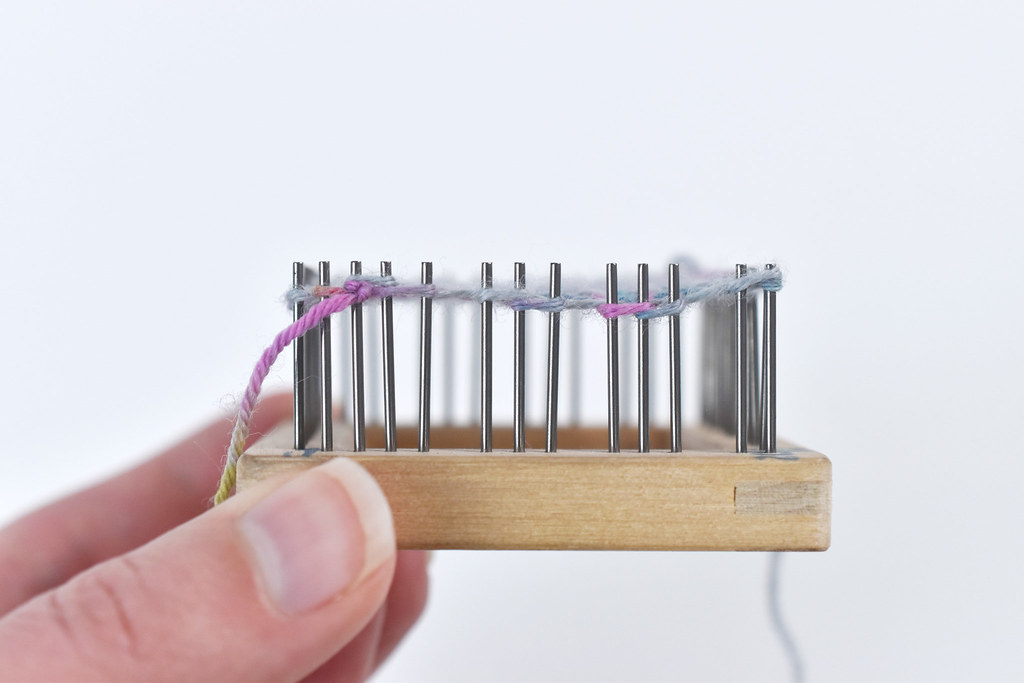
The Weave-It pin loom, by the way, is very similar to the Zoom Loom. And like the new version suggests, it is fast! All you have to do is wind the yarn back and forth between the pins, and repeat that two times, rotating the loom each time. Finally, you weave the yarn through the layers to secure the weaving.

That's the simple version, but you can find tons of patterns to make different versions with multiple colors and textures.

Vintage Weave-It Tool

After the end is secured, you slide the square up to the top of the pins...

Vintage Weave-It Tool

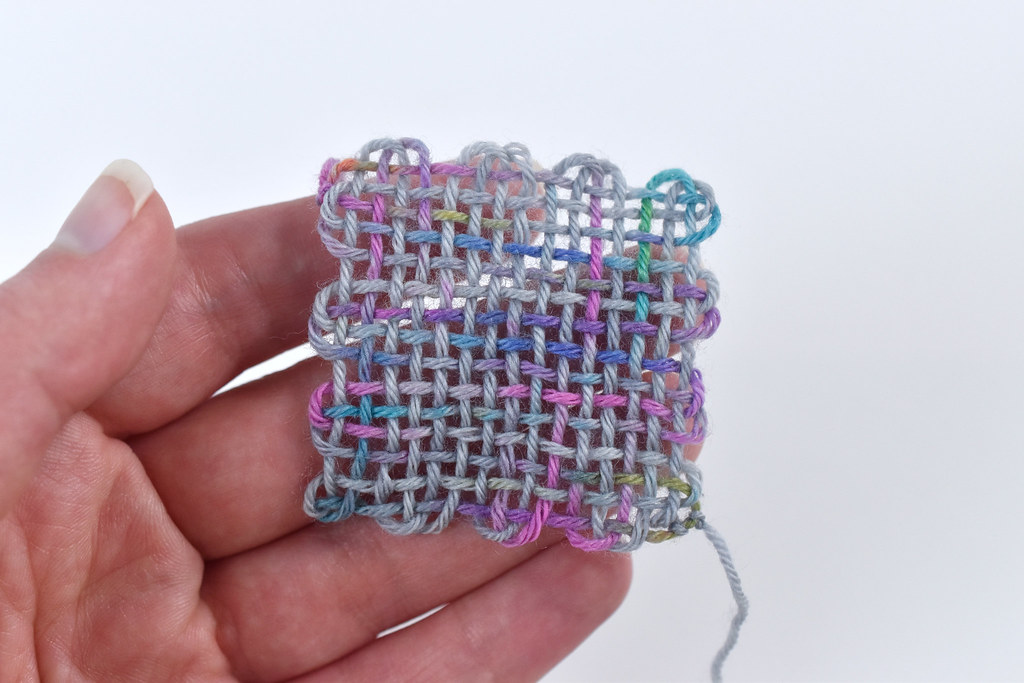
...and you have a woven square! You can see how much it relaxes and the warp and weft comes together. It's still much more open than it should be, but hey...this was a test.

Vintage Weave-It Tool

My favorite thing from my first (or possibly my second?) square is that you can spot a little heart in the corner. Maybe because I think I love these squares and can't wait to make more and learn how to join them next!

You can hear me talk about these fun tools and more in episode 8 of the Very Serious Crafts Podcast. You'll find some pin loom links in the show notes too!

vintage book review // easy embroidery by lis paludan

Easy Embroidery by Lis Paludan

I love the excitement of getting a new embroidery book, even when that book is old. Sometimes I get so excited about finding one new old book that I get into an ordering frenzy finding even more. And then I have a little stack of them that I forget to write about.

I'm kind of okay with that this time around, however, because it all works with my plan. If I want to talk about making old new again, what could be more perfect than working with a vintage embroidery book?

Vintage books are wonderful resources for finding ideas because they contain projects that you haven't seen in years and years. Making them with a fresh spin is such a good way to make old new.

In the case of Easy Embroidery by Lis Paludan (ISBN 0800823583), it doesn't even take all that much effort to make the 1970s designs seem like they've been newly designed. They are all a complete delight.

Easy Embroidery by Lis Paludan

Because this book was published in a time when color printing was more costly, many of the pages in here are in black and white. But the information, illustrations, and photos are still really useful and helpful. But there also plenty of full color pages so you can get a good sense for the projects and ideas.

Easy Embroidery by Lis Paludan

As the title suggests, this is an embroidery book for beginners (kids through adults, although many of the examples have a very kid-friendly feel). There is really good explanation of materials, stitches, and techniques.

I especially love the encouragement to explore the techniques and create your own designs. The author even gives some instruction for how to create patterns with different methods. I know that both kids and adults can benefit from this time of help! And it's this type of content that should encourage you to see if you can track down a copy of Easy Embroidery.

Easy Embroidery by Lis Paludan

Do you just love this tiger? It reminds me of a child's drawing, but the full-size pattern is in the back of the book. Actually, all of the patterns that are included are full-size. What a great thing to have!

Easy Embroidery by Lis Paludan

Above are two examples of appliqué embroidery. If you look closely, the top one is a little...ahem...questionable. I'm gonna chalk that up to this being a book that was originally published in Denmark in 1970. Maybe? I don't know. But I do love the style of the appliqué.

Easy Embroidery by Lis Paludan

And then there's a section on pompoms. What? They're so cute, but I still haven't figured out why they're in a book on embroidery.

Easy Embroidery by Lis Paludan

The instructions are given in in brief paragraphs, and many of them describe projects that aren't pictured in the book, other than those tiny illustrations. Granted, they are fairly simple, but it really does make you appreciate how craft books are these days.

Maybe I need to try making a few of these with some step-by-step photos? I already have one of the embroideries in here that I want to recreate with my own spin. I'm definitely up for making old new with this book.

Easy Embroidery by Lis Paludan

This chicken is one of my favorite projects in the book. It's such a fun way to incorporate embroidery into another item, just by filling the shape with some circles of stitches. And how about those chicks?

Perhaps you might try something similar?

Easy Embroidery by Lis Paludan

I'll end with something that represents my style, something that combines paint and embroidery. A sun with a face!

Now that I've pulled Easy Embroidery off my shelf again, I can't wait to try updating a few of these vintage designs!

making old new // stitching with paint

Painting an Embroidery Pattern

When it comes to my making and blogging here on Wild Olive, my big theme for this year is "Making Old New." I've already mentioned a few ways I'm exploring that idea, and here's another: working with vintage or vintage-style supplies.

While flipping through a copy of McCall's Needlework and Crafts from the 1960s, I spotted an ad. I've seen this ad plenty of times before (apparently I've even shared photos of it here on two previous occasions), but it jumped out at me differently this time.

Painting an Embroidery Pattern

Tri-Chem Liquid Embroidery is a fabric paint that comes in tubes, and it's designed so you can, essentially, draw the stitches. I remember that my grandma had some and I used it a bit as a child. When I saw the ad, I also remembered seeing the Aunt Martha's version at JoAnn.

It seemed a little strange that they even still make a product like this. Are people still using it much? I'm not sure, but I decided that it might be fun to try something old, and picked up a tube.

Painting an Embroidery Pattern

To start, you want to hoop your fabric so that the wrong side can lay against your work surface. Aunt Martha's makes a hoop designed for this, which is solid in the center, but it isn't necessary.

The pattern I chose is from a Japanese embroidery book, and I thought it would work well in the brown I bought.

Painting an Embroidery Pattern

The instructions tell you to place a blotter under your work, and in this case, a folded piece of paper worked perfectly.

Painting an Embroidery Pattern

To use the paint, you just hold the tube upright and press down as you trace the pattern. You do have to press down fairly hard as you do it. And it's best to test it on a scrap area of your fabric first...to get it started and to get a feel for it.

It feels a bit like tracing with a marker, but with more effort. Because it's paint, it doesn't bleed like a marker would. But again, because it's paint and a ballpoint tip, it doesn't just flow along.

Painting an Embroidery Pattern

Here's what we have after making the first few lines. Mmmhmm...

Painting an Embroidery Pattern

And after adding the rest of the details.

As you can see, this is not something from which you should expect perfection. I'm not sure if I'm disappointed or not surprised. Or both? The lines are thick and clunky, and they didn't even come out even. By the way, this is after I went back over a few spots where the paint dropped out.

It's hard to imagine anyone suggesting that this was meant to replicate embroidery in any way other than that you can use embroidery patterns. I could see it as a good way to fill or tint areas in your embroidery, as it is permanent and washable.

Painting an Embroidery Pattern

But here's the thing. The more I look at the little design on my hoop, the more it grows on me. I sort of go back and forth between "I never want to touch this stuff ever again!" and "what incredible things might this work out to be?"

Now that I've tried it once, maybe I'll find a way to make the old new...in a new way.

Have you ever used this type of product? I'd love to hear your thoughts and experiences!

making an old project into something new

Vintage Hexies

The great thing about digging out the mess you've made over several years is that you find untold treasure.

That's what happened recently when I was trying to get rid of the excess that has accumulated. I pulled out a bag of crumpled fabric pieces. The fabric looked old, so I had a feeling it was good. And it was.

The bag was filled with pieces cut for making dresden plates. Some were even started, all stitched by hand. The pieces still have some visible markings from where a pencil traced the shapes.

Vintage Hexies
Vintage Hexies

My attention went immediately to the fabrics. In my opinion they are far superior to any reproduction fabrics meant to reflect the style of this era of fabric. At least, the prints are. The fabric itself is a lighter weight than modern quilting cotton, but still much better than cheap fabric. At any rate, I'm smitten.

I showed my mom and she's fairly sure that the project was started by my great grandmother, Mollie. Of course. I never knew her, but I'm named for her. And even though I'm adopted, I seem to have the family crafting genes.

Usually I look at something like this and feel obligated to keep the integrity of the original project. Like, because this work-in-progress came to me, I need to finish it as it was intended. Because not doing that would dishonor the maker.

This time, I decided that was silly. The women who came before me would have repurposed things to make what they wanted or needed to make. Who knows? These dresden pieces may have been other items before they were so lovingly cut.

Vintage Hexies

Since I'm an English paper piecing and hexagon gal, I hoped that I could cut some pieces from the fabric bits. And I was delighted to find that 1/2" hexies will fit...and if I'm careful I get two from each piece!

Vintage Hexies

Cutting these fabric hexagons was both challenging and refreshing. As I went to take the first cut I kept thinking, "What am I doing? You're crazy Mollie!" But with each cut I was more and more pleased with my decision.

And as I basted them, it got better and better.

Suddenly I felt like I was honoring my great grandmother in a whole new way. I'm sure she'd be pleased.

At this point I don't know what these hexagons will become. I'll probably wait to see how many I end up with, but I know that whatever it is, it will be treasured. And I'll enjoy this connection to my past in a crafty sort of way.

Vintage Hexies

thread bits // vintage supplies that bring joy

Thread Bits // Vintage Supplies

This is an odd Thread Bits, since there's no sewing/thread officially involved, but that's more because of the photo that I just HAD to share. I hope you'll indulge me!

I keep seeing talk online about the KonMari method of clearing out the clutter. And anytime I hear talk of clearing out the clutter I become hopeful, because I have a lot of clutter. Seriously, a lot. If you're not familiar with the KonMari method, I've gathered that the heart of it is to keep only what truly brings you joy.

This is a great idea. Except for this...

Thread Bits // Vintage Supplies

I find joy in vintage boxes of gummed stars. And buttons. And bias tape. And tiny scraps of fabric. And an old sewing basket filled with random bits that belonged to my grandmother's cousin and came to me intact.

These things lead to much clutter, and yet they truly bring me joy. How could I possibly get rid of any of them?

The unfortunate part in all of this is that I have a lot of other things that easily fall into this category too. Not vintage, but cute and fun, and I become far too attached to them all.

What are the things that you could never part with?

vintage craft // yoyo clown

Yoyo Clown

This week I received an email from Jackie asking if I had ever heard of yoyo clown dolls. (Jackie, I tried to email you back, but my message bounced.) And the answer to Jackie's question is, yes! I have heard of them, because I have one!

This fella was my mom's but may be older than she is. We're estimating that's it's around 60 years old, but it's hard to say. It was probably made by a relative. The arms, legs, and torso are make out of fabric yoyos. There are two sizes in there, and they're definitely rather flat, but that's what they are. Jackie tells me that sometimes you insert batting into the yoyos, but I'm pretty sure that these never had that.

The face isn't quite as friendly as I would like, but not as scary as some that you see when you do a search for "yoyo clown". The saddest thing for me is that you can see through the fabric enough to see the back of the embroidery. I don't think that's just because of age, though I could be wrong.

If you do a search for this type of doll, and I highly recommend that you do, you'll find plenty of instructional blog posts so you can make your own. And I'm betting that you'll make it really cute. Even if yours doesn't have the awesome vintage fabrics in this guy!

And for those who aren't so big on the clown, Simplicity once made a pattern for these, but it also made a dog, a caterpillar, and an owl!

vintage craft // crochet for christmas

Crochet for Christmas

If you follow me on Instagram or Twitter, you will have seen this already, but it's too good not to share with all, right? This vintage booklet tells you how to crochet for Christmas, and if my skills went beyond garland, I might just make everything in here.

As it currently stands, I think I'm capable of making maybe three projects from this booklet. Since it's the time of year when I start setting goals for the new year, maybe upping my crochet skills should be on the list. Not that I need more projects going!

This week I've got a lot of Christmas going on, so I'm unsure how much I'll be posting here. But I'll surely be sharing some glimpses elsewhere, so be sure to follow my Twitter and Instagram for updates!

vintage craft // the zero-progress tablecloth

Progress Tablecloth

When you are a maker, you are in a constant loop of starting new projects, working on existing projects, and finishing projects. The reality of this loop, however, is that some projects get left behind. Show me a maker, and I'll show you their unfinished makes. Well, maybe...often they are hidden away!

I come from generations of makers and somehow many of the things they were making have passed down to me. As if I don't have enough of these unfinished objects of my own! Some are treasures, some feel like burdens, and some are too good to get rid of even if you don't know what you'll do with them.

This stamped tablecloth is the latter. And because I love irony, note that this is sealed in its package and the title of the design is "Progress."

Progress Tablecloth

I've decided to leave it sealed for now, but look closely at the stamping and fabric. The edges of the cloth are simply overlock. No fancy hem! And the fabric isn't all that great either. It was made for easy washing so you could use the piece you had just spent all the time stitching.

Progress Tablecloth

The size is 60 x 104 inches, and according to the back, it would use a total of 44 skeins of floss in two colors. Just think of how many cross stitches that would be

I actually really like the design on this, but I'm not sure that I'll ever start it, let alone finish it. Apparently my relative had the same feeling.

Do you have any old projects waiting to be finished?

found: souvenir needle book

Souvenir Needle Book

Is it just me, or did souvenirs used to be a lot nicer and a lot more useful? Take this needle book for example. I found this in the drawer of my grandma's sewing machine, which I've been through many times before, but only just spotted my new old treasure.

The stamped leather cover has fantastic lettering, and will certainly stop the "needles and pins" from poking through. But of course, what makes this a souvenir over just your standard needle book is that it's from Niagara Falls. How great is that? I don't recall ever seeing something like this on any of my trips and stops at tourist shops. Or maybe I just wasn't looking?

I now invite you to take a closer look, then come back tomorrow to make your own needle book inspired by my find.

Souvenir Needle Book

PS: If you look closely, you can see the price written inside the front cover. I'm pretty sure it was 25 cents. Nice.

PPS: Even non-reading books count for book month, right?