about shop patterns projects printables extras sponsorship wild olive twitter flickr pinterest subscribe

project // needle minder keeper

DIY Needle Minder Keeper


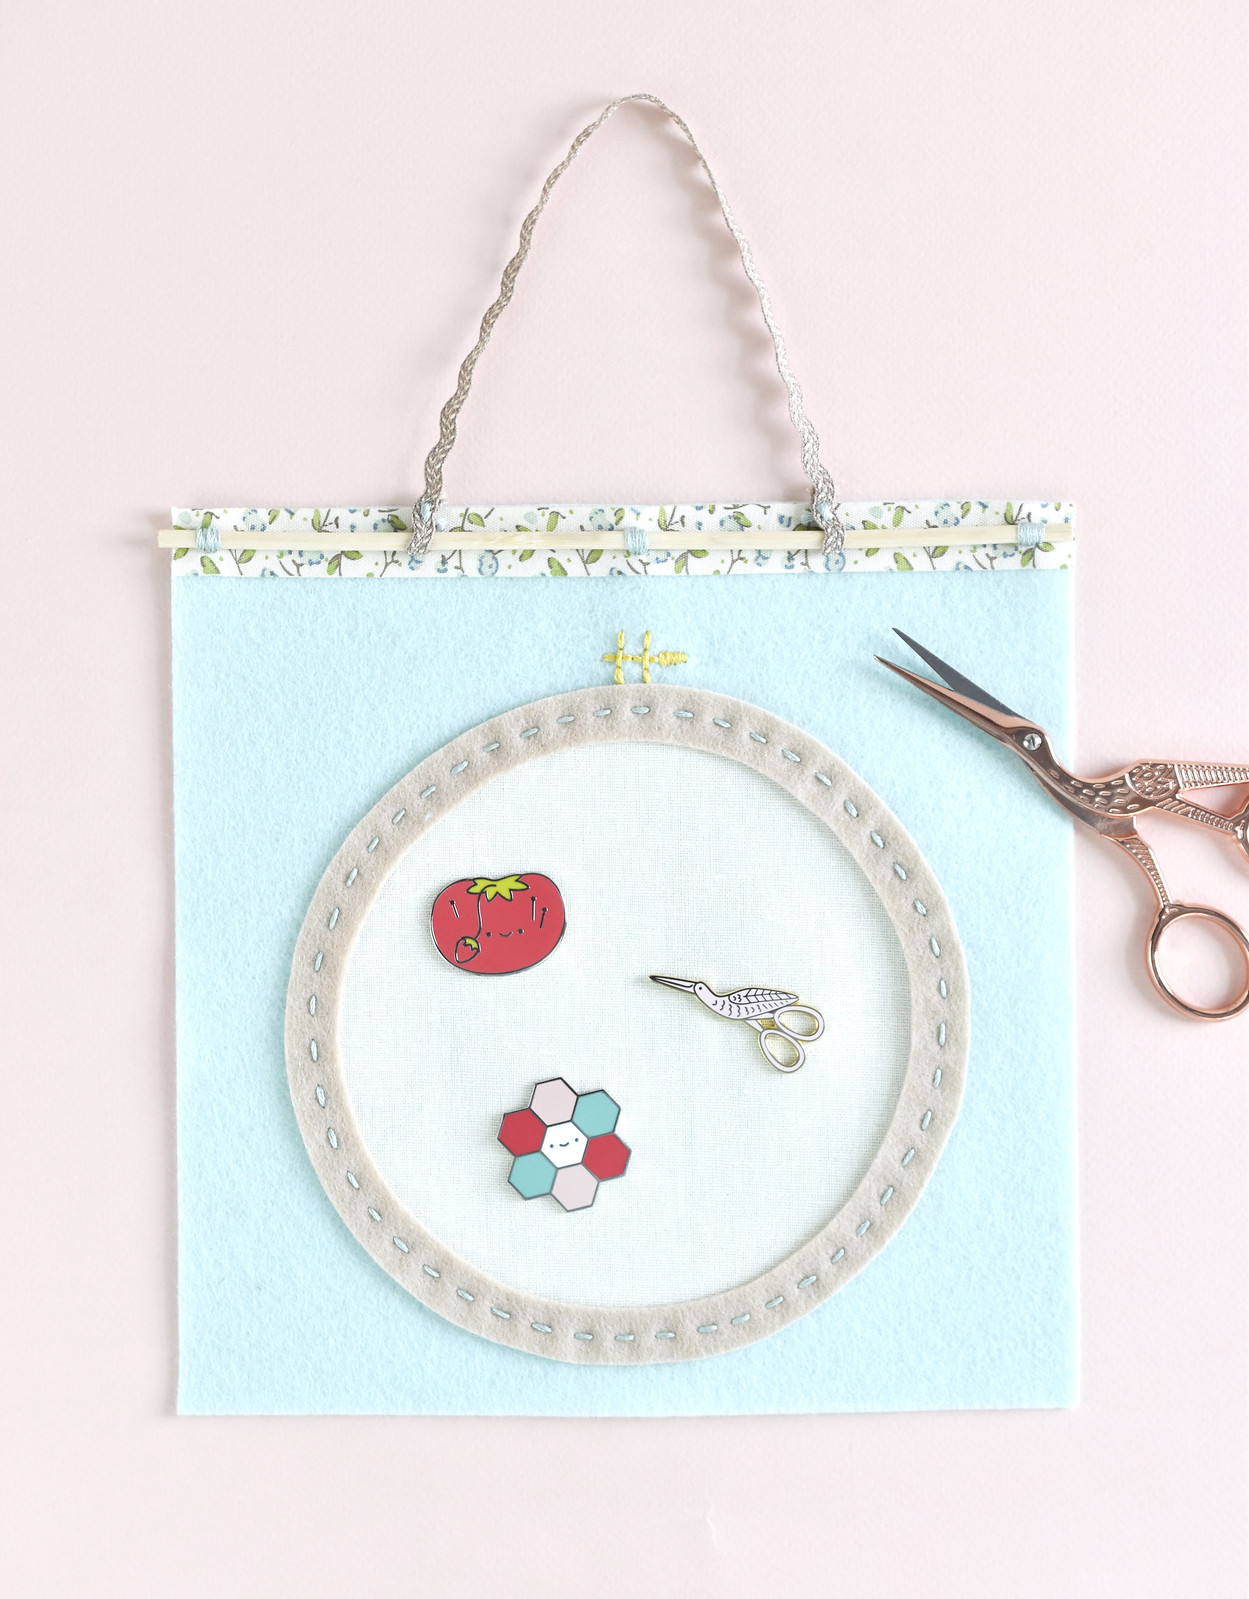
Do you use and collect needle minders? They're such a fun and useful embroidery accessory, and now you can store and display them on your wall!

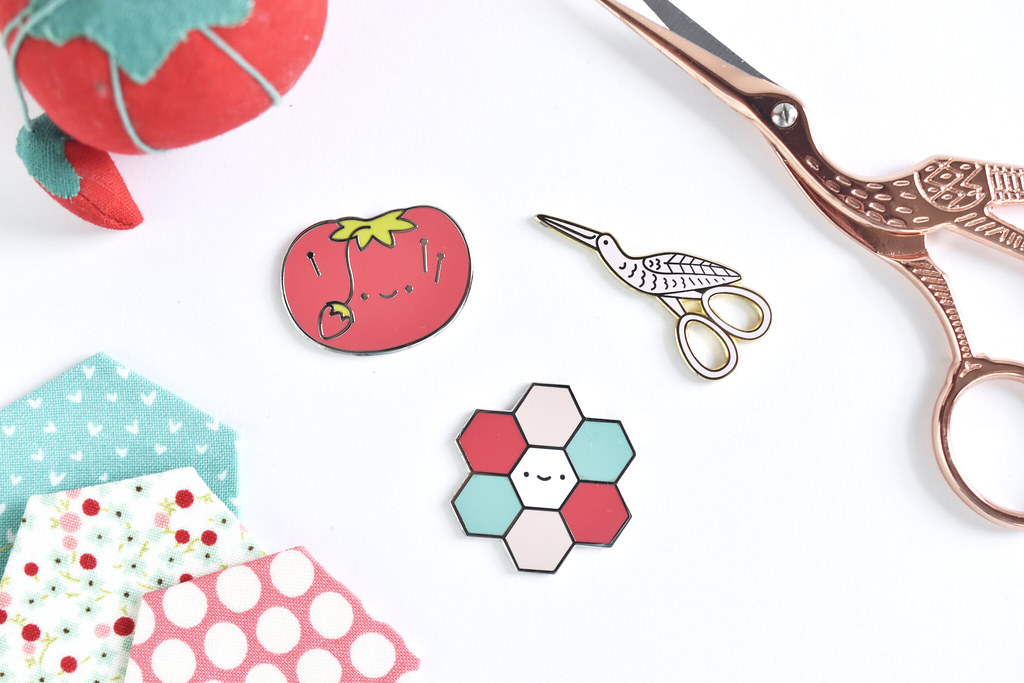
As I've designed enamel needle minders with Nicole at Cloud Craft, I've also had a growing stack of stitching and sewing items that like to stick to these magnets. What an ugly mess! So I decided it was time to make something to hold them, while showing off my favorites. This project was inspired by the banners and boards that people make to hold their enamel pin collections. I needed my own version!

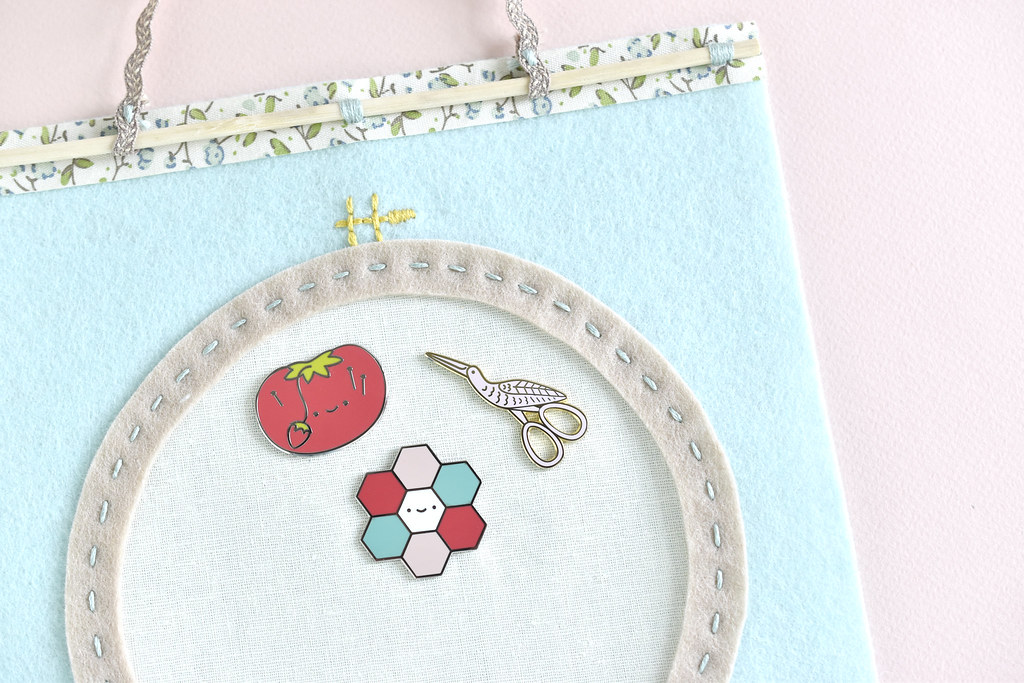
And so the needle minder minder was born!

DIY Needle Minder Keeper

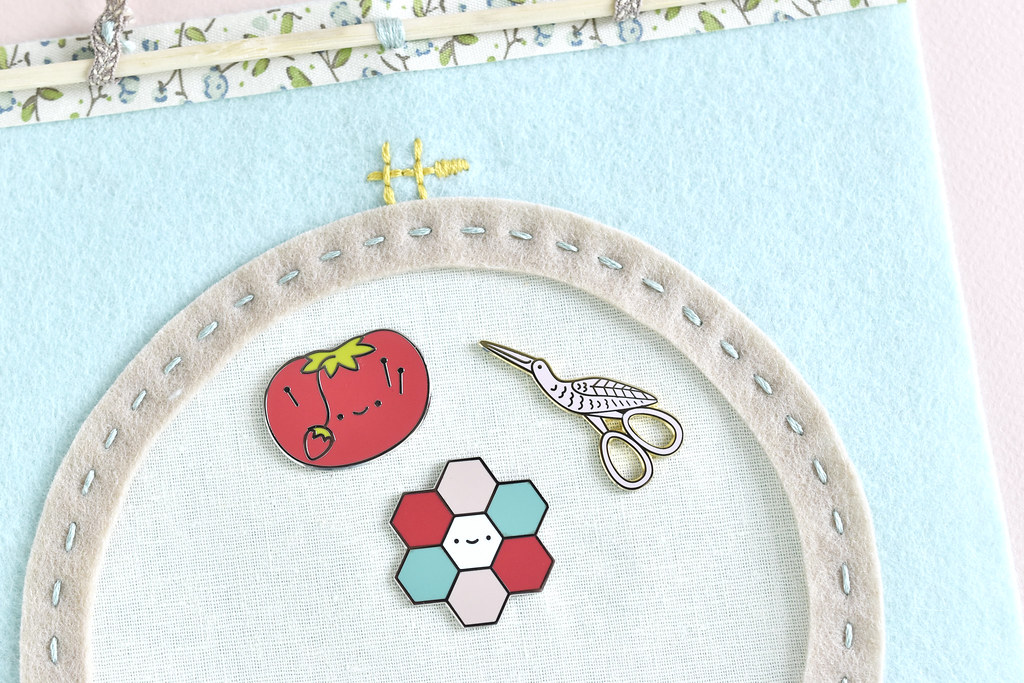
Since a needle minder goes on an embroidery hoop, I went with an embroidery hoop design. And to show off these pretty collaborations, Cloud Craft provided materials to make it. Oh, and maybe you've noticed that there's a new design on there? Yes? It's a brand new tomato pin cushion needle minder!

Find all three of these at Cloud Craft (the newest one is coming very soon!).

DIY Needle Minder Keeper

You will need:

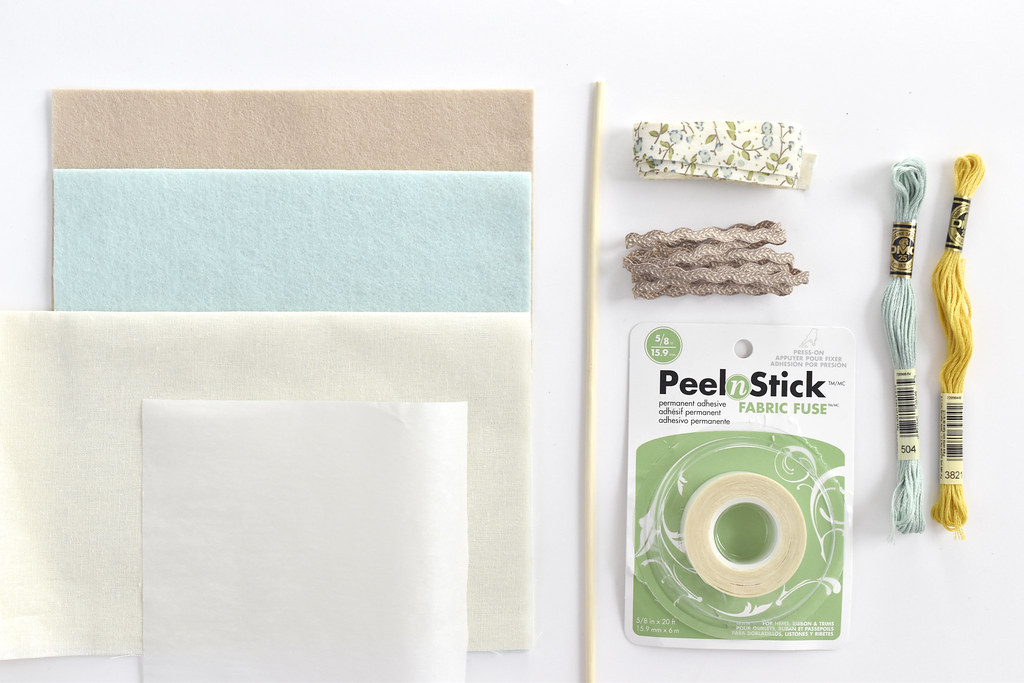
Wool Felt (I used 20x20cm sheets of Spearmint and Chai)
Freezer Paper
Linen
Paper-backed Fusible Web
Embroidery Floss
Cotton Ribbon
Peel-n-Stick Fabric Fuse (or more fusible web!)
Wooden Skewer or Dowel Rod
Ric Rac Trim or Other Thin Ribbon
Pencil
Iron
Scissors
Needle

DOWNLOAD THE NEEDLE MINDER KEEPER PDF TEMPLATE

Note: Each of the links above will take you to Cloud Craft, where you can purchase the exact items that they provided for this project.

DIY Needle Minder Keeper

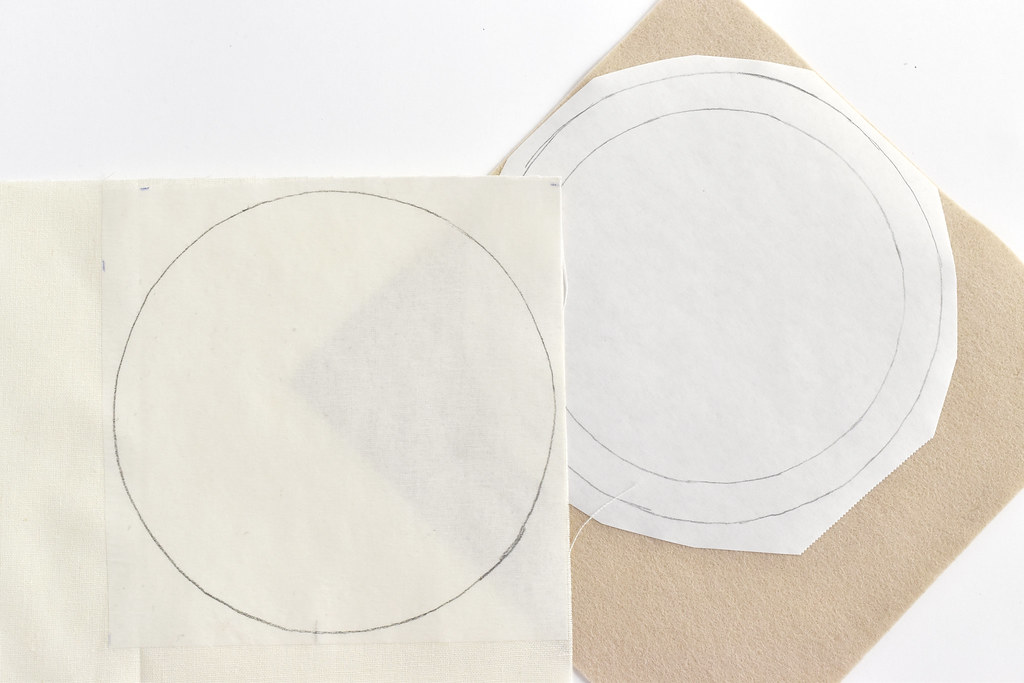
Trace the double circle template (page 1) onto the non-shiny side of the freezer paper and trace the single circle template (page 2) onto the paper side of the fusible web.

Iron the freezer paper onto the Chai-colored felt and the fusible web onto the linen.

DIY Needle Minder Keeper

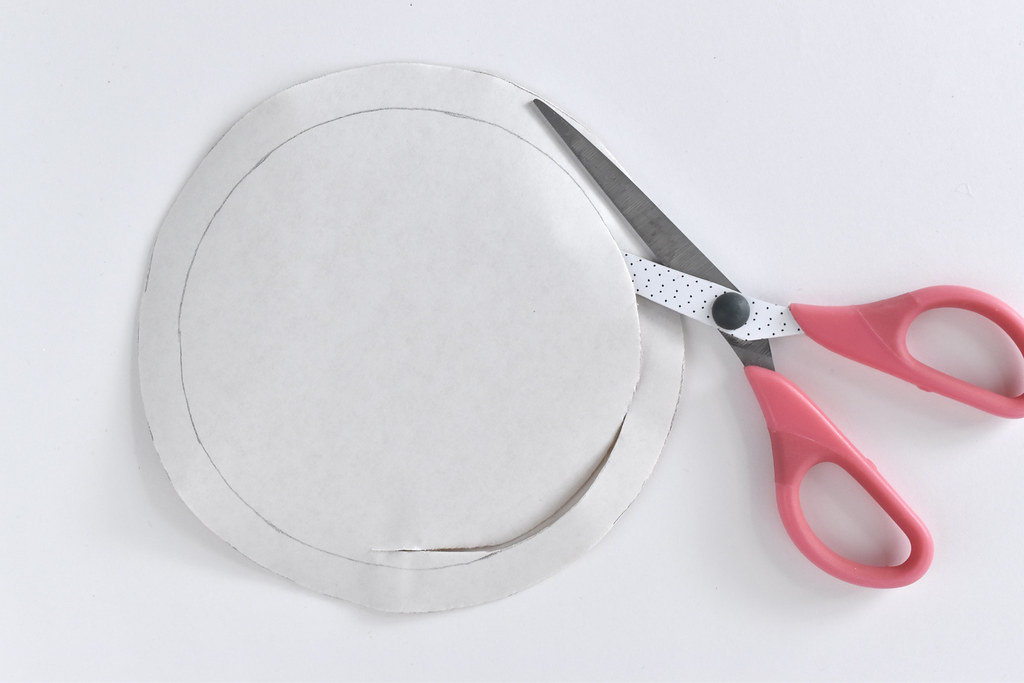
Cut out the two circle pieces. On the felt circle, cut out the center of the ring. I'm a big fan of "waste not, want not" so I carefully cut near the line to start, preserving as much of the middle as possible.

DIY Needle Minder Keeper

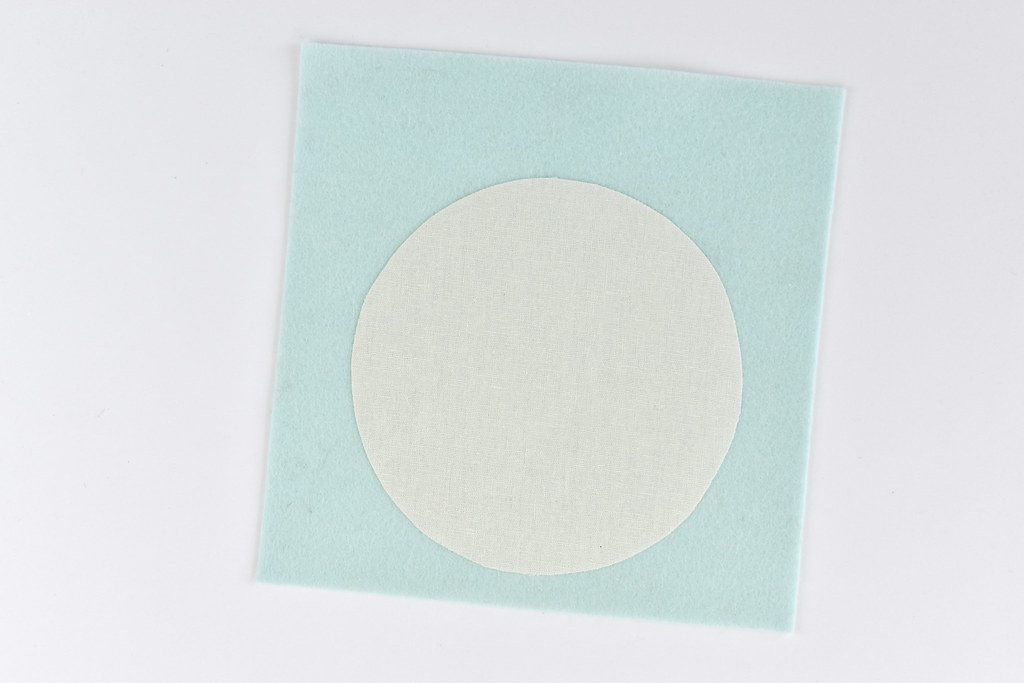
If you're using Cloud Craft felt, it comes as a 20x20cm square, which is the perfect size. If you're working with other felt, cut it to 20x20cm or about 8in square.

Peel the backing paper off the fusible web on the linen and iron the circle to the Spearmint-colored felt square. Place it near the bottom so there's extra room at the top.

DIY Needle Minder Keeper

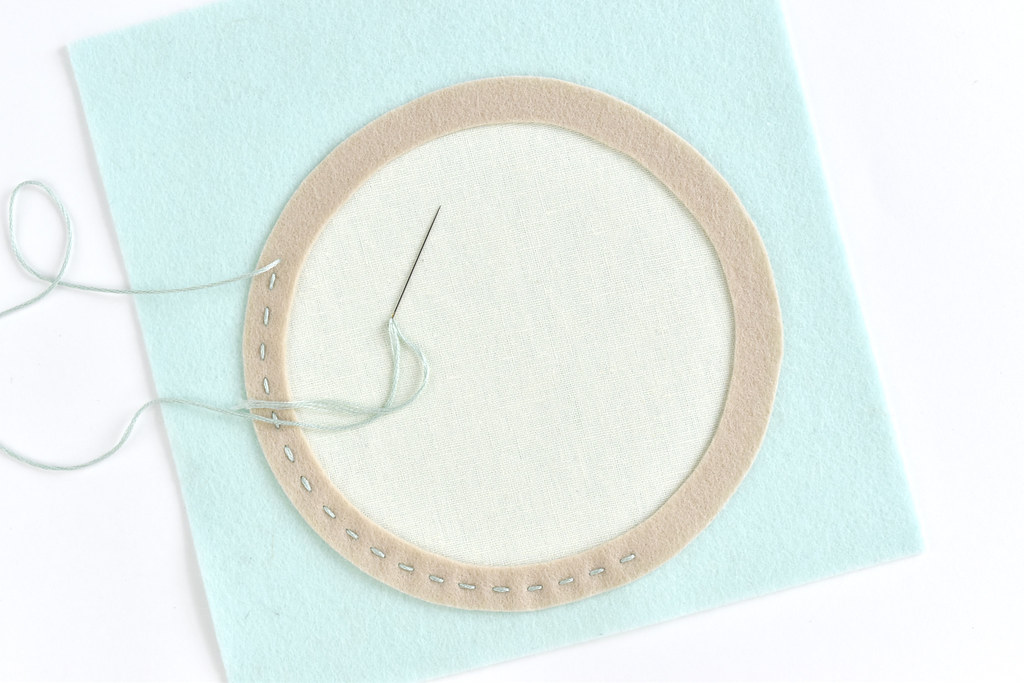
Peel the freezer paper off the felt ring and center it on the linen circle. Stitch around the circle with running stitch and all six strands of embroidery floss.

DIY Needle Minder Keeper

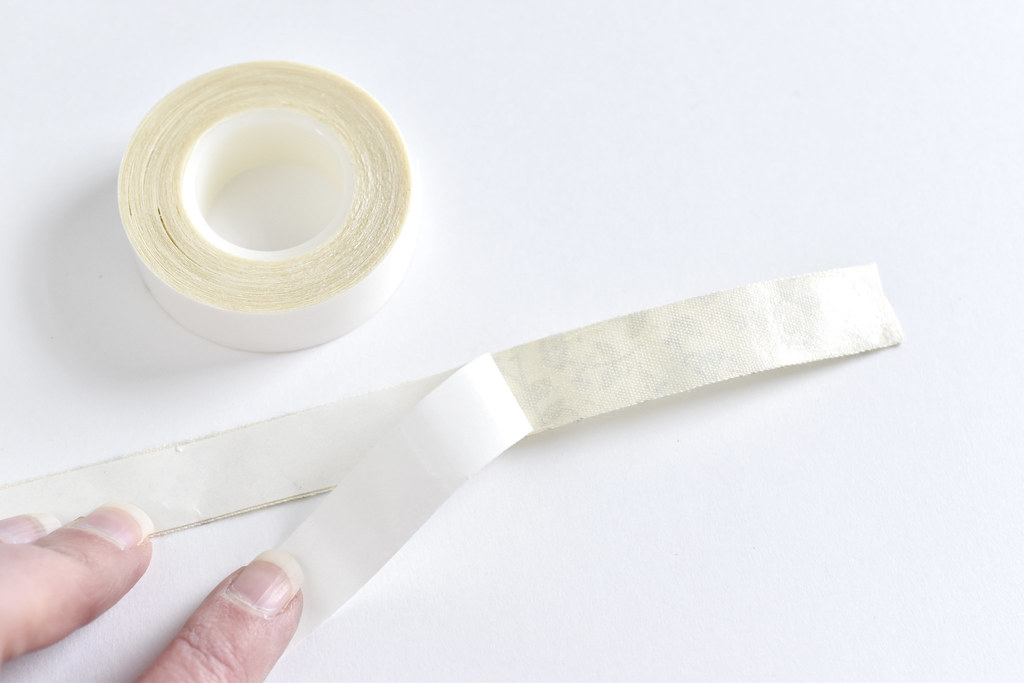
Use fabric fuse tape or a strip of fusible web to attach a piece of cotton ribbon to the top of the felt square...

DIY Needle Minder Keeper

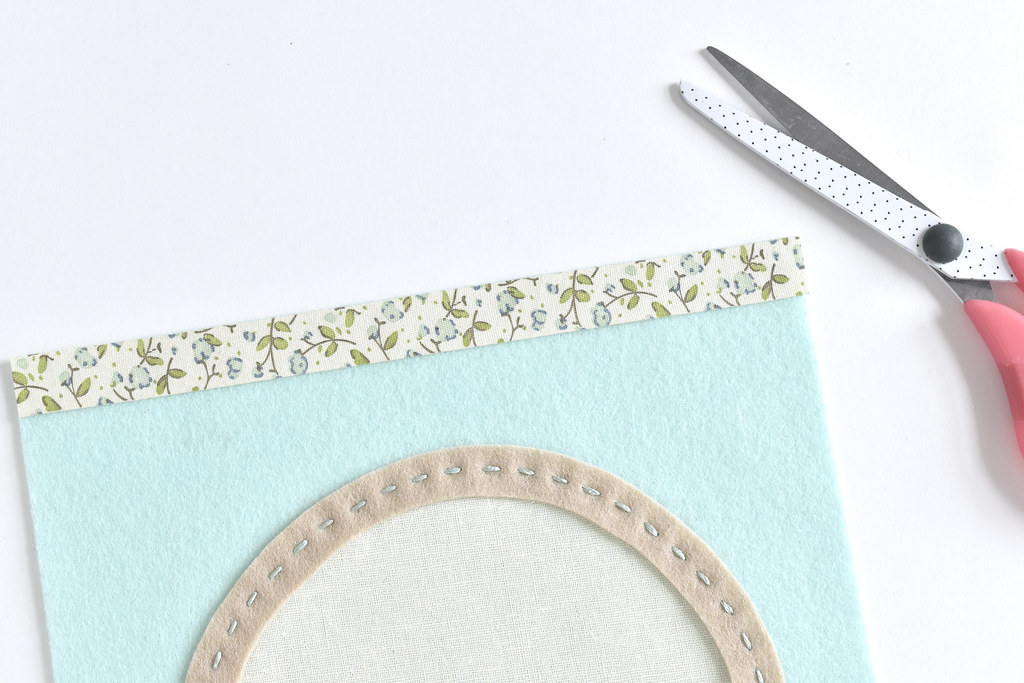
...and trim the ends to make them even with the edge of the felt.

DIY Needle Minder Keeper

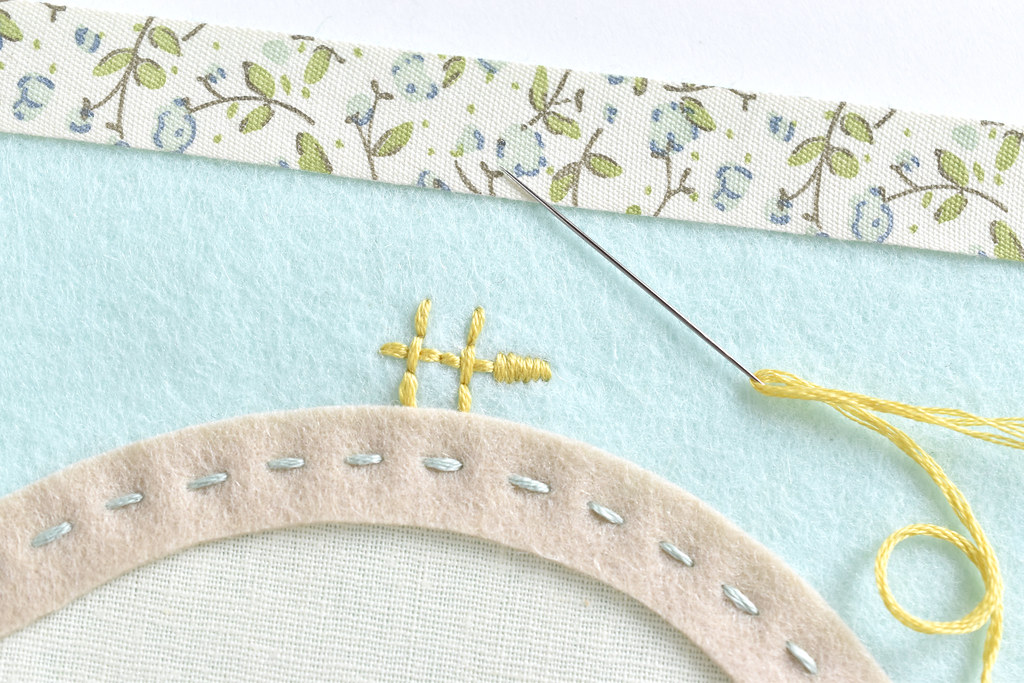
Embroider the hardware at the top of the felt embroidery hoop. These lines are pretty simple, so you can freehand stitch them if you'd like, or use the pattern on page 2 of the PDF. Use back stitch and satin stitch with all six strands of embroidery thread.

DIY Needle Minder Keeper

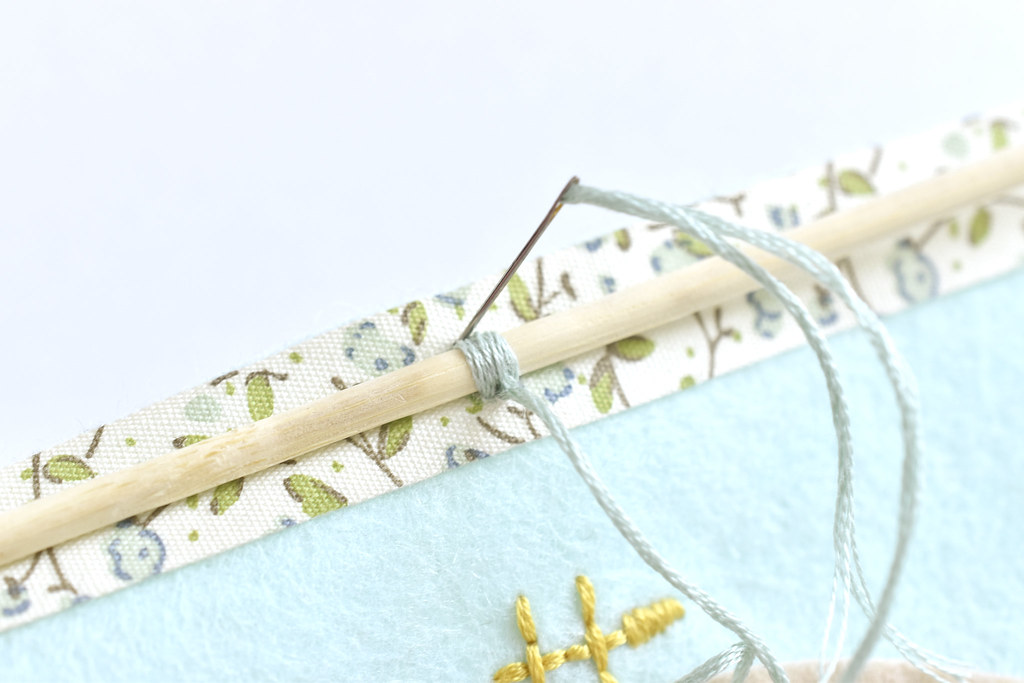
Cut the skewer or dowel to match the width of the banner. Hold it in place over the ribbon trim and stitch it with embroidery floss at the center and two ends.

I should warn you, stitching through the adhesive tape made the needle gummy, but it wipes off. I'd imagine that using fusible web would be easier...but this still wasn't bad.

DIY Needle Minder Keeper

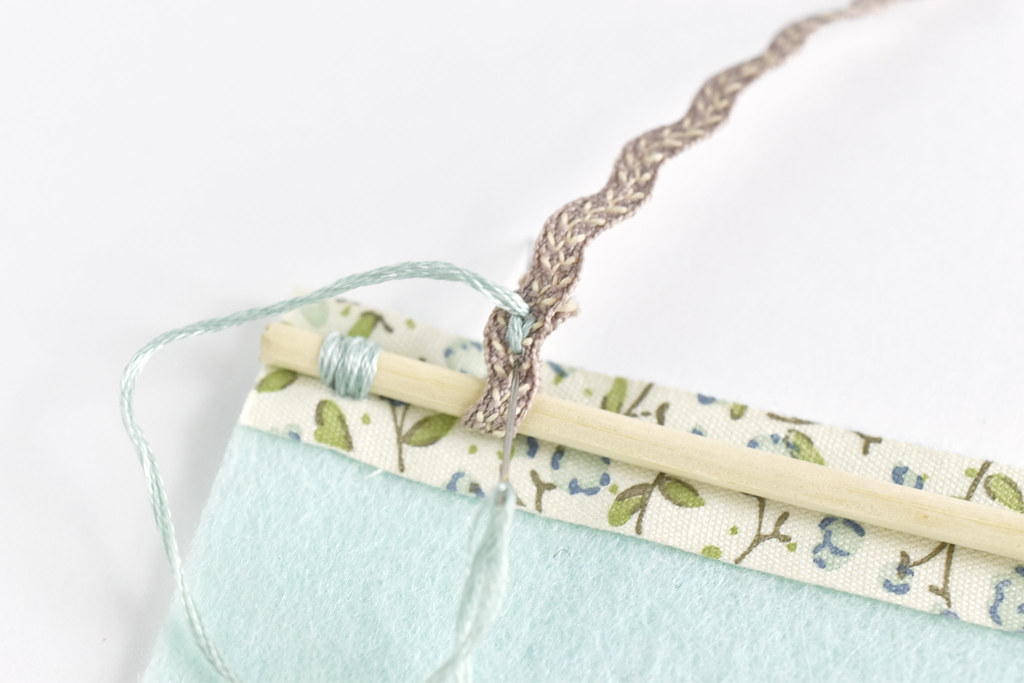
Cut a 12-inch piece of ric rac trim and fold an end around the skewer near the end. Stitch it with a few straight stitches to secure it, then repeat at the other end.

DIY Needle Minder Keeper

Now you can load up this needle minder minder with your favorite needle minders so you can find them easily and display them when they aren't attached to a project!

DIY Needle Minder Keeper

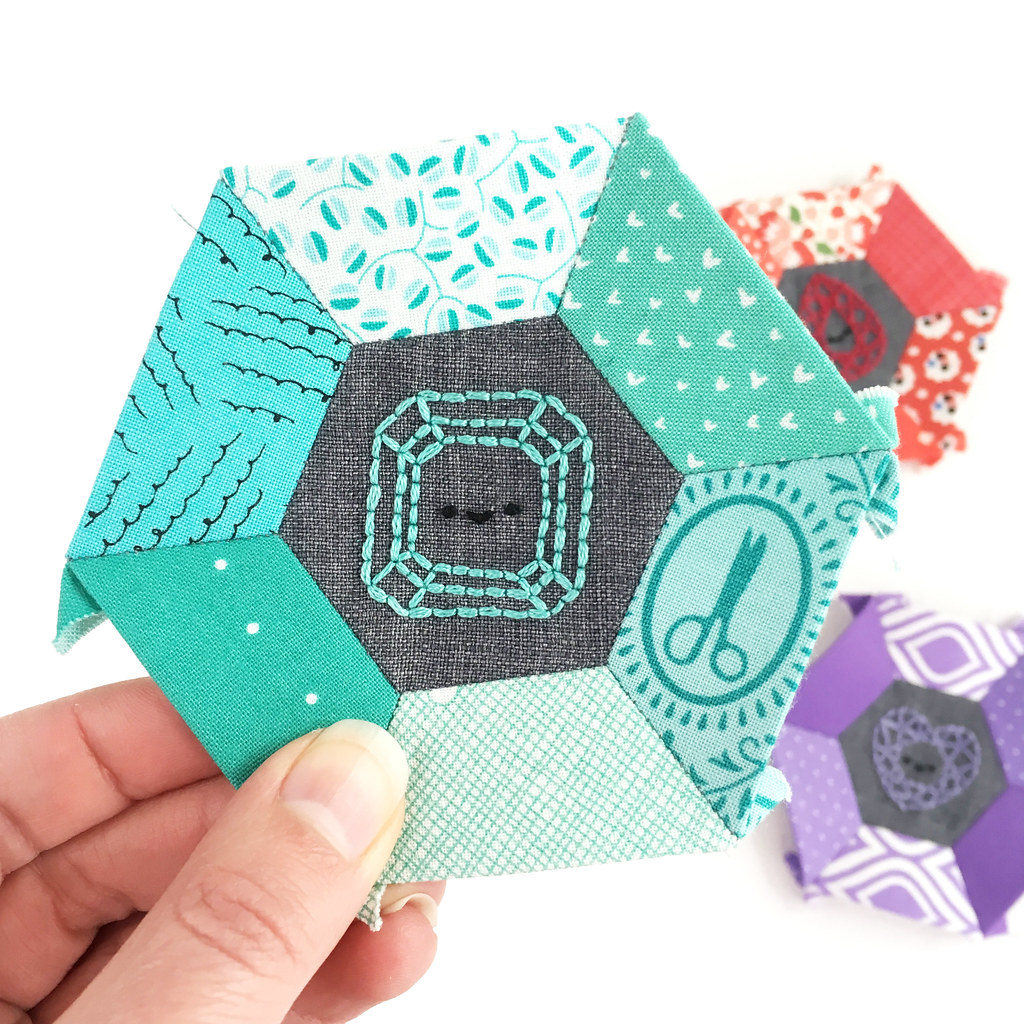
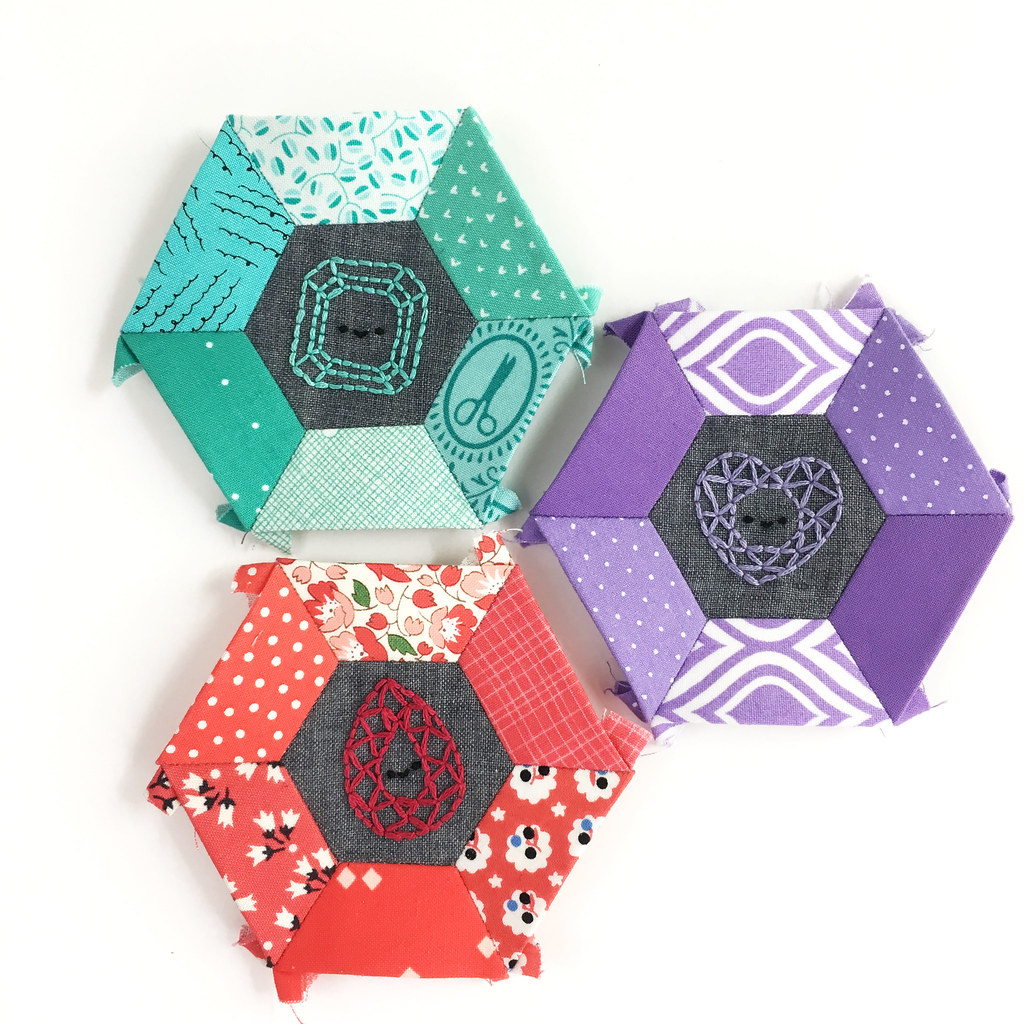
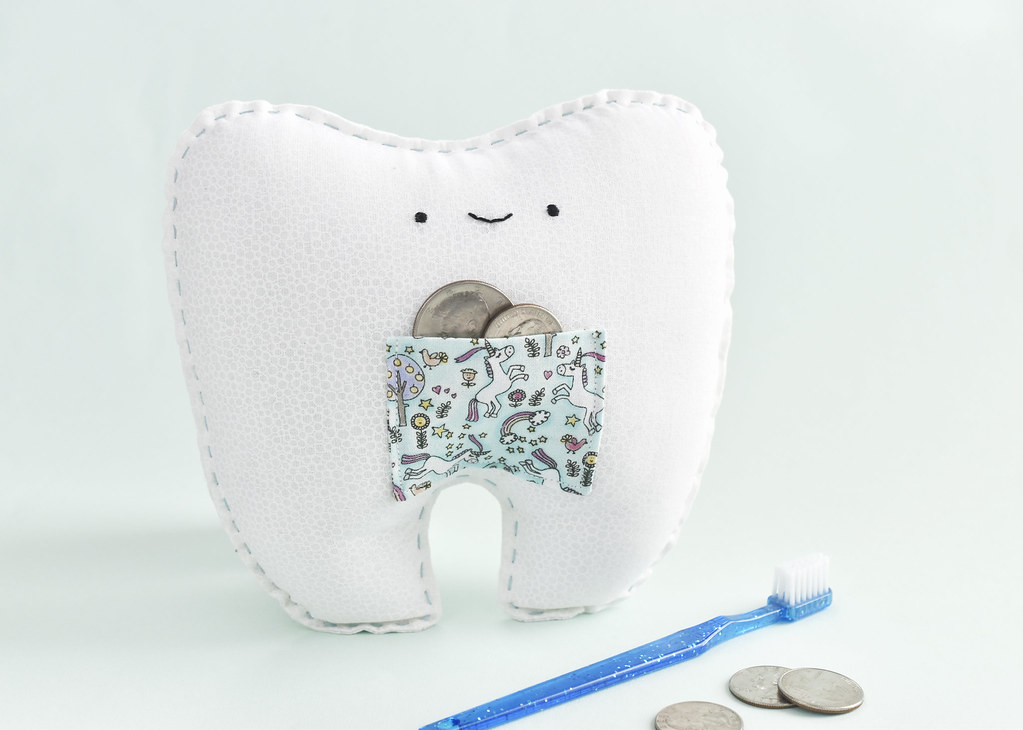
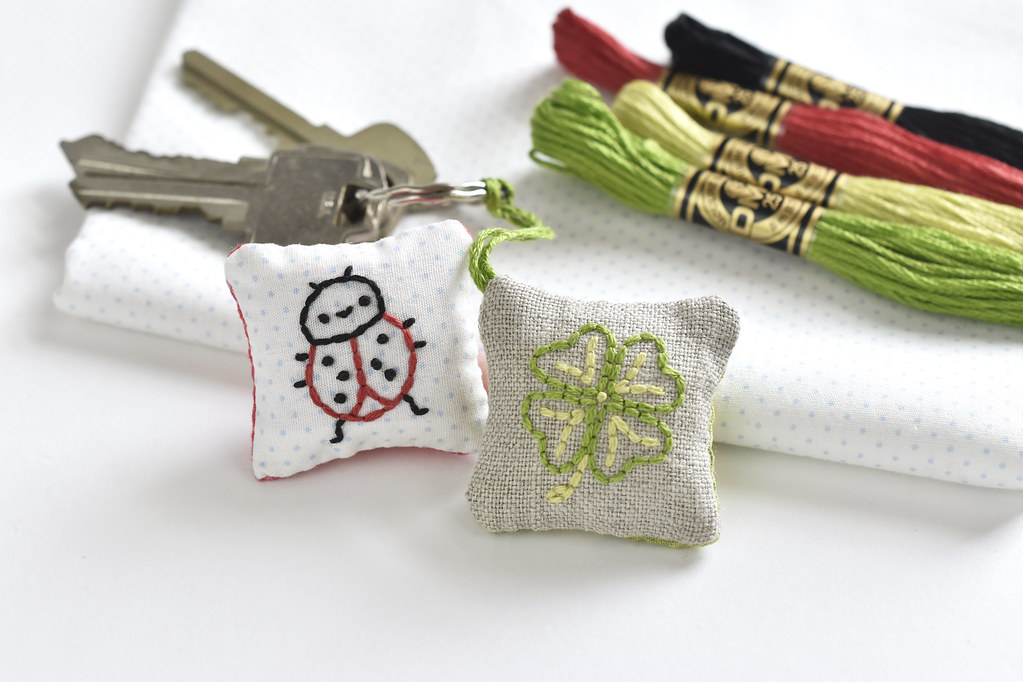
I have a growing collection of needle minders, and I've made many of them. But these three are my favorites!

Even though my needle minders are frequently in use, sometimes they need a place to rest, and this is a much better (and prettier!) solution to a magnetic clump of safety pins, scissors, WonderClips and needle minders. I no longer have to pry things apart!

DIY Needle Minder Keeper

So far, I haven't tested how much weight this banner will really hold, but I'd say we're safe with nearly filling the space. Besides, how many will you really have on there at once...we have too many projects going!

pattern // aquamarine birthstone embroidery and epp

March Aquamarine Birthstone Embroidery Pattern

When it comes to birthstones, aquamarine is, in my opinion, one of the prettiest colors. And while it might not sparkle the same as a gem, this aquamarine embroidery pattern is set to be some truly stunning (and cute!) stitching.

Last month, I determined that I would post the next pattern earlier in the month, and while that didn't work out quite as I hoped, it's still the first half of March. Close enough.


In this PDF you'll find the mini pattern and the larger pattern, along with the templates for making English paper piecing blocks like you see here. And you can find all the 2018 mini birthstone embroidery patterns here.

March Aquamarine Birthstone Embroidery Pattern

I love seeing these come together, as well as seeing them as a group. This club started without a definite plan for how the twelve blocks would join up to become something, but I made a decision! I'll share more instructions (and of course patterns!) through the rest of the year, but here's a look at the birthday birthstone placemat!


Right now my plan is to place these gem embroidered blocks in color order, rather than calendar order. But that may change, and of course, you can do as you wish if you make this project.

The four hexagons in the center will get some extra embroidery, with patterns still to come. And all those triangles (which you could do as diamonds)? I don't want them to be white. But I don't know what they'll be yet on my quilty mat. Maybe a scattering of the colors from the other blocks? We'll see.

But if you'd like to get a jump on those pieces, you can download the EPP templates for the triangles (which, again, you can leave joined into diamonds) and hexagons. Just remember that you won't want to make the center hexagons until you get those embroidery patterns.


Kawaii Unicorn Dreams Pattern

And just in case you haven't seen this yet, I have a new pattern in my Etsy shop! It's called Kawaii Unicorn Dreams, and it's all about a Lisa Frank childhood. I hope you love it as much as I do! (It's hard to tell in the photo, but I used sparkly magic metallic linen for my sample. Be sure to check it out for yours!)

project // vintage-style pipe cleaner leprechauns

Pipe Cleaner Leprechauns


Kitschy, vintage-style holiday decorations are so cute (and okay...sometimes a little creepy). But I love them. And I love making them! These pipe-cleaner leprechauns are a variation on the pipe-cleaner Santas I made a few years ago. They were modeled after a vintage decoration, and I couldn't resist making a new version.

These little guys are simple and silly, and lots of fun to tuck in around on shelves. You could even use them as a little St. Patrick's Day greeting or hide them as a game!

Pipe Cleaner Leprechauns

You will need:

Green "Bumpy" Pipe Cleaners
Scissors
Craft Glue
Paper

Printable Leprechaun Faces PDF

Pipe Cleaner Leprechauns

Fold a bumpy pipe cleaner in half. At the skinny section, twist the pieces together a couple times. The "bumps" sticking out will be the arms.

Pipe Cleaner Leprechauns

Take a second pipe cleaner and fold it in half as you twist it around the skinny section of the first pipe cleaner.

Pipe Cleaner Leprechauns

Here's where it starts to get interesting. Fold the head toward the back, then up and around through the two loose stems.

Pipe Cleaner Leprechauns

Odds are, the arms will look extra long, so wrap each one across the front to shorten them a bit. Twist the two lower stems at the skinny point, to form the torso and legs.

Pipe Cleaner Leprechauns

The legs and lower body look a little strange if you leave them, so let's fix that.

Fold the legs toward the back, then through the torso and back into the correct position. Sometimes it helps to repeat this step twice to get the legs looking right, but you can look at your leprechaun and decide.

Pipe Cleaner Leprechauns

We're down to the final details now!

If you want, pinch the fold a little to form the top of the hat. Fold the tips of the arms and legs to make hands and feet. Then, cut a single "bump" to fill in the torso.

Pipe Cleaner Leprechauns

Fold the ends of the single "bump" through around the torso so his belly isn't open.

Pipe Cleaner Leprechauns

Cut out a printed leprechaun face and have it handy. Dab a bit of glue on the lower part of the pipe cleaner head (this works better than putting the glue on the paper face).

Pipe Cleaner Leprechauns

Attach the face and let the glue dry.

Pipe Cleaner Leprechauns

These leprechaun friends are ready to create some mischief!

Pipe Cleaner Leprechauns

I'm tempted to try making some Easter Bunnies like this too...what do you think?

calendar // a cheerful aquamarine for march


With February always ending so quickly, I'm never quite ready for March. And yet, I'm always so ready for March because spring is just around the corner! To add to that bit of joy, this month's birthstone, aquamarine, is bright and pretty and one of my favorite colors.

I went with a square-ish/octagon-ish style gem and learned that this is called an Asscher cut. You guys...I'm starting to geek out over gemstone cuts. There are so many! Including one called a "scissors cut" which sounds like something a crafter might want.

But I do love the simplicity of this one, and I'm looking forward to stitching it up soon...

Download the aquamarine calendars below. Save whichever you need to your devices and then set them as your background wallpapers or lock screens.


Last month, when I wasn't posting here (which was quite often!), I was creating projects for other sites. Here are a few of my favorites:

Valentine Donut Friends

I made these donut friends for Valentine's Day, but with a few small changes, they work any time of the year!

Tooth Fairy Pillow

Will your little one be losing a tooth soon? Sew up a happy tooth pillow in no time at all!

Lucky Charm

St. Patrick's Day will be here soon, which gets us thinking about all things Irish, and a bit of luck. Which is a perfect time to stitch your own lucky charms!

Rainbow Fringe Cloud Purse

And most recently, I shared this kawaii cloud purse with a rainbow fringe. It may have just been an excuse for me to put my ribbons in color order...

One last thing...Happy Birthday to all my aquamarine birthstone March birthday friends! Tell me, do you like your birthstone color/stone?