


When I think of cute soft toys, the first person who comes to mind is Abby Glassenberg. She has an amazing talent for creating adorable softies to hug and love, as well as passing that talent on to others through her blog and shop. In her book Stuffed Animals: from concept to Construction, Abby shares just about all you need to know to get making soft toys. Her designs are as thoughtful as she is, and I simply love her passion!
I'm quite giddy to say that she has designed something special for this month of the flying squirrel here on Wild Olive. I squealed when she sent me the pictures! And now, I'll turn it over to Abby.
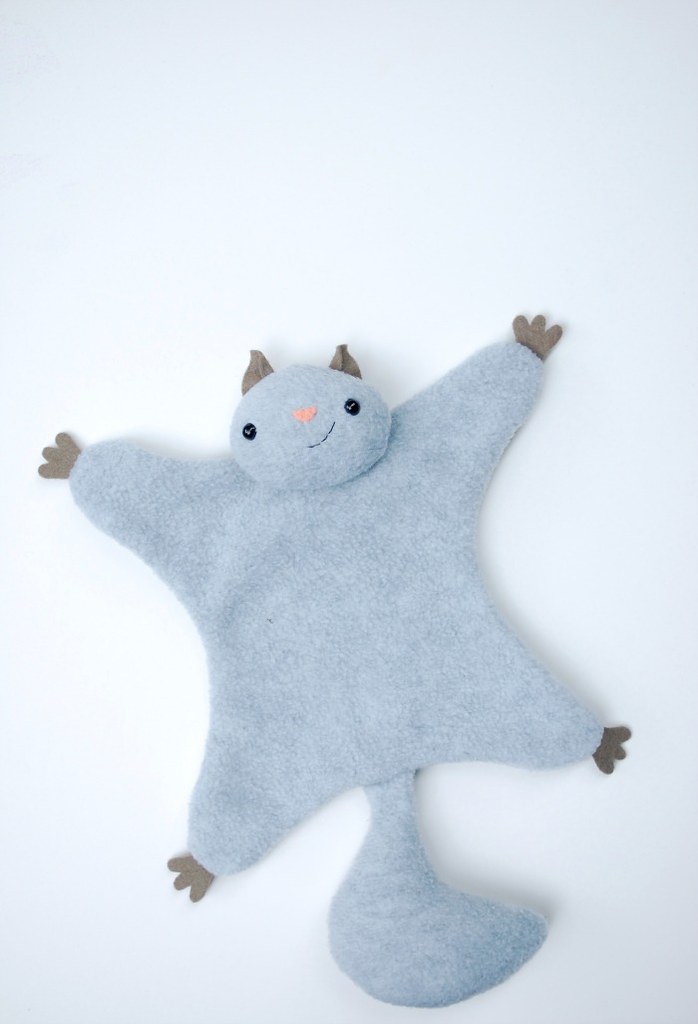
Flying squirrels make excellent softies, mostly because they’re so cute! Here’s a simple pattern to make your own flying squirrel. You can sew him in about an hour and I think you’ll agree that this is one huggable squirrel.
The finished squirrel is 13 inches long (from the tip of the ears to the tail).
First, gather some materials:
1/4 yard of light gray fleece (you could also use flannel or a felted wool sweater)
a small scrap of dark gray felt for the feet and ears
a small scrap of pink felt for the nose
a pair of 8mm safety eyes
black embroidery floss, 12 inches
fiberfill stuffing, 1 ounce
coordinating all-purpose thread
an embroidery needle
a pair of small scissors
chalk or a disappearing fabric marker
Download the Flying Squirrel Templates.
Let’s get started! First, cut everything out.
From light gray fleece cut:
• 2 Bodies
• 2 Heads
• 2 Tails (reversing 1)
From dark gray felt cut:
• 4 Feet
• 2 Ears
From pink felt cut:
• 1 Nose
Transfer all of the markings to the pattern pieces using chalk or a disappearing fabric marker. Note that a 1/4 inch seam allowance has been added to all of the pattern pieces that require it. Cut on the solid lines and sew on the dotted lines.
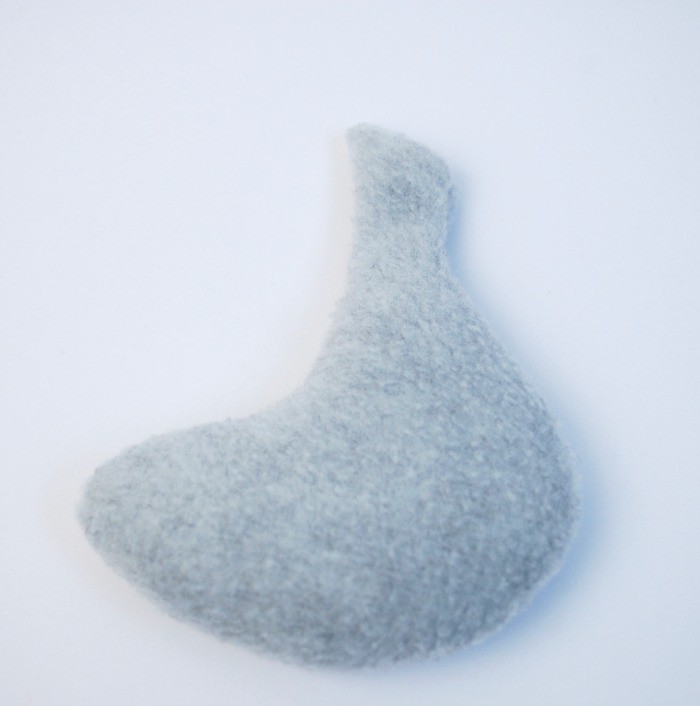
Now, we’ll sew the tail. Place the two tail pieces right sides together. Pin. Stitch around the tail, leaving the straight edge open as marked. Clip the curves and turn the tail right side out. Stuff the tail lightly, leaving the inch closest to the opening unstuffed.
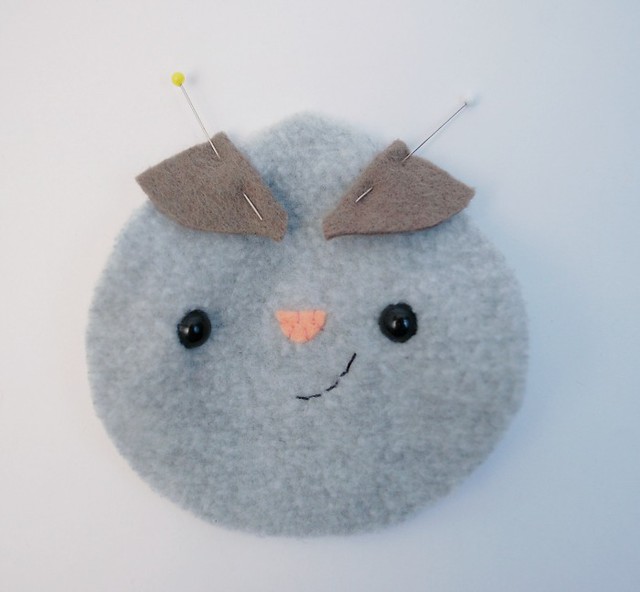
Next, prepare the face. Poke a small hole for each eye using the tip of a pair of small scissors. Insert the safety eyes and slide the washers on the backs of the posts until they’re secure.
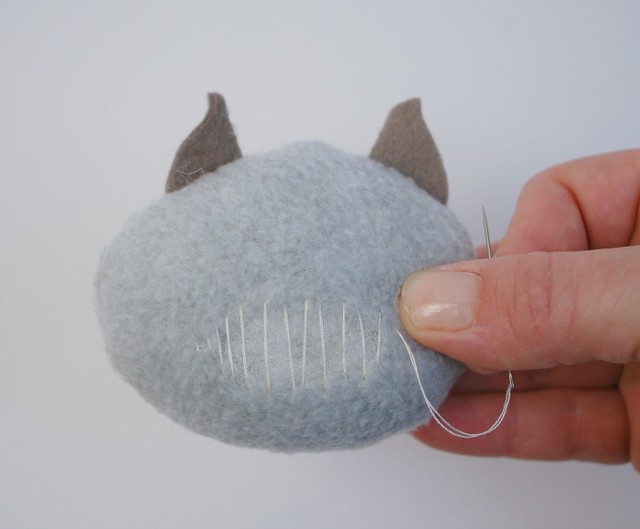
Whipstitch the nose in place. Stitch the mouth with black embroidery floss using backstitch.
Flip one ear over so that you have two mirror image ears on your worktable. Fold each ear along the fold line and press. Place the ears on the face, folded side down, as marked, and pin in place.
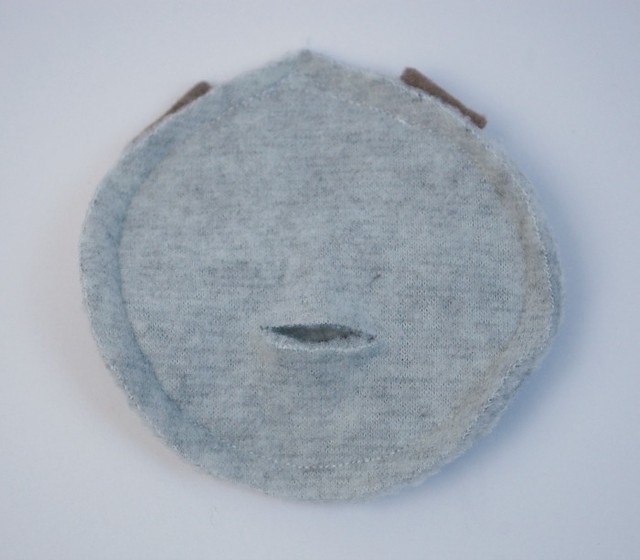
It’s time to sew and stuff the head! Place the two head pieces right sides together and pin well. Sew around the entire head, catching the raw edges of the ears in the seam. On the back of the head toward the bottom pinch one layer of fabric and cut a small slit. Clip the curves and turn the head right side out through the slit.
Stuff the head firmly, being sure there are no hollow spots or lumps. Ladder stitch the hole closed.
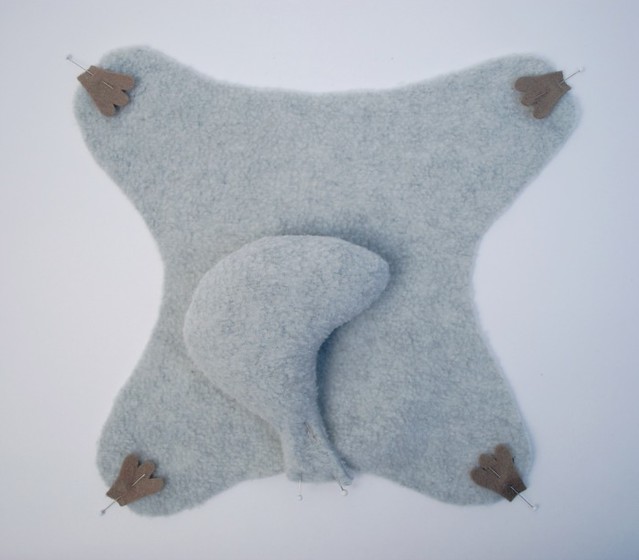
Now let’s sew up the body. Place the feet on the right side of one body piece, as marked. Pin in place. Place the tail on the body piece and pin. Now place the second body piece on top, right sides together, and pin well. Stitch around the body, leaving the opening at the neck as marked.
Clip the curves and turn the body right side out. Ladder stitch the opening closed.
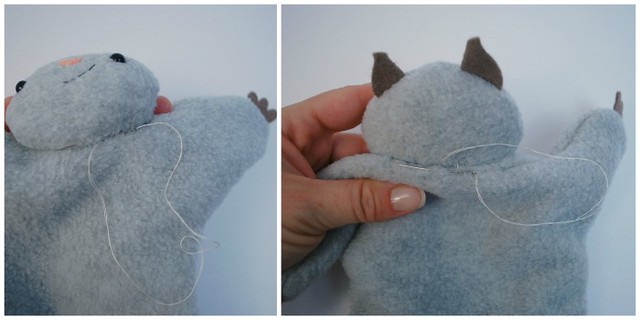
We’re almost done! Place the head on the body, as marked. Pin from the back to hold it in place. Ladder stitch the head to the body, going down the marked curve and then across the neck portion of the body. You might want to stitch around twice just to be sure the head is secure stitched in place.
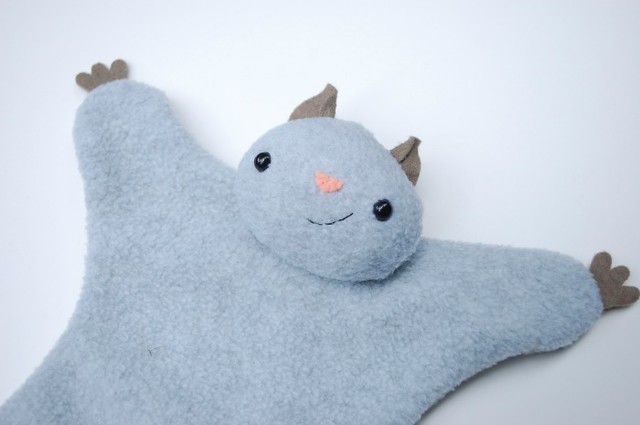
That’s it! Give your flying squirrel a big hug!
Thank you so very much, Abby! Is it safe to say that everyone needs a flying squirrel in their life? I have a feeling that as soon as I make one, I'll need to make three or four more, because folks at my house will be fighting over them.
Be sure to visit While She Naps for more from Abby Glassenberg.

Oh my word, too cute!!! :)
ReplyDeleteoh, it's SO cute!!
ReplyDeleteLove.This.
ReplyDeleteAnd, I have everything I need to make it right now... except the time. But, maybe this weekend!
Thank you so much for having me, Mollie! I really enjoyed designing this guy!
ReplyDeleteThis is so cute! I've shared it on my blog's FB page & pinned it. It would be perfect to tuck inside an Operation Christmas Child shoe box!
ReplyDeleteThat is adorable!
ReplyDeleteThat is SO AWESOME! Some kids near me are definitely getting these soon! :D
ReplyDeleteCould I have permission to make these for my quilt guild's bazaar?
ReplyDeleteAbby's free patterns like this one are for personal use/gift giving only. The patterns in her shop may be used for items for sale, and she has similar designs available for sale. Look for her Lovey Doveys!
DeleteSo cute! I found you just in time for our OCCKickoff event this Saturday. We planned to have a table of hand crafted items with instructions. Hope to include one of these little cuties. People who pack shoeboxes, from all over the Central Valley here in California will be there :)
ReplyDeleteThanks for this, I made one today :)
ReplyDeleteThank you for this amazingly cute tutorial! -Brittany
ReplyDeleteSuper cute!
ReplyDeleteSo cute! Thanks for the great instructions and pattern!
ReplyDeleteThanks for the pattern, I can't wait to make this. I think it will be a great to use when I read Scaredy Squirrel.
ReplyDeleteIt is so beautiful !
ReplyDeleteThanks for the fabulous pattern! I made a flying squirrel using the pattern then modified it to create a flying bat. I posted the results on my blog here: http://lifewithnaturegirl.blogspot.com/2014/09/crafty-freaks-project-6-flying-squirrel.html
ReplyDeleteThis would be great to pair with the book "Scaredy Squirrel" thank you!
ReplyDeletecute cute cute. Thank you.
ReplyDeleteLove him/her; thank you so much for the pattern - my two grandsons will love them!
ReplyDeleteI love this. So cute, thank you!
ReplyDeleteThis pattern in perfect. I made one for my godson and gave it to him yesterday. It was a hit!!
ReplyDeletehttp://venividivicky.wordpress.com/2014/11/02/meet-stuart-the-flying-squirrel/
Es precioso y muy dulce !!!!!!!!
ReplyDeleteGracias por compartir
Besos.
hello, thanks for the pattern! the squirrel is really funny and cute! Since it was a gift for my little nephew I added in the legs at the top two small magnets ..... so you can throw it on the magnetic board and stick! Unfortunately in this form I can not send a photo! Kiss;)
ReplyDeleteAntonella
P.S. sorry for my bad english !!
That's such a great idea, Antonella! Thank you for sharing. Velcro might be fun, too! Then you can make a baby squirrel for it to hug :)
DeleteThis would be good for a washcloth - just use terry cloth.
ReplyDeletetried to print up instructions but would not work. also the pattern printed up tiny. can you help ?
ReplyDeleteFor the pattern, make sure your printer is set to print at 100% (not "to fit"). For printing the instructions, are you trying to print the entire blog post? I'm not really sure how to help you with that because there's isn't an easy way to print without all of the extras. Maybe try copying and pasting the text into a blank Word document and then print that.
DeleteOMG it's just so cute!
ReplyDeleteI love this flying squirrel so much!! thank you for the free pattern and easy to understand instructions!! I'm so inspired, I'm going to try one myself! :)
ReplyDeleteThank you for the lovely pattern very cute I love it 😍
ReplyDeleteAaaaawwwwh, the cutest thing, I've ever seen!
ReplyDeleteThis reminds me so much of Scaredy Squirrel (a fav bedtime read in our house). I think I need one for storytime! thanks
ReplyDeletesooooooooooooooooooooooooooooooooooooooooooooooooooooooooooooooooooooooooooooooooooooooooooooooooooooooooooooooooooooooooooooooooooooooooooooooooooooooooooooo
ReplyDelete--------------------------------CUTE-------------------------------------------
THIS IS THE C-U-T-E-S-T THING EVER! IM A TEENAGER BUT I WANT ONE FOR MYSELF! <3
ReplyDeleteThanks a lot. My first one was for my niece (birth planned for Christmas) and the second one is for my grandson Léo who is only 1 year old. Maybe I'll make another one for me, because they are so cute !!!!
ReplyDeleteMerci beaucoup, adorable.
ReplyDeleteClarification please - the body DOES NOT get stuffed, right?
ReplyDeleteCorrect. It stays flat so it's more like a cuddly mini blankie.
DeleteI'm so in love with this pattern! it was so quick and easy to follow, and he turned out so adorable, both my kids want me to make more :)
ReplyDeleteA friend suggested to fill it up with wheat to make it a warm pillow, do you think it can work ?
I bet it would work great!
DeleteMy granddaughter and I made one together! She's 14 and she LOVES IT! Thank you!
ReplyDeleteCan I still get the pattern?
ReplyDeleteYes! The link is by the supply list.
DeleteMade this with my mom, so cute:)
ReplyDeleteI made it using black fabric and stuffed with rice to be a weighted bat-like animal. The only thing I would do differently would be to use less rice in the tail or altering the tail to be smaller altogether. Amazing pattern!
ReplyDeleteI just made mine for my 15 month old daughter. She is used to animals with snouts that she can bite :P - maybe she'll love it more when she's older. Which I'd seen someone's idea to make it crinkly before I sewed him up! I showed my husband who appreciated it a lot more since I used one of his old T-shirts for the fabric and we used to have sugar gliders for pets. His suggestion was to attach the head but leave the body open so the sugar gliders could crawl into it and sleep in it XD
ReplyDeleteThat is an amazing idea! My cousin has sugar gliders, so I'll have to remember this!
DeleteAdorable! Thank you.
ReplyDeleteI love it so cute!!!!!!
ReplyDeleteAaaaww so cute
ReplyDeleteI love this so much! My kids love rice bags heated up in the microwave - we call them "warm things". So I made this squirrel as a cuddly warm thing with a mixture of stuffing and rice in the head and tail and rice in the body. 30 seconds in the microwave and it is SUCH a snuggler. I had some little scraps of suede leather that made the paws and ears so luxe. Thank you for this amazing pattern!
ReplyDelete