


When I started working on the Bitty Beluga pattern and really, all of the beluga things so far this month, I kept thinking about making something for a baby. Once the pattern was done, I knew that it needed to go on a blankie, and somehow that ended up becoming a little quilt. The great thing about this is that as far as quilts go, this one goes pretty quickly!
There's no piecing involved with this project, so that's the biggest time-saver. You leave the fabric whole, which is why it's called a whole cloth quilt. I've been wanting to make one for a while, and have some other fabrics picked out for not one, but two (!) more similar projects. Now that this one is under my belt, I think I might need to get the others going again.
The added detail of embroidery is completely optional with a quilt like this, but I do like how it creates a focal point. Of course, you could use any embroidery you want as you make yours!
Here's what you need:
Embroidery floss
Front and backing fabric - 1 1/2 yards each
Batting - at least 45" square
Binding fabric - 1/2 yard
Thread
Pearl cotton
Needle
Embroidery hoop
Scissors
Safety pins
Sewing machine
Walking foot (highly recommended!)
Rotary cutter, ruler and mat (optional)
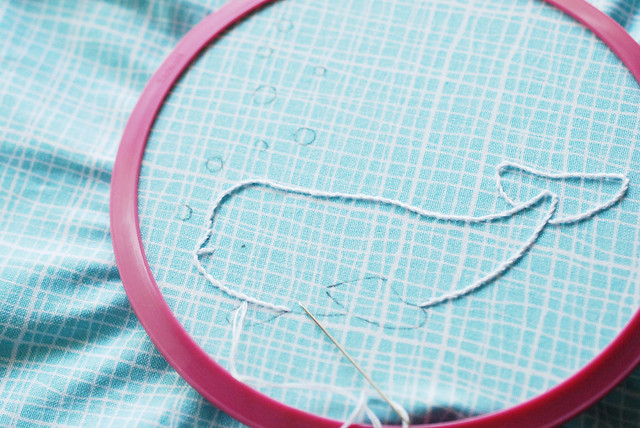

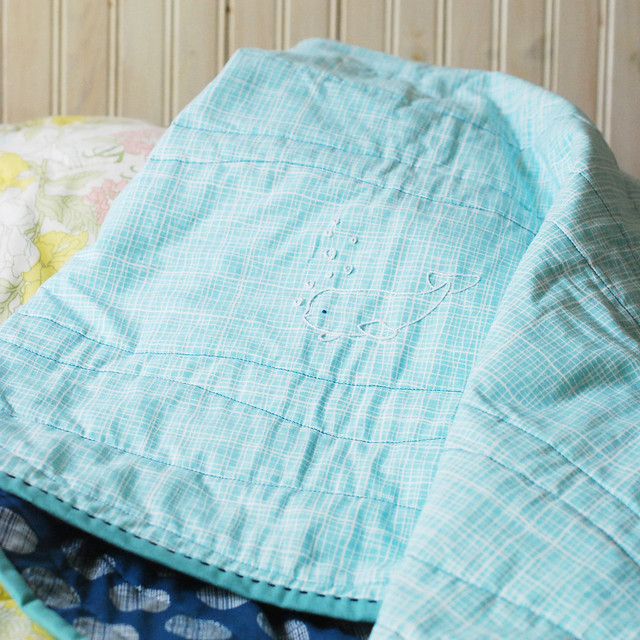
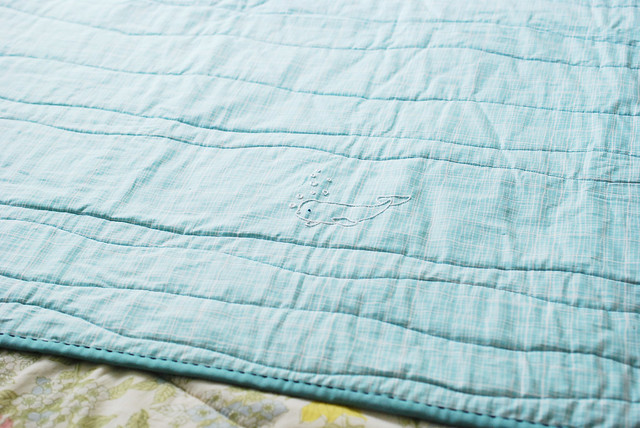
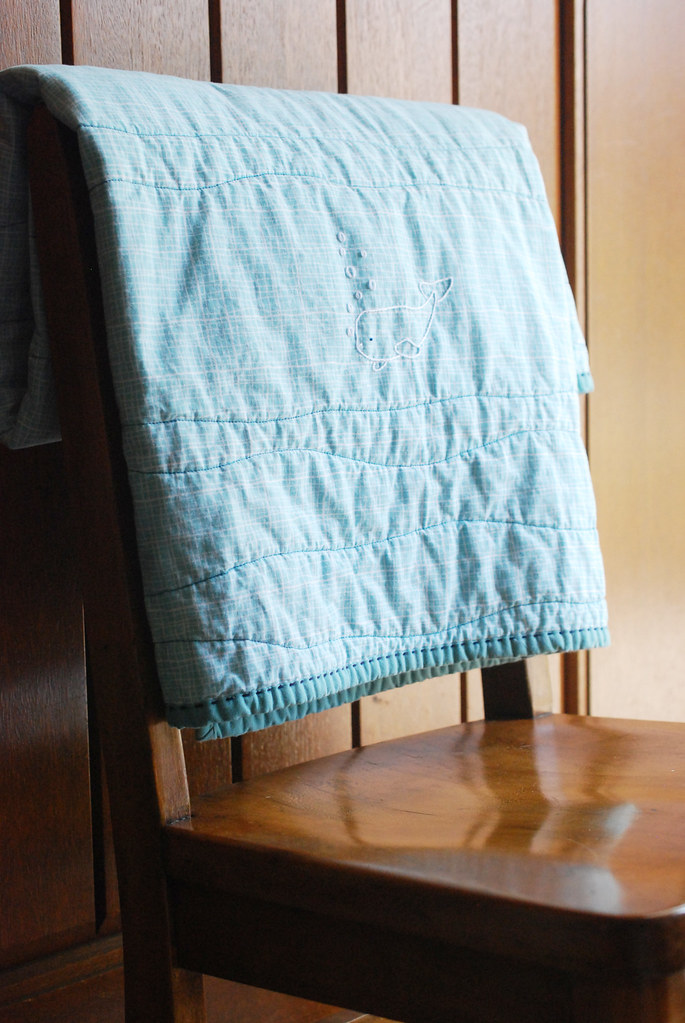
Cut your front fabric into a square, using the width of the fabric as your guide. Embroider the Bitty Beluga motif onto the front square.
You can place it wherever you want. Mine is centered towards the bottom.

Make a quilt sandwich with your backing fabric, batting, and the front.
Typically, it's recommended that the backing fabric and batting be several inches larger than the front. Mine ended up being only about 1 inch larger, but I didn't notice much shift or shrinkage when I quilted.
Use safety pins to hold the layers together.
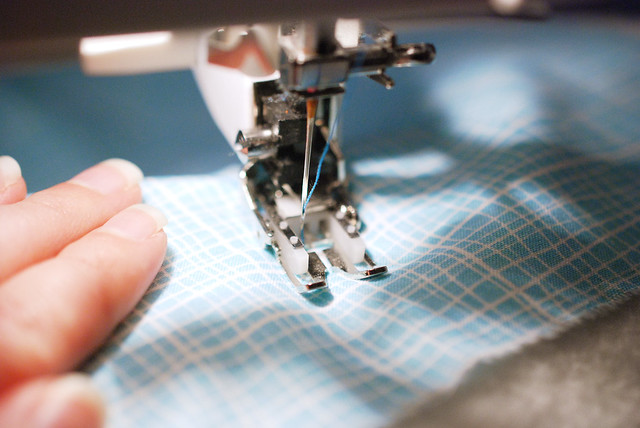
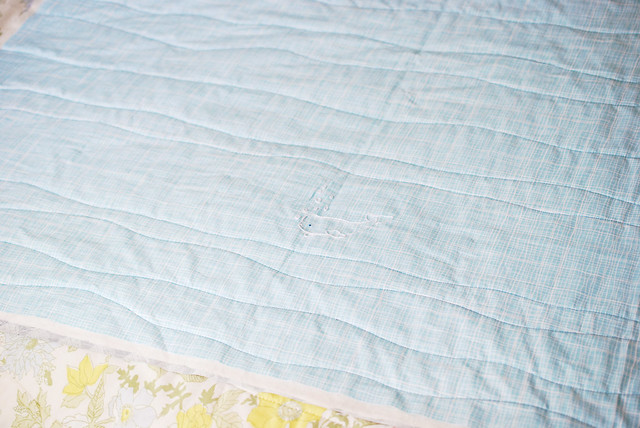
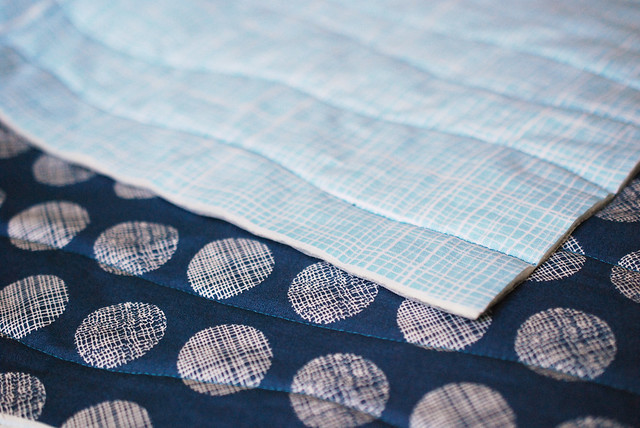
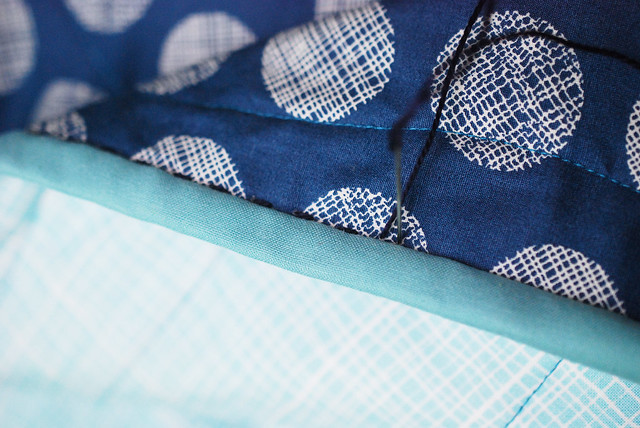
Now it's time to quilt! This was honestly the most relaxing part of this project for me, and I had the quilting done in just over 30 minutes! The thread I'm using is a deep teal that contrasts with both the front and the back. And since this is a beluga in the deep blue sea, I thought that waves would be appropriate.
With the walking foot in place on the sewing machine, quilt gently waving horizontal lines across the quilt. Start at the center and work your way to the top and bottom. You can space them very evenly, or vary them.
You may find it helpful to mark the fabric with masking tape so that you don't get too far off from horizontal (you want waves...but not on the diagonal!). I had the benefit of fabric that has lines, which kept me on track.
In the section where your embroidery is, avoid quilting too close.
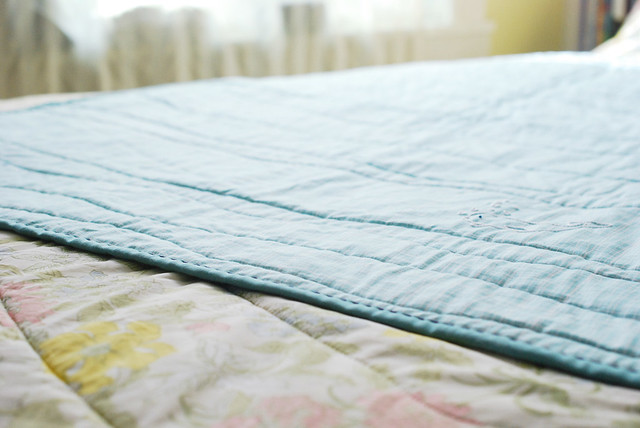
Cut the batting and backing to match the front of the quilt, squaring it up if you need to. A rotary cutter makes this very easy, and the edges very neat.
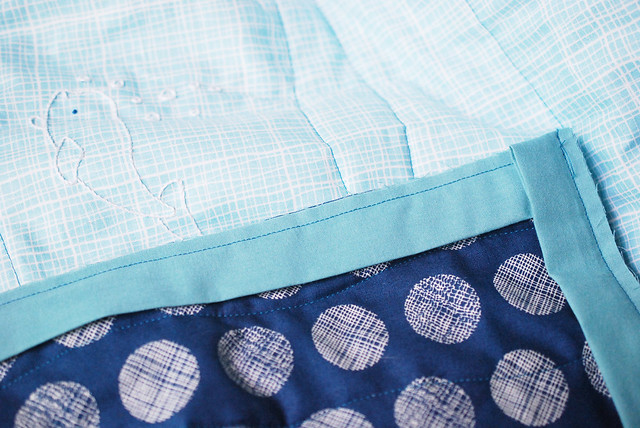

Let's bind it! For this, you'll need to cut five 2 1/2-inch strips, join them and prepare the binding. I won't go into detailed instructions, because there are plenty of good tutorials you can reference if needed. I highly recommend the binding videos from Wendi Gratz and Missouri Star Quilt Co.
But, I do usually sew my binding slightly different than most folks, resulting in visible stitches that add a cute detail to the edge.
First, I attach it to the back of the quilt, instead of the front. That means that the folded edge wraps around to the front.
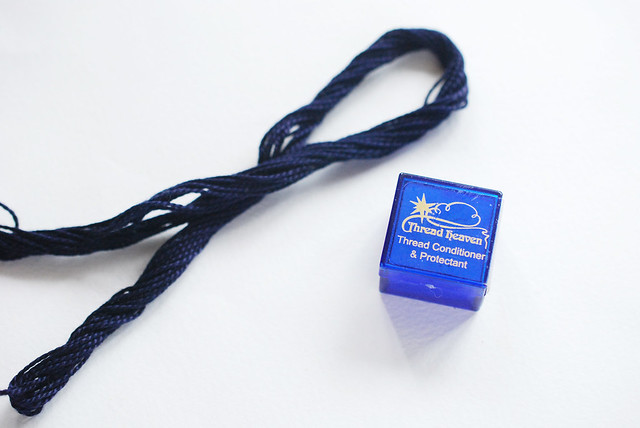
Instead of using thread that will blend in and stay hidden, I use perle cotton, and usually I choose a color that will have a nice contrast to it. So that I can use slightly longer cuts of the thread, I treat them with Thread Heaven.
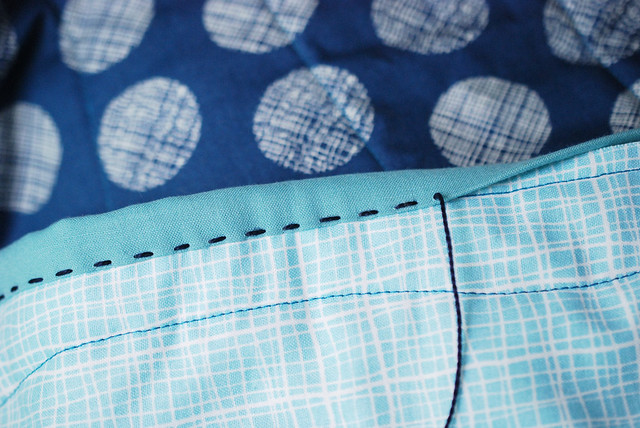
To hold the binding in place, I use running stitch. The stitches are very close to the folded edge of the binding that wraps to the front. Because these stitches are highly visible, I do take my time with this, and work to ensure that they are even and tidy on the back.
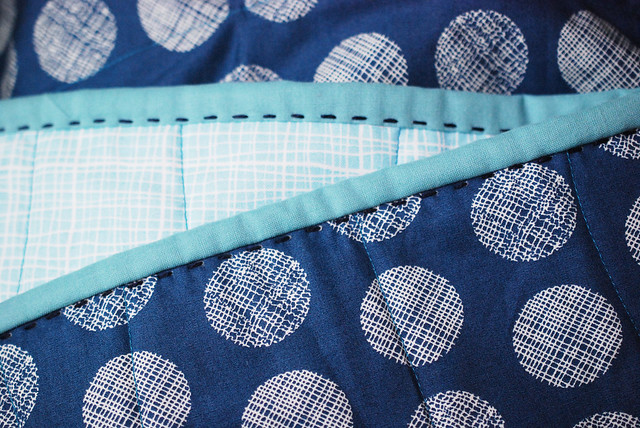
To keep the back tidy, I pretty much flip back and forth with each stitch. The back side has the stitches on the back of the quilt part, just inside the binding. In this case, they blend with the backing, though sometimes I choose colors that stand out on both sides.

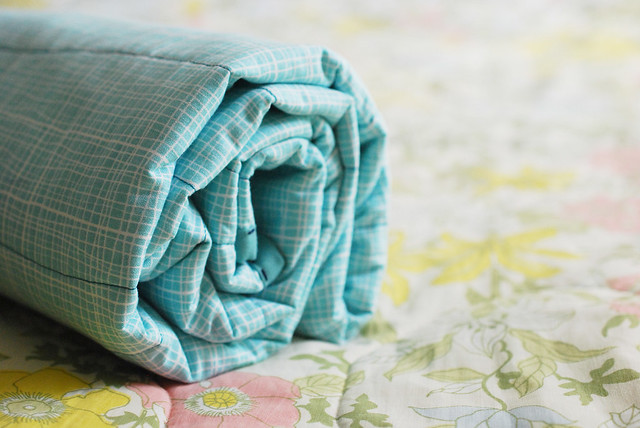
After some stitching with Netflix, you'll have a very sweet little blankie!
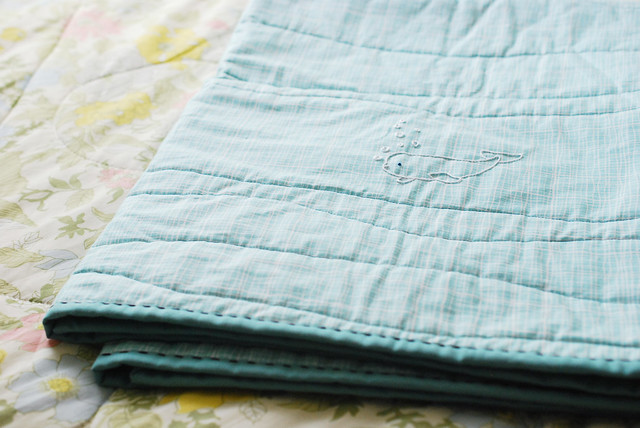
I don't have a baby in mind to gift this to, which is probably good because I feel like folks around here are going to fight over it. It's a great size for a baby, but it's kind of like a small lap quilt too. We've had such a cool August (up until this week anyway) that we've been pulling out the little blankets in the evening. I love it!
Very cute! I love the embroidery, it makes a simple quilt extra special!
ReplyDeleteI love the way you stitched the binding! very cute
ReplyDeleteLove your binding! And whole cloth quilts are lovely. Great post.
ReplyDeleteI've never heard of a whole cloth quilt, but I love it! Looks like it would be very quick... and I love the little embroidery focal point! I like how you do your binding too :) Thanks for the tutorial, I will put this on my never ending list of projects to do! ;)
ReplyDeleteOMG! I love this! I've been wanting to dip my toe into quilting & embroidery, and I think this is the project! I singing "Baby Beluga" to my 7.5 month old ALL the time and she just laughs and smiles. I think this would be a sweet quilt to give her.
ReplyDeleteDarling! Baby quilts are always good to have on hand. I'm filing away your binding method for the future! We've been hot and sticky all summer, highly unusual, so no blankies for us.
ReplyDeleteI love making baby blankies! Thanks for sharing!
ReplyDeleteWhere is the fabric you used from? I love the sea feel to them!
ReplyDeleteThe front is Treasure Crosshatch in Blue ( Riley Blake ) and the back is Pointelle in Navy ( Art Gallery ). Both came from Pink Castle Fabrics.
DeleteThanks!
DeleteBeautiful! I love your hand binding with peele cotton!
ReplyDeleteMollie, that quilt is absolutely precious. In fact, you make me want to have another baby just so I can wrap it up and snuggle it in something sweet like your quilt!
ReplyDeleteMollie,
ReplyDeleteThis baby quilt is absolutely precious! I am a beginner quilter and the thought of doing a whole cloth quilt doesn't seem as intimidating for me to do alone. My husband and I are expecting our first child in January, it's a boy, and this project is perfect! Thanks for always posting great tutorials, projects, and great pictures of all your work! :)
I LOVE this! It's such a great idea to use a single piece of fabric and adding the embroidery makes it extra adorable. I love the wavy line quilting! Everything about it is just so lovely!
ReplyDeleteI love everything about this quilting! Although it's just a piece of fabric, but your work makes it beautiful. Great work.
ReplyDelete