about shop patterns projects printables extras sponsorship wild olive twitter flickr pinterest subscribe

thread bits // the importance of seam allowance

Thread Bits // Seam Allowance

One of the things I like most about English paper piecing, or EPP, is that seam allowance is less of an issue than with traditional quilting. The paper templates take care of getting straight seams and perfect points. But that doesn't mean that you can't mess it up.

With regular quilting, a 1/4" seam allowance is pretty standard. In my mind, that should work for EPP too. So I trim around my templates thinking that way.

Thread Bits // Seam Allowance

But I like to fit things as closely as possible to conserve fabric, and so maybe I trim just a hair less...and suddenly I'm trying to baste shapes with too little fabric. Or at the very least, a seam allowance that is asking for trouble.

Now I trim the seam allowance around the templates to 3/8". I still get a little fabric stingy at times, but when I'm aiming for 3/8", my small allowances are now 1/4". Much safer!

---

Today's Thread Bits post is brought to you by the 2015 Holiday Stitching Club. The EPP pieces you see above are templates from the club, which starts tomorrow!

If you'd like to do some embroidery and English paper piecing along with us, sign up before the early bird pricing goes away. Tomorrow is the last day to sign up and save a couple dollars. Plus you'll have less catch-up to do!

Read more about the Holiday Stitching Club here.

pattern // walk with me

Walk With Me


Sometimes a particular message keeps coming at me. I see it and hear it everywhere over a period of weeks or months. Does that ever happen to you? For me, it's typically rooted in God's Word. And it's usually something that I need to hear. A lot. For a good reason or reasons.

Nearly a month ago I was at a church service and they asked us to listen to a few verses. To read over them, think on them, and try to discern what we were supposed to hear from God in those words. This is what I heard:

Walk with me. Work with me.

We were reading from The Message, a wonderful paraphrase of the Bible that I love to look to in addition to a traditional translation. Here's the chunk of verses in another version:

Come to me, all who labor and are heavy laden, and I will give you rest. Take my yoke upon you, and learn from me, for I am gentle and lowly in heart, and you will find rest for your souls. For my yoke is easy, and my burden is light. -Matthew 11:28-30

Life has come into another busy season for me. When I have lots of work to do, I can easily become overwhelmed, which puts me in a bad place. I can forget that work is a blessing, which it is.

But I keep hearing the same message. Come to me. Walk with me. Work with me. Find rest for your soul. My burden is light. And it has changed my attitude. Walking with Jesus, even when life is work, it changes things.

So I made a pattern.

I haven't started stitching yet, but I know that I'm going to want this reminder hanging on my wall. Maybe you will too. I kept the wording simple so it can mean what you want it to mean. But I also hope you also think about what it might mean to walk with Jesus. I'd love to talk with you more about that, so if you ever want to talk, let me know. Seriously. He changes things.

book review // the embroidered garden

book review // The Embroidered Garden

Friends, you are in for a treat today. And if you order the gem of a book that I'm going to give you a glimpse at, you'll be in for a treat as soon as it's delivered to you.

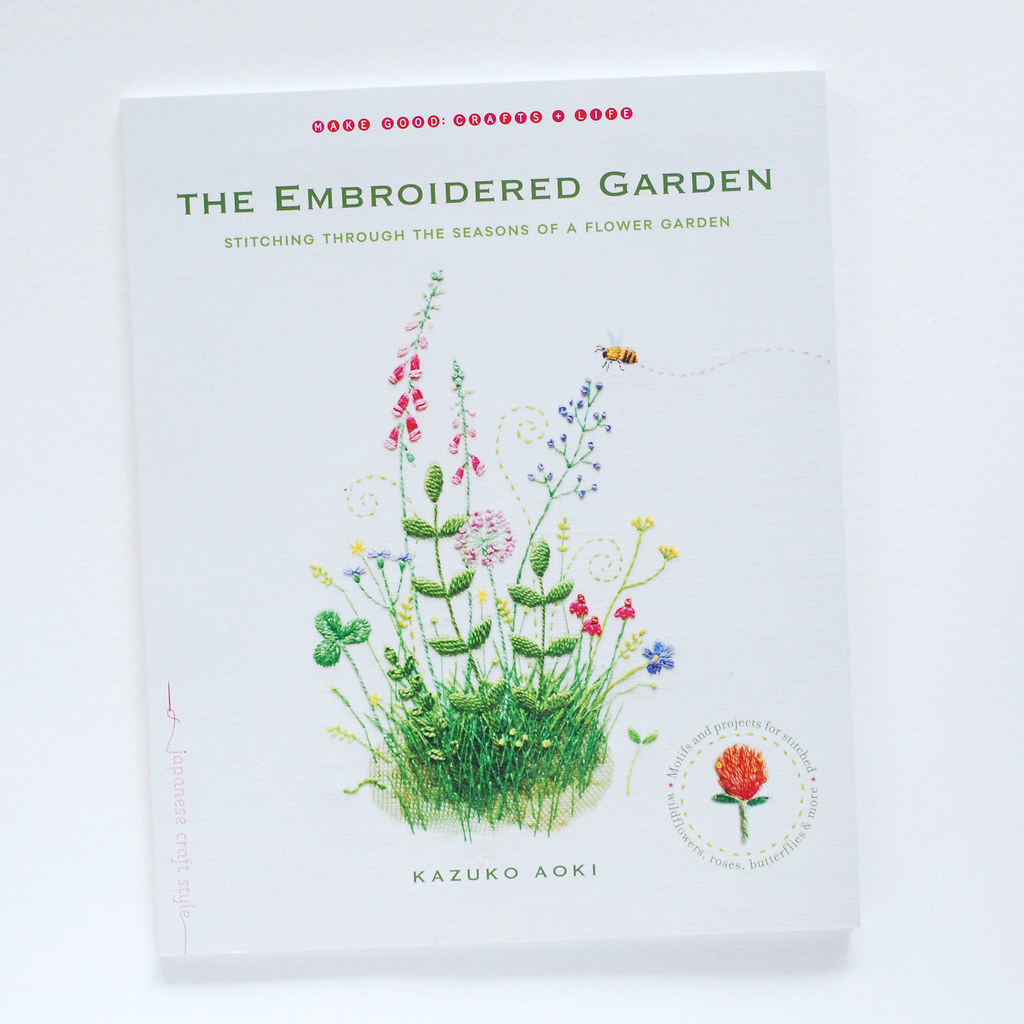
The Embroidered Garden, by Kazuko Aoki and published by Roost Books, is simply stunning. In fact, would it be weird to say that it's prettier than any actual flower garden that I've ever grown? It's the truth. I kinda want to go and sit and stitch in this embroidered garden.

I think that what impresses me the most is that the stitches used for these designs are pretty simple. They are almost entirely basics that you learn early on in your embroidery experience. The author just uses them really well, and shows you how to do the same.

book review // The Embroidered Garden

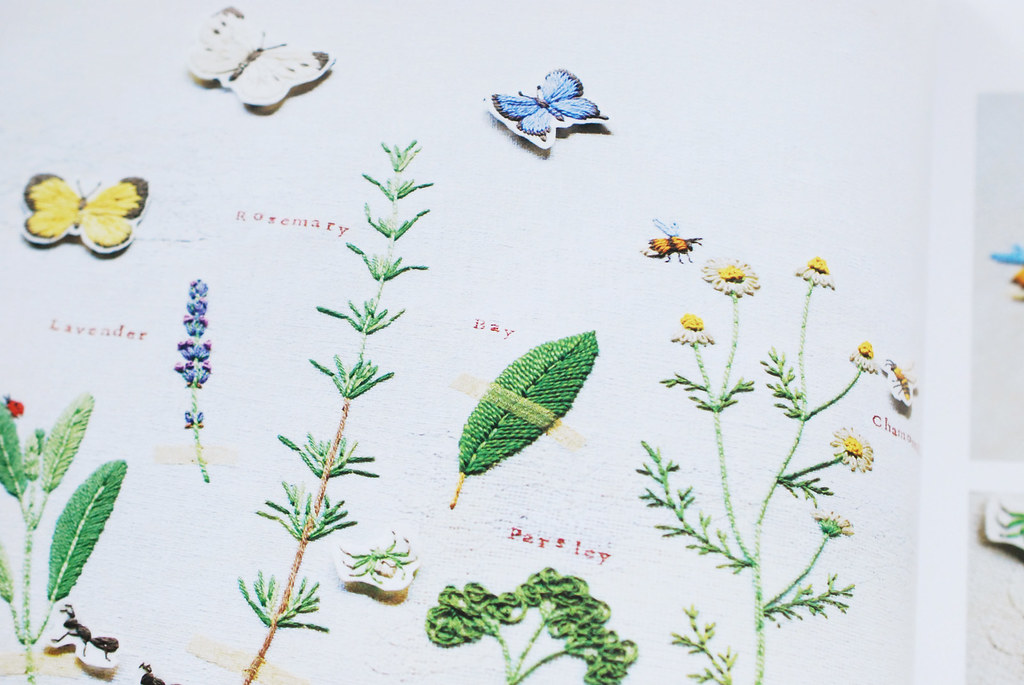
Looking through the pages feels a lot like looking through an embroidered nature journal, and I'm pretty sure that's the objective. The stitching is reminiscent of sketches or watercolors, but there are also other details that bring that image to mind. See those little "tape" strips? They are made with organza fabric. I love them. And many of the embroideries include stamped or perfectly stitched labels, much like you would label something in a notebook.

book review // The Embroidered Garden

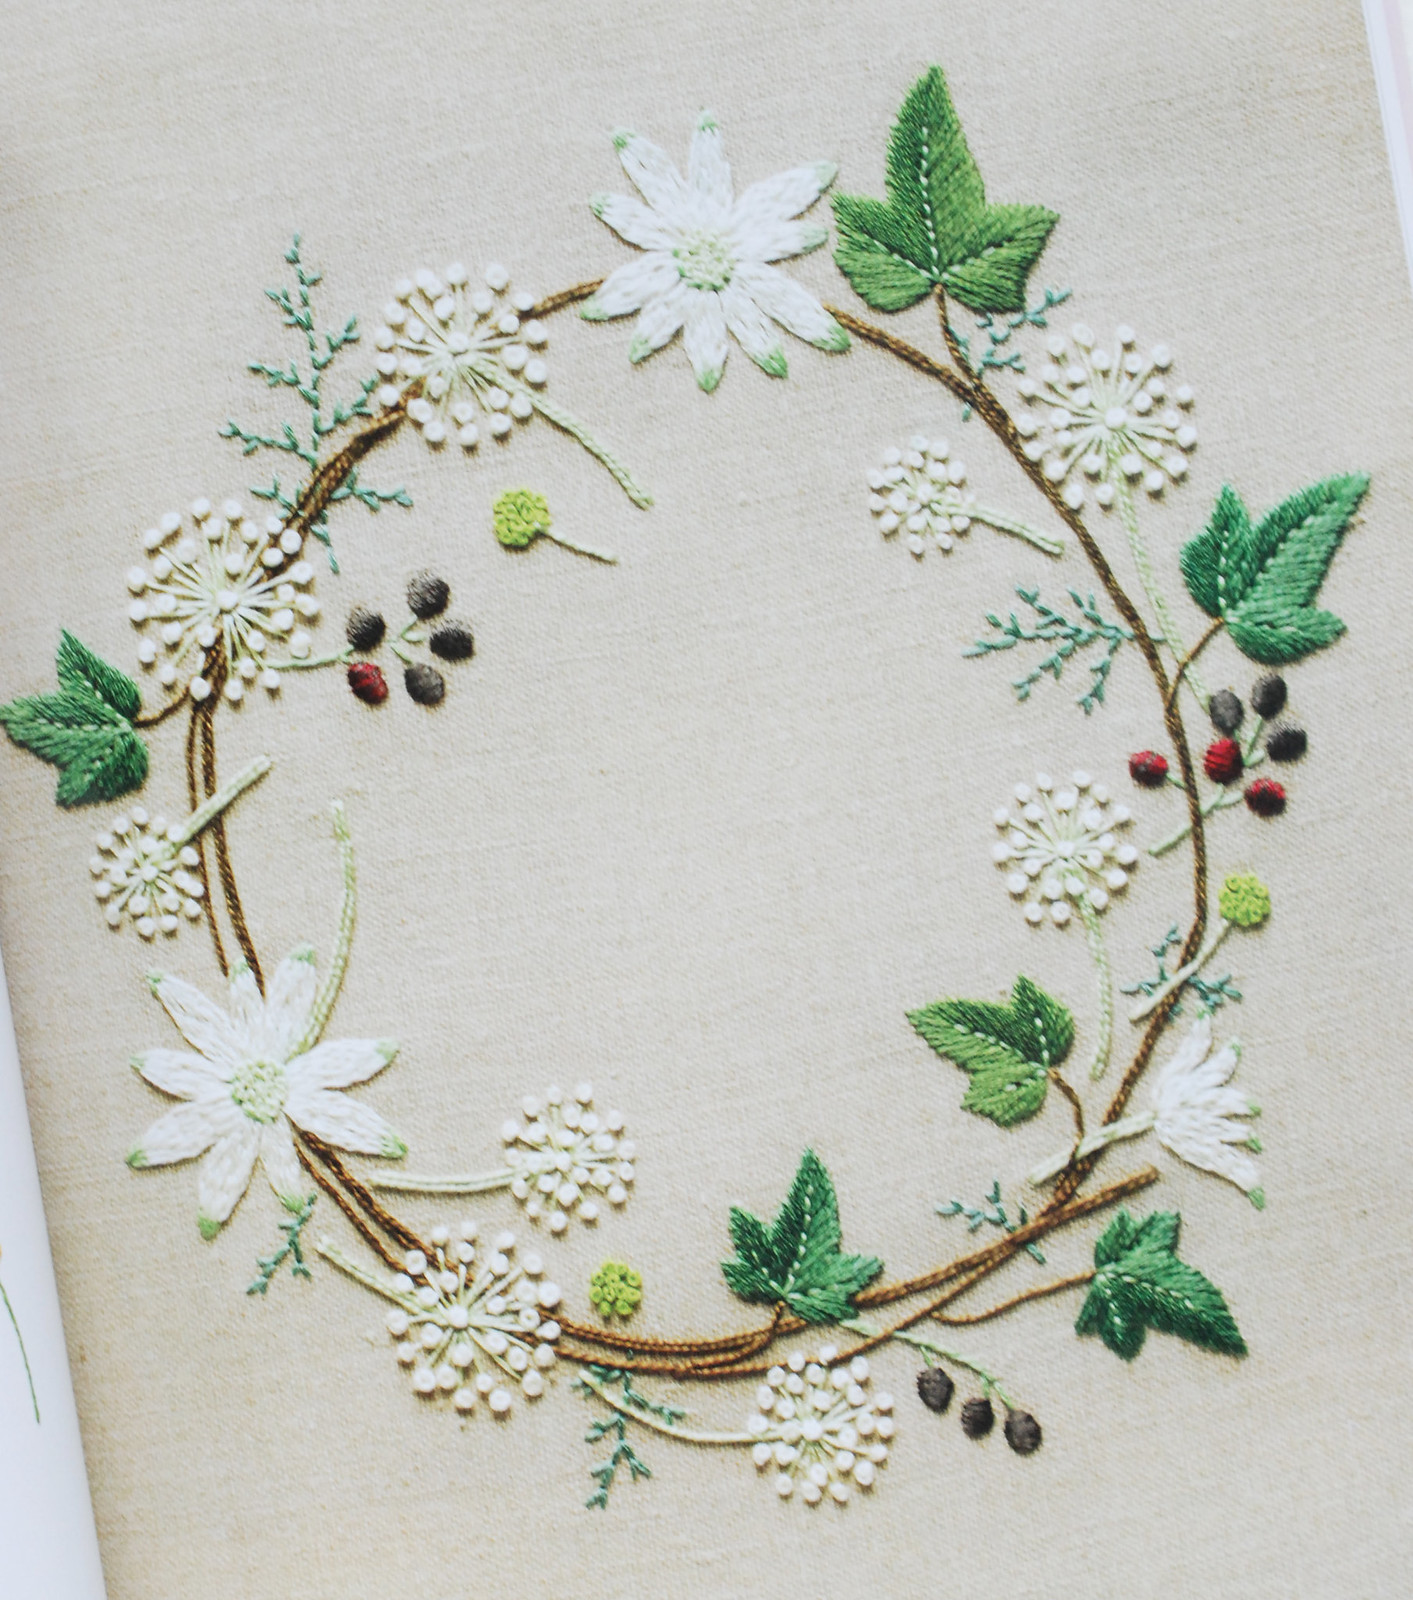
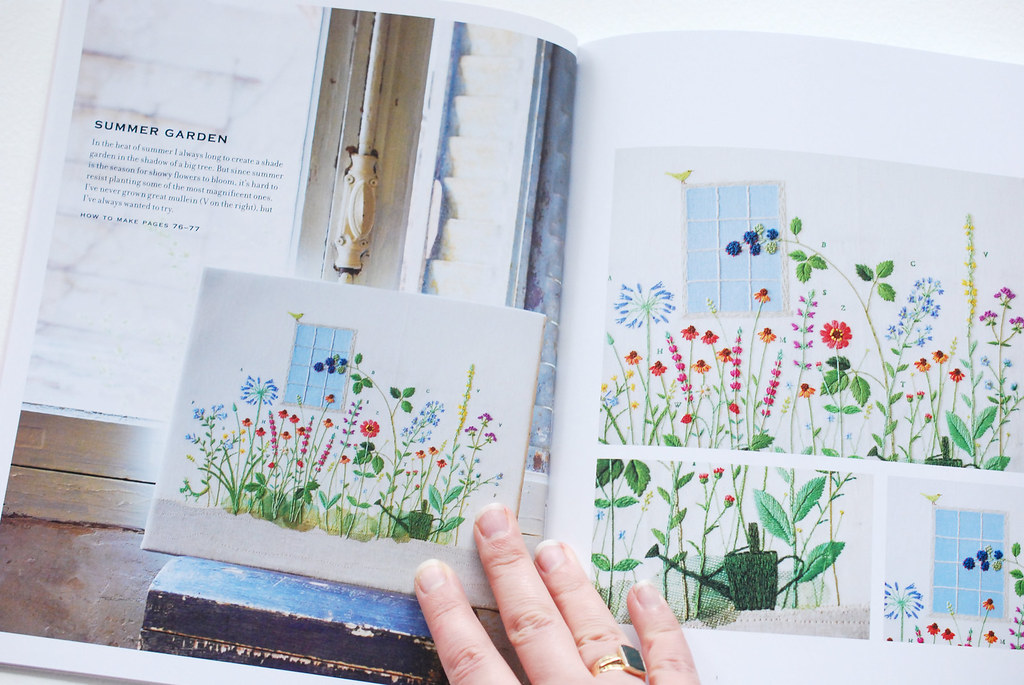
The subtitle of this book is "stitching through the seasons of a flower garden", and that idea is best represented through the seasonal wreaths. There is a circle of flowers and foliage for each of the four seasons, and oh! How lovely they are!

They would be beautiful as a grouping, or perhaps as wall art that you change out seasonally. Winter is shown above.

book review // The Embroidered Garden

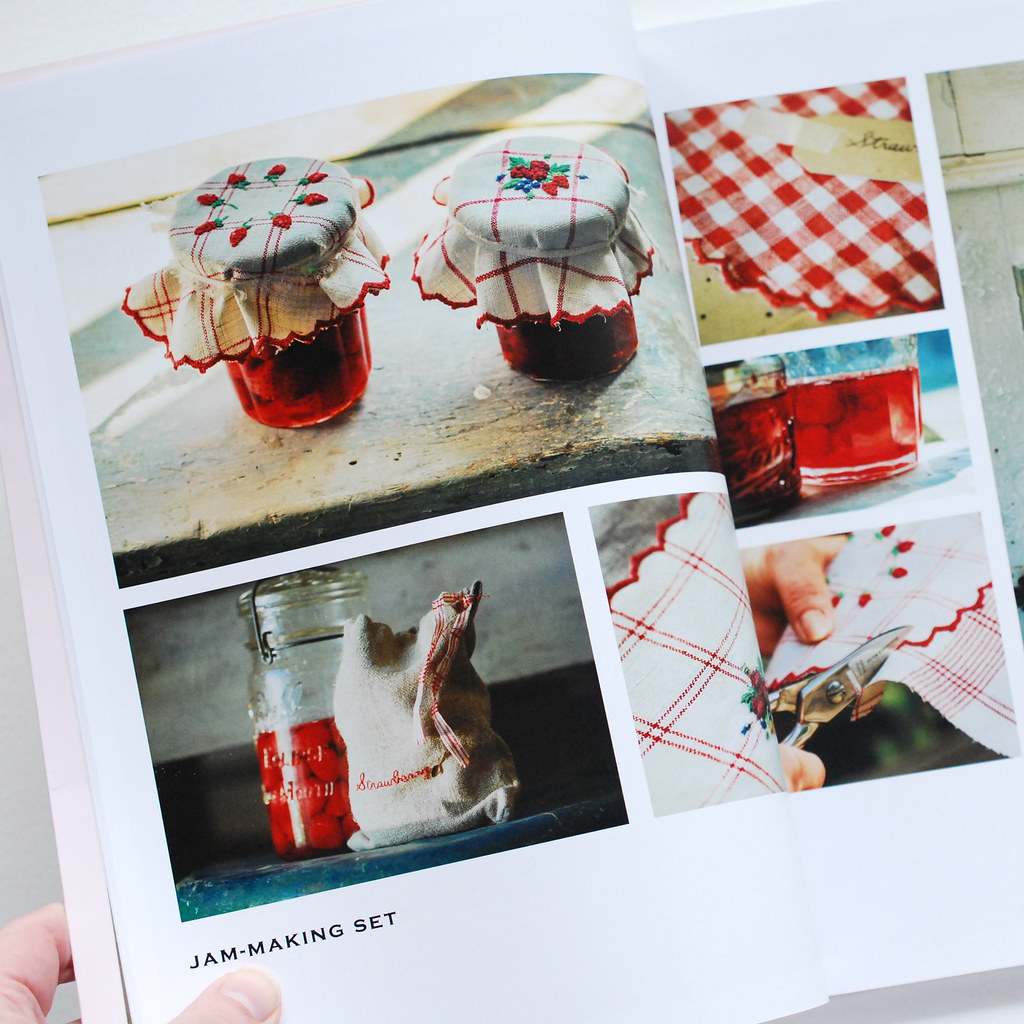
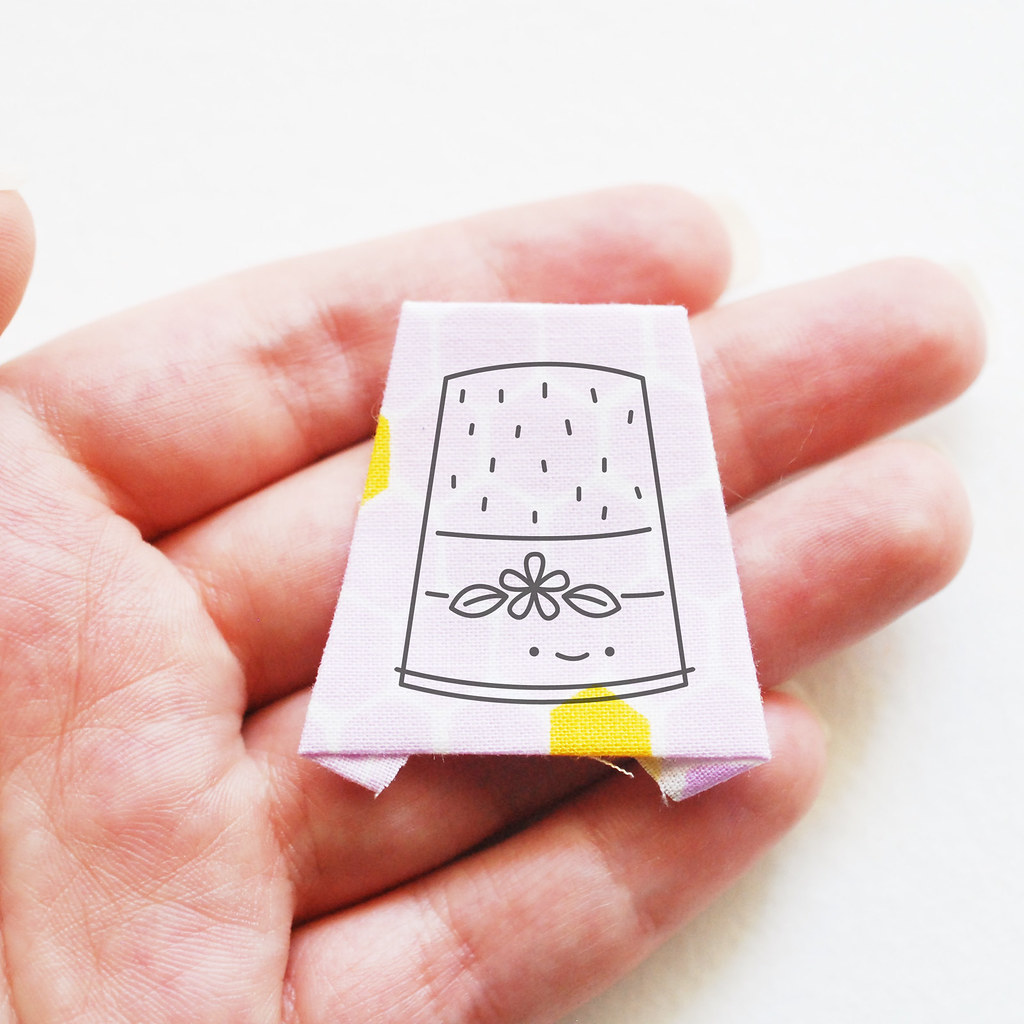
While the embroidery truly is a work of art that you'll want hanging on your walls, there are also plenty of smaller projects to make. This jam-making set is a favorite of mine (it has jam jar covers, a little bag, and a hot pad.) Additionally, you'll find pillows, a sewing set, sachets, a coin purse, cards, and more.

book review // The Embroidered Garden

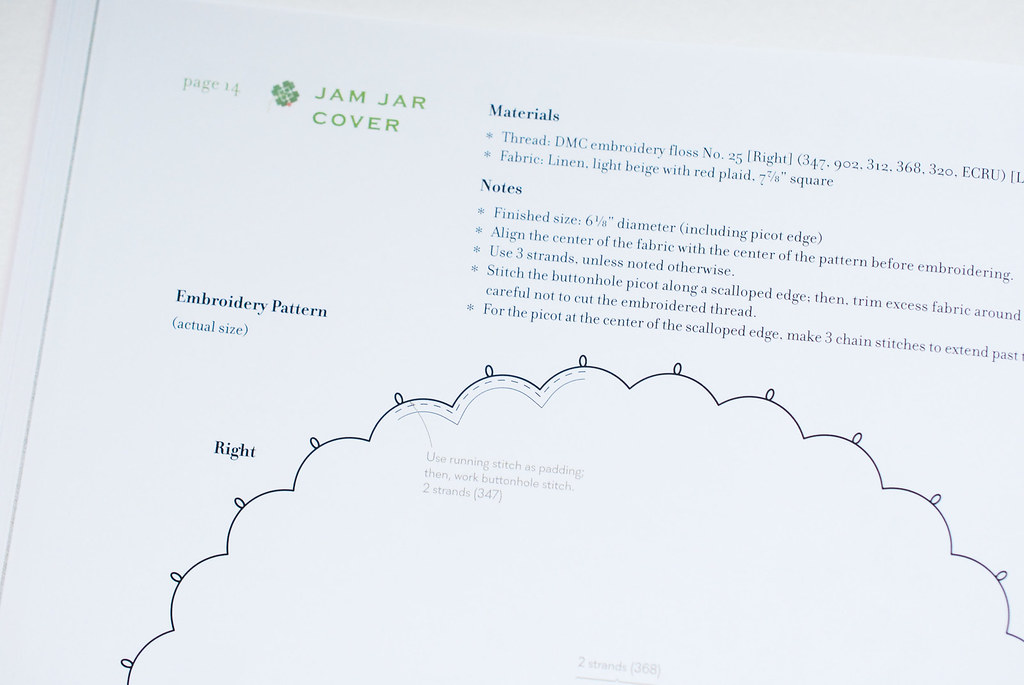
The instructions are presented in a classic Japanese craft book fashion: notes and diagrams at the end of the book. I will admit that this leads to a fair amount of flipping back and forth, but for some reason I enjoy that. It adds activity to the process of looking through the book!

book review // The Embroidered Garden

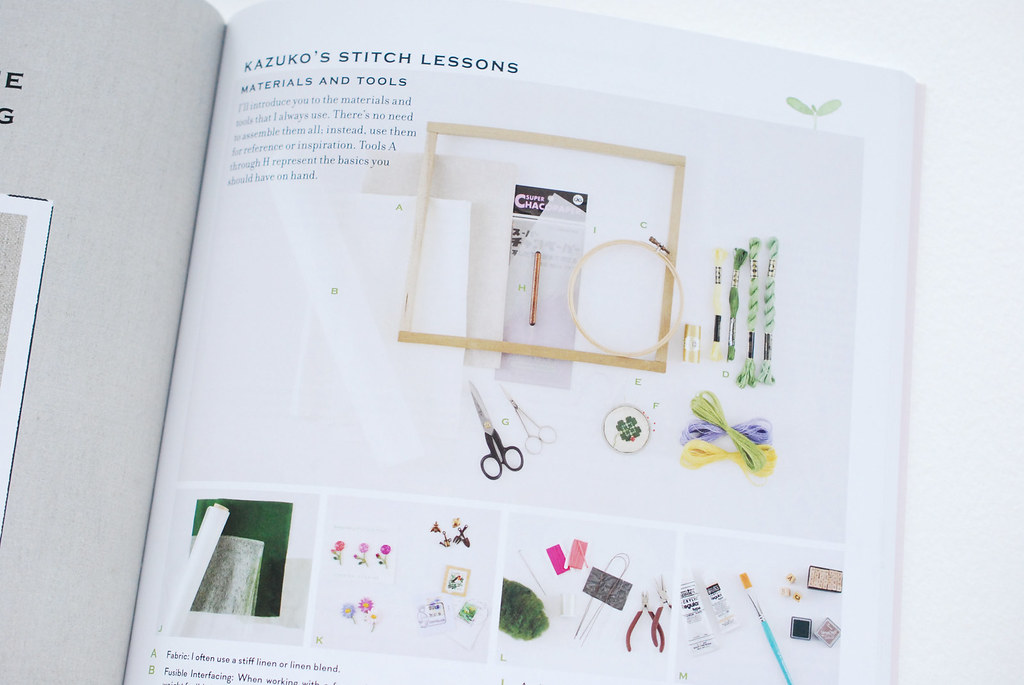
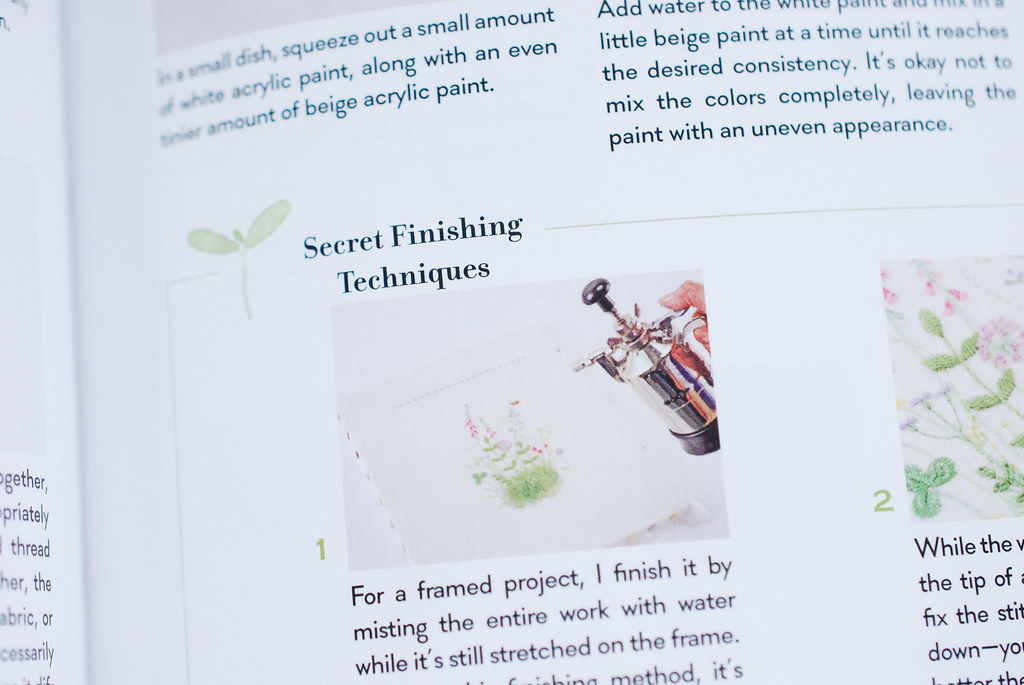
The general instructions for creating the embroidery and projects are also beautifully done. There's a combination of photos and diagrams, which is helpful. The section on extra techniques is one of my favorite elements in here. The information is gold, and I don't want to give away too much, because it's a big part of the value of this book.

book review // The Embroidered Garden

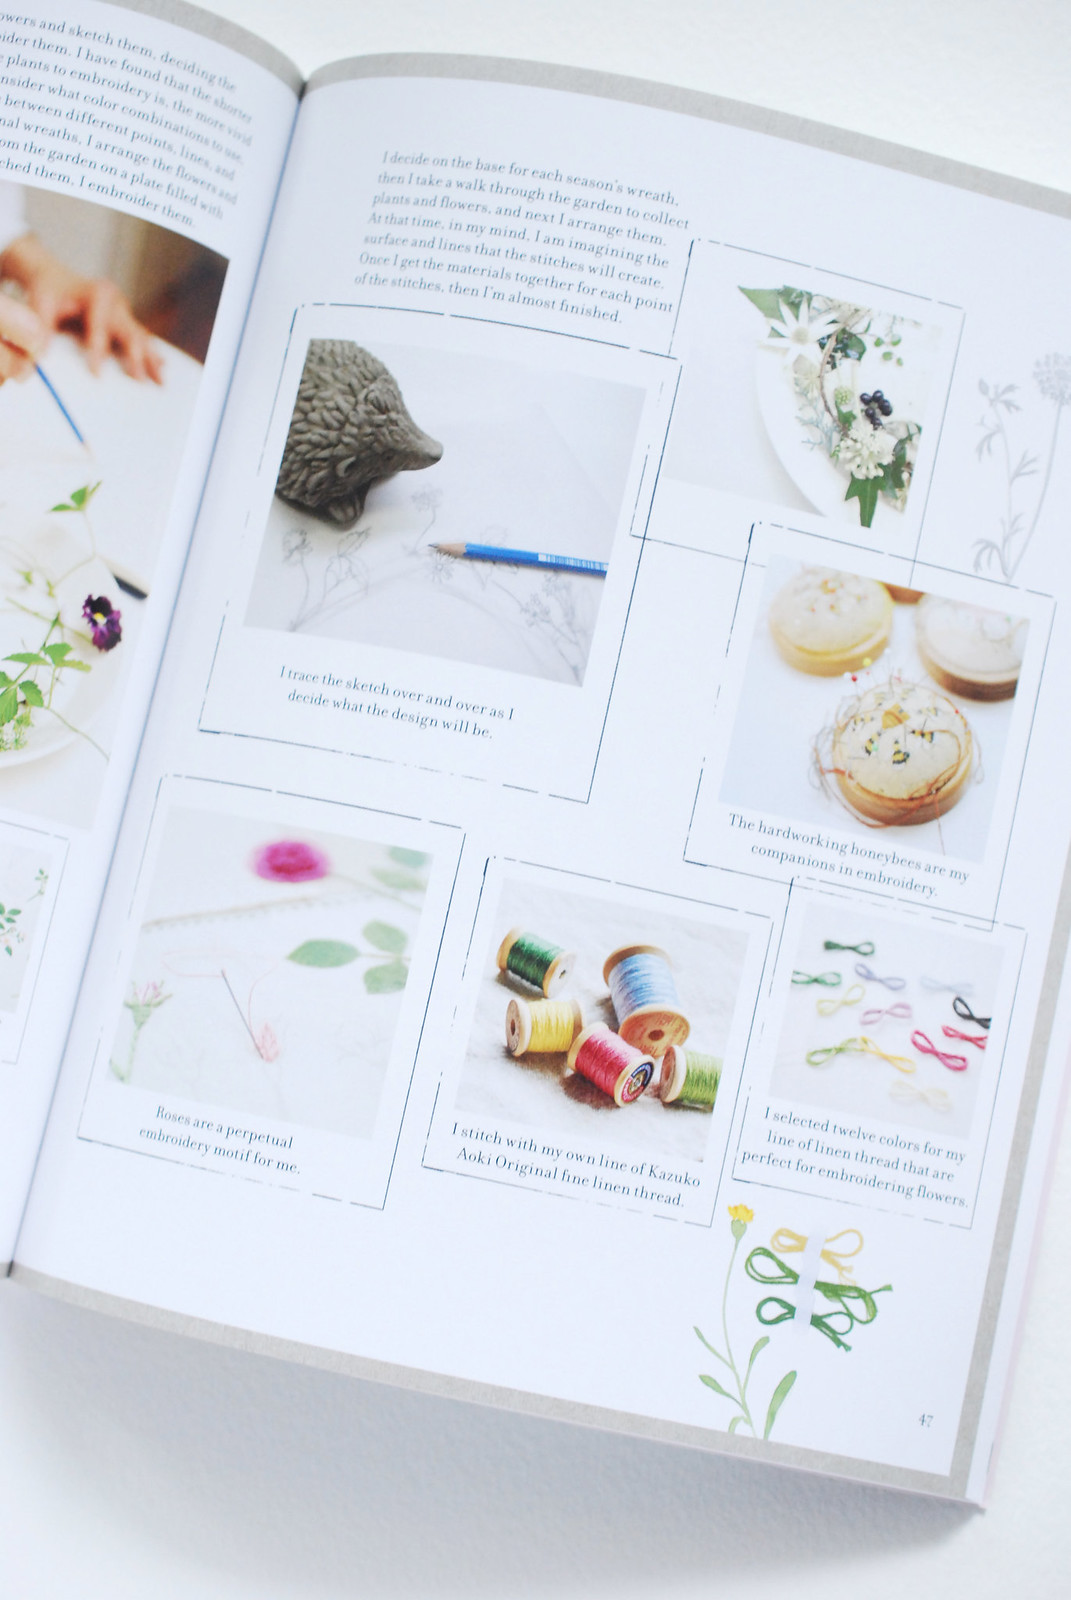
And remember when I said that The Embroidered Garden feels like a nature journal? Kazuko Aoki tells a little about her process for creating the embroidery designs. She talks about her garden, spending time looking at and gathering flowers, sketching them, and then stitching them. Her work really is like a journal!

book review // The Embroidered Garden

I honestly believe that even if you never stitch a thing from this book, you'd still be happy to have it. Because looking through it is like taking a walk in a garden and that's happy in itself.

Beyond that, I'm so inspired by the techniques the author employs to achieve many of the looks in here. She layers stitches, uses a beautiful mix of stitches for tiny text, and adds in some incredible texture. I can't wait to try these in my own stitching experiments!

Find The Embroidered Garden on Amazon, Roost Books (where you'll also find a free project from the book!), or through your local book seller.

printable // paper lantern garland with kawaii faces

Printable Tumbler Lanterns

I don't think I'll ever get tired of making garlands to hang around the house. They are simple, colorful, and just fun. This printable garland is based on the tumbler shape that I've been working with this month. It's used in quilting a lot, but there are so many possibilities with this shape!

Here they come together to form what looks like a little lampshade or lantern. They don't light up, but I am working on an adaptation for that. For now, they are a happy way to keep smiling faces around!

Printable Tumbler Lanterns

You will need:

Card stock (Astrobrights colors are awesome for this!)
Scissors
Glue stick
Tape
Perle cotton
Needle

Tumbler Lanterns PDF Template

Printable Tumbler Lanterns

Print the template onto card stock. Cut out around the lantern shape. The shape is comprised of four tumbler shapes and a flap.

Printable Tumbler Lanterns

Fold the lanterns on the solid lines dividing the sections. If you don't want faces on your lanterns (WHAT?!?), fold them so the faces are toward the center.

Printable Tumbler Lanterns

Use glue stick on the flap, and add a bit of tape for extra security. The tape is especially helpful as the glue is drying.

Printable Tumbler Lanterns

Cut a piece of perle cotton that is about 6 feet long and thread it on a needle. Choose which face you want to face forward, then poke the needle through from the side. Go through the other side too.

Continue adding little lanterns to your string.

Printable Tumbler Lanterns

These faces are friendly, but you don't want them getting TOO friendly. To keep the lanterns from sliding right up next to each other, add a tab of tape to the string inside each lantern.

Printable Tumbler Lanterns

Hang the garland of lantern shapes and enjoy!

Printable Tumbler Lanterns

cute tips // amy from nanaCompany


Welcome to Cute Tips! Last time we had two folks who illustrate adorable things (and craft them up too!), and this time it's gonna look a little different. But equally cute!

Amy Sinibaldi of nanaCompany makes beautiful things. She chooses wonderful fabrics, stitches sweetness, and it all comes together to make the cutest items for kids and grown-ups alike. I think part of what makes Amy's work so adorable is that she infuses it with her own heart, which is pure gold. But since it's hard to pass that along as a tip, Amy has another super stitchy way to make things cute!

AmyS1

Add a patch! Whether it's hand-embroidered or a fussy-cut patch of fabric, or cut from a roll of printed cotton tape, a patch sewn onto a handmade item adds definite cute factor. It can be a subtle addition of cute (like when added to the a lower corner of a child's skirt or dress) or it can take center stage ~ at the center of a pouch or handbag. The best part is that you can add a patch to a project at any time, it doesn't have to be planned ahead. :)

AmyS2
AmyS3
AmyS4
AmyS5
AmyS6

Thank you, Amy! You're the best!

To pick up more of Amy's super cute style, check out her book, Sweetly Stitched Handmades!

when things turn out to be a mess

Supplies

These supplies were meant to turn into a bookmark. Aren't they nice? Pretty fabrics, lovely trim, and perle cotton for stitches. It was a wonderful idea until it was all pieced, and then I realized that it was bulky and looking rather gross.

Sigh.

This happens sometimes, doesn't it? Things end up messier than we think they will. Pretty sure that doesn't just apply to crafts. The elements have potential, but we don't quite pull it together in the best way possible.

It's at this point that I really, really need to resist looking at others and comparing my work (or life!) to theirs. It's not helpful in any way. Okay, so maybe if what I've made just needs some polishing, seeing how someone else did it can be a benefit. But when I'm feeling like I've failed, it's so much better to move forward and try something new.

Because a mess doesn't mean that we're done.

Hold onto that. I'm not sure why, but I felt like I needed to remind us all of this.

(and here's hoping that the next thing goes better!)

introducing wild olive's holiday stitching club

Holiday Stitching Club

We've stitched the seasons and the fifty states. Now it's time for some holiday stitching!

If you haven't heard about the Wild Olive Stitching Clubs before, let me tell you about what has become one of my favorite ways to connect with stitching friends from around the world.

Each Stitching Club has three components: embroidery, English paper piecing, and a project. And all of those elements work together. You do some embroidery, you use that embroidery with some paper piecing, and it all comes together in a project. You also get to share your work with others, which is great for getting to know other stitchers and encouraging each other along the way.

Holiday Stitching Club

My newest club starts on September 1 and runs for 12 weeks. Registration is officially now open, and is discounted through the first day of the club.

The Holiday Stitching Club will include six embroidery patterns of sweet little animals enjoying winter activities. It will also include six templates for making large pieced hexagons (with space for embroidery), as well as three projects to use the pieced hexagons.

We will make a mug rug that also works as a candle mat or trivet, a table runner, and a quilted fabric wreath.

Holiday Stitching Club

Holiday Stitching Club might be a confusing name because nothing in the patterns will have a holiday theme to it. Rather, the idea here is that you can use these designs and projects for making holiday gifts and decor. Or you can just use them for your own winter enjoyment. (The club will end before we reach peak holiday season!)

You can choose to make the projects in wintery colors, Christmas colors, or really...anything you like! The hexagon templates use a variety of shapes and range from simple to moderately complex (the red, green, and yellow one shown below is the most complex).

Basic English paper piecing will be taught, and all necessary instructions for the projects will be included with lots of pictures. I recommend that club members have some basic embroidery experience. Throughout the club and beyond, I'm always happy to give individual help.

Holiday Stitching Club

When you register, you'll receive a welcome PDF with a basic supply list, EPP instructions, and a bonus hexagon template. Then, starting Tuesday, September 1st you will receive weekly emails with the patterns, templates and projects.

All of the elements are sent via email, and club interaction happens through social media, so anyone in the world can participate!

Holiday Stitching Club 2015: $12

Add to CartView Cart


If you are outside the US or Canada, please register in my Etsy shop. Thank you!

I'm so looking forward to share all of these designs with the Holiday Stitching Club, and even more excited to see what everyone is making! I hope you join us!

stitch-love-along // round two

#StitchLoveAlong

Okay, my stitching friends. I have been having an awesome 2 weeks, and the reason is that I've been seeing the creative Pocket Pals that folks are making. Take a look at what's been posted on Instagram!

And I have a confession. This is as far as I've gotten on my own Stitch-Love-Along project:


I'm giving myself special treatment though since I'm the author. I get perks like that. So I'm not forcing myself to finish in time for the end of round one. Which ends today. (I'm pretty lenient about these things in general though, so read on!) In the meantime, take a look at a few projects that fellow stitchers made during the last two weeks!


A photo posted by @ceciliainthestable on


A photo posted by @ceciliainthestable on


If you participated in round one, you get a free pattern! If you aren't quite finished, don't worry about it. So long as you got it started and have plans to finish, you're good. To claim your free pattern, send me an email (molliejohanson at gmail.com) and I'll send it over to you. The pattern is a surprise animal, created just for this round of the Stitch-Love-Along.

And now, let's move on to round two!

Stitch Love Along Round 2

This round is to make an animal! What does that mean? It means choosing a project that actually forms an animal, rather than embroidering or appliquéing one. Nearly half the projects in Stitch Love fall into this category, and it's very possible to adapt or expand them. Seeing how people take an idea and run with it makes my heart go pitter pat!

To participate in this round, choose one of these projects from Stitch Love:

Awesome Outback Plush Trio
Darling Dachshund Wrist Rest
Flighty Frog Pond Game
Fluttery Butterfly Pencil Topper
Frozen Yeti Ice Pack
Gleeful Guinea Pig Plush
Glowing Fireflies Jar
Precious Possum Hanging Sachet
Restless Robin Drawstring Pouch
Sniffly Sea Turtle Tissue Cozy
Whimsical Whale Wristlet
Wild Animal Finger Puppets

Again, customize these to your heart's content! Not too long ago I saw someone who made the animals from the Wild Animal Finger Puppets, but in the style of the Awesome Outback Plush Trio. Such a fun way to make these! And I can't wait to see what you make.

Round 1 // August 4-18
Stitch a Pocket Pal (any Stitch Love embroidery motif with the Pocket Pal project on page 53)

Round 2 // August 18-September 1
Make an Animal (choose a project that creates an animal...examples to come!)

Round 3 // September 1-15
Stitch a Critter (embroider any Stitch Love motif on a handmade item...ideas to come!)

Share your progress on Instagram, Facebook, Twitter, Flickr, or your own blog. This is all about stitching along together and sharing with each other, so be sure to tag your posts #StitchLoveAlong. We all want to see your materials, your process, and of course...the finished project!

At the end of each round everyone who participates will receive a free Stitch Love pattern designed just for that round of the Stitch-Love-Along!

Many thanks to Faith and Becca for helping me with the Stitch-Love-Along! They are such supportive gals!

thread bits // choosing thread for epp

Thread Bits // EPP Thread

If you've been here before, you have probably noticed that English paper piecing is something I do on a regular basis. I love it.

And while I try not to be too particular about my supplies, I do like trying options to see what I like best. Usually I baste and join the pieces with hand quilting thread. It works well for me, plus it's easy to find at JoAnn (which makes it not too expensive too).

Thread Bits // EPP Thread

My typical thread of choice is the Dual Duty on the left. But then someone suggested that I try the So Fine thread on the right. My local quilt shop carries it, so I figured I may as well give it a try.

It's 100% polyester, as compared to the 68% poly/32% cotton of the Dual Duty.

Thread Bits // EPP Thread

The biggest difference to be see between the threads is the thickness. Taking pictures of strands of thread isn't easy, but I think you can see the difference here. Which, to me, is significant that it shows up in a photo like this.

The So Fine really is so fine. And the theory is that it will show less when you stitch with it. I think it does.

Thread Bits // EPP Thread

I say "I think" because I often wonder if it has a placebo effect. I'm expecting it to show less, so maybe I'm seeing it less? Or maybe it really is the Superior Thread. I'm going to work with it longer before I show off samples (although they may be even harder to photograph!).

For now I ask, what kind of thread do you like to use for EPP?

pattern // stitching thimbles on tumblers

Tumblers

I've finally started making some EPP tumblers. There are a few projects I'd like to make with this shape, but right now I'm super slow. So we'll see.

But as I was looking at these tumblers, some of them were turned around, and I noticed that when they are upside down...

Tumbler Thimbles

...they also look a lot like thimbles! I'm certainly not the first to spot this, but it made me think that it would be fun to make something sewing themed with thimbles stitched into the tumbler pattern. Of course, that let to this:

Tumbler Thimble Pattern


A thimble embroidery pattern that will fit perfectly on a tumbler!

Obviously you don't have to use the design in this way, but wouldn't it be cute? Maybe for a little patchwork needle book or project pouch? I'm officially calling on you to make it happen.


In the download, you'll have the embroidery motif, as well as the EPP template pieces that the pattern fits on. And if all goes as planned we'll make some more things with these little shapes.

I do love this simple shape and how it fits together!